Pregunta: ¿Qué se debe revisar al auditar un sitio web de eventos de WordPress?
Una lista de verificación para sitios web de eventos debe comprobar si los usuarios pueden encontrar el evento, comprender la oferta, registrarse sin problemas, recibir la confirmación correcta y usar el sitio desde un teléfono o con un teclado. Una lista de verificación para sitios web de eventos en WordPress también requiere comprobaciones técnicas de indexabilidad, datos estructurados del evento, listados caducados, velocidad, actualizaciones, copias de seguridad, seguridad y análisis. La mayoría de las auditorías deficientes de sitios web de eventos comienzan mal. Realizan una prueba de velocidad, analizan algunos títulos y dejan una lista de advertencias sin orden. Una lista de verificación útil para sitios web de eventos vincula cada advertencia con una tarea que el visitante o el propietario del sitio debe completar.
Deberás probar tres lugares: el calendario o archivo de eventos, una página de evento en vivo y el proceso completo de registro. Marca cada resultado en verde, ámbar o rojo. Soluciona primero los fallos en rojo que impiden el descubrimiento o el registro, y luego programa los problemas en ámbar según su impacto y la dificultad que requieran. Una lista de verificación aprobada no garantiza clasificaciones ni ventas de entradas. Demuestra que se ha probado el recorrido principal del evento y que cada fallo tiene un responsable.
Ponte en el lugar de los asistentes. Sigue el recorrido desde los resultados de búsqueda hasta la página del evento, la selección de entradas, el pago y la confirmación. Luego, analiza los sistemas de WordPress que hay detrás de ese recorrido. Si aún estás planificando el sitio web, empieza con nuestra guía para crear un sitio web de eventos con WordPress y vuelve aquí antes del lanzamiento.
¿Cómo se debe puntuar una lista de verificación para el sitio web de un evento?
Utilice un código de estado tricolor y exija evidencia para cada prueba. Un resultado verde indica que la prueba se completó y se obtuvo el resultado esperado. Ámbar significa que la ruta funciona, pero genera riesgos o dificultades evitables. Rojo significa que un visitante, un rastreador de búsqueda o un administrador del sitio no puede completar una tarea importante.
| Puntuación | Significado | Acción requerida |
|---|---|---|
| Verde | La prueba se supera en las páginas y dispositivos verificados. | Anota la fecha y repítelo según lo programado. |
| Amber | La tarea funciona, pero el resultado no es claro, es lento, inconsistente o frágil. | Asigne un propietario y repárelo en el próximo ciclo de mantenimiento. |
| Rojo | El problema bloquea el descubrimiento, el acceso, el registro, el pago o la confirmación. | Arréglalo antes de la promoción o la próxima promoción de entradas. |
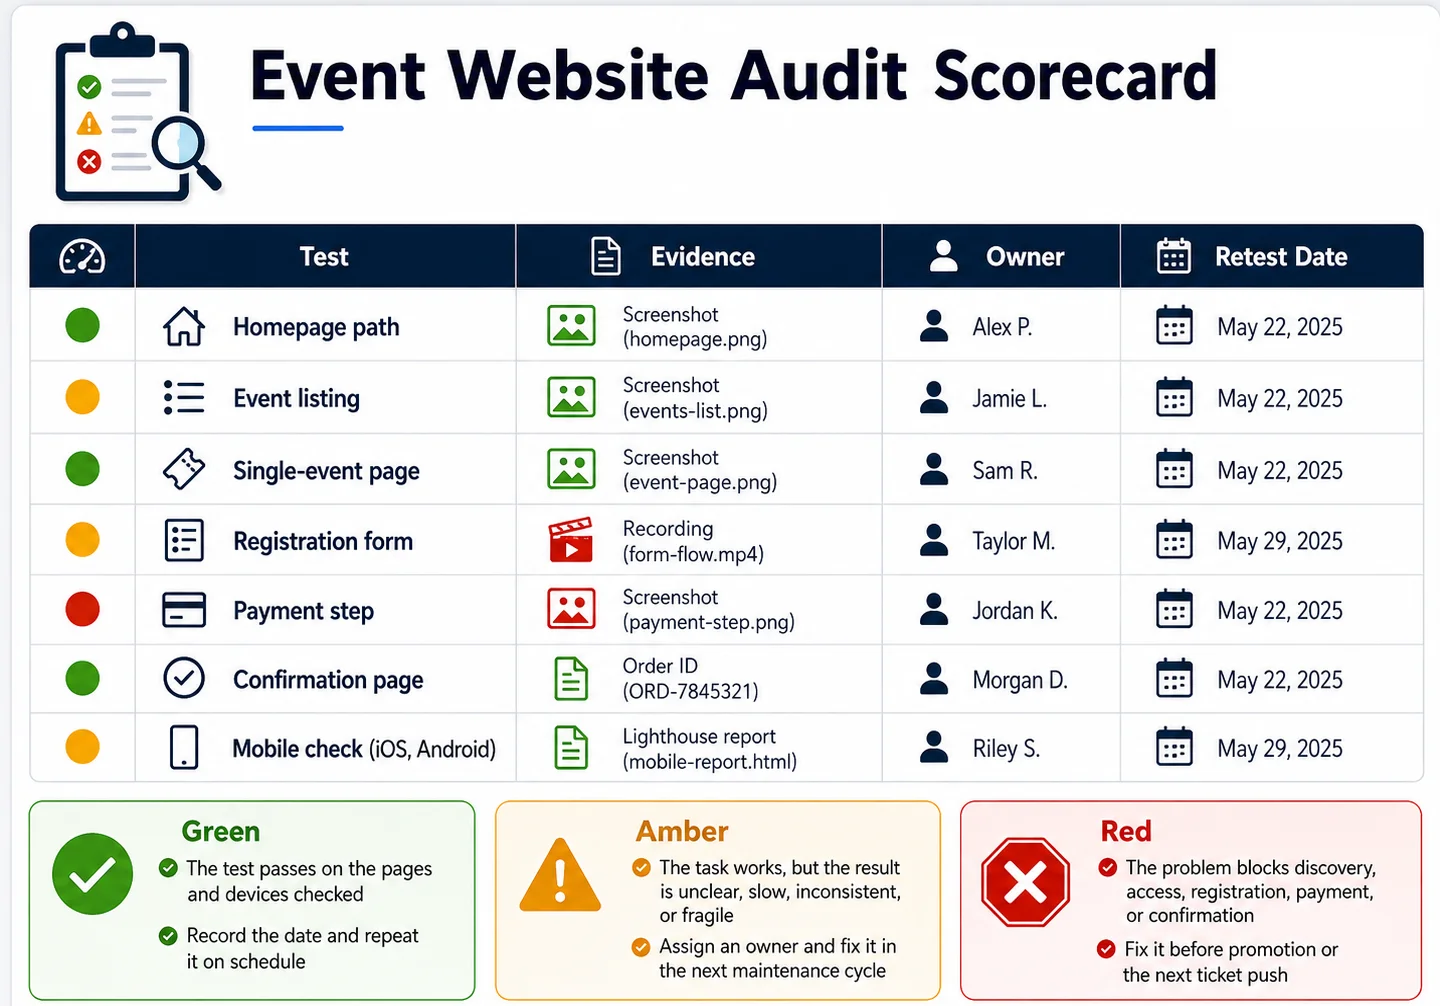
Antes de comenzar, crea una nueva reserva de prueba y usa una dirección de correo electrónico que no esté vinculada a una cuenta de administrador. Realiza la transacción una vez en una ventana de navegación privada y otra vez en un teléfono real. Guarda las capturas de pantalla, las marcas de tiempo, las URL y los ID de transacción en el registro de auditoría.
Esa evidencia importa. «El formulario se ve bien» es una opinión. «Un huésped completó el ticket 1047 en un teléfono Android y recibió el correo electrónico de confirmación correcto a las 14:32» es el resultado de una prueba.
Utilice la lista de verificación del sitio del evento como hoja de prueba y la auditoría del sitio web como archivo de evidencia. La lista de verificación indica qué se debe probar. La auditoría registra lo sucedido, quién es responsable de la solución y cuándo se volverá a probar.
¿Pueden los visitantes encontrar y comprender el evento?
La página de un evento debe responder a las preguntas prácticas del visitante antes de solicitar su registro. El nombre del evento, el público objetivo, la fecha, la zona horaria, la ubicación, el precio, la disponibilidad y los pasos a seguir deben ser coherentes en todos los puntos donde aparecen. Esta sección de la lista de verificación del sitio web del evento permite detectar contradicciones antes de que lleguen al formulario de reserva.
Siga esta parte de la lista de verificación del sitio web del evento en el archivo del calendario y en al menos una página de un solo evento.
1. Indica en qué consiste el evento y a quién va dirigido.
Lea la primera pantalla sin desplazarse. El visitante debe poder identificar el tipo de evento, el tema, el público objetivo y el principal beneficio. Reemplace eslóganes como «Una experiencia inolvidable» con información concreta sobre qué sucede y quién debería asistir.
Requisito para aprobar: El título de la página y el texto inicial explican el evento sin hacer referencia a la imagen, el logotipo o el conocimiento previo de la campaña.
Registra la URL probada y el texto de apertura en la auditoría del sitio web del evento para que el resultado pueda compararse después de editar la campaña.
2. Muestre el formato claramente.
Indica si el evento es presencial, en línea o híbrido cerca del título y del formulario de registro. Si se trata de un evento híbrido, explica qué incluye cada entrada. Evita que los visitantes tengan que consultar las preguntas frecuentes para saber si necesitan viajar.
Condición de aprobación: El formato aparece en la página del evento, la tarjeta del calendario y la pantalla de selección de entradas.
La lista de verificación del sitio del evento debe indicar todos los lugares donde aparece el formato, ya que una etiqueta híbrida puede ser correcta en la página e incorrecta en el proceso de pago.
3. Compruebe la fecha, la hora y la zona horaria.
Compara la tarjeta del calendario, la página del evento, el widget de reservas, el correo electrónico de confirmación, el archivo de calendario descargable y los datos estructurados del evento. Un error de zona horaria puede persistir en cinco pantallas, aunque parezca correcto para quien creó el evento.
Requisito para superar la prueba: Las horas de inicio y finalización coinciden en todas partes, y un evento en línea o multirregional indica la zona horaria o la convierte claramente.
Guarda cualquier discrepancia en la auditoría del sitio web del evento con el dispositivo del visitante y la zona horaria mostrada.
4. Verifique la ubicación y las instrucciones de acceso.
Para un evento presencial, prueba el enlace del mapa y confirma el nombre del lugar, la dirección completa, los detalles de la entrada, las indicaciones sobre estacionamiento o transporte público y la información de accesibilidad. Para un evento en línea, verifica cuándo y cómo se entrega el enlace de acceso. Nunca publiques un enlace de reunión privada en la página de un evento público, a menos que sea intencional.
Requisito para aprobar el examen: El solicitante debe saber adónde ir y cuándo recibirá los detalles de acceso.
Agregue el comportamiento del mapa o enlace de acceso probado al registro de la lista de verificación del sitio del evento.
5. Revisa el programa, los ponentes y los cambios de sesión.
Verifique que el programa utilice una sola zona horaria y que los nombres de los oradores, los títulos de las sesiones, las salas y los horarios de inicio coincidan con el resto del material de campaña. Si el programa es provisional, indíquelo y proporcione la fecha de la próxima actualización.
Requisito para aprobar: La agenda debe ser legible en dispositivos móviles y cualquier cambio reciente en el horario debe reflejarse en todas las páginas afectadas.
Identifique el cronograma original que los editores deben considerar como fidedigno en la auditoría del sitio web del evento.
6. Deje claros el precio y la disponibilidad.
Muestra la moneda, los impuestos o cargos que aparecen antes del pago, la fecha límite de venta, los límites de entradas y lo que incluye cada entrada. Prueba las transiciones de compra anticipada y los precios basados en fechas en lugar de asumir que la automatización cambiará correctamente.
Condición para obtener el pase: El importe y el estado de la entrada que se muestran en la página del evento coinciden con la pantalla de reserva o de pago.
Registre los importes mostrados y cobrados en la auditoría del sitio web del evento, incluyendo la moneda y cualquier cargo que se muestre posteriormente durante el proceso de pago.
7. Publicar las políticas y una ruta de contacto real.
Los visitantes podrán encontrar información sobre cancelaciones, reembolsos, transferencias, privacidad, accesibilidad y código de conducta, según corresponda. Envíe una pregunta de prueba a través del método de contacto indicado.
Condición de aprobación: Los enlaces de la política se abren, coinciden con el evento actual y conducen a un canal de contacto supervisado.
Finaliza esta parte de la lista de verificación del sitio del evento nombrando a la persona o al equipo que supervisa la ruta de contacto.
¿El proceso de registro funciona de principio a fin?
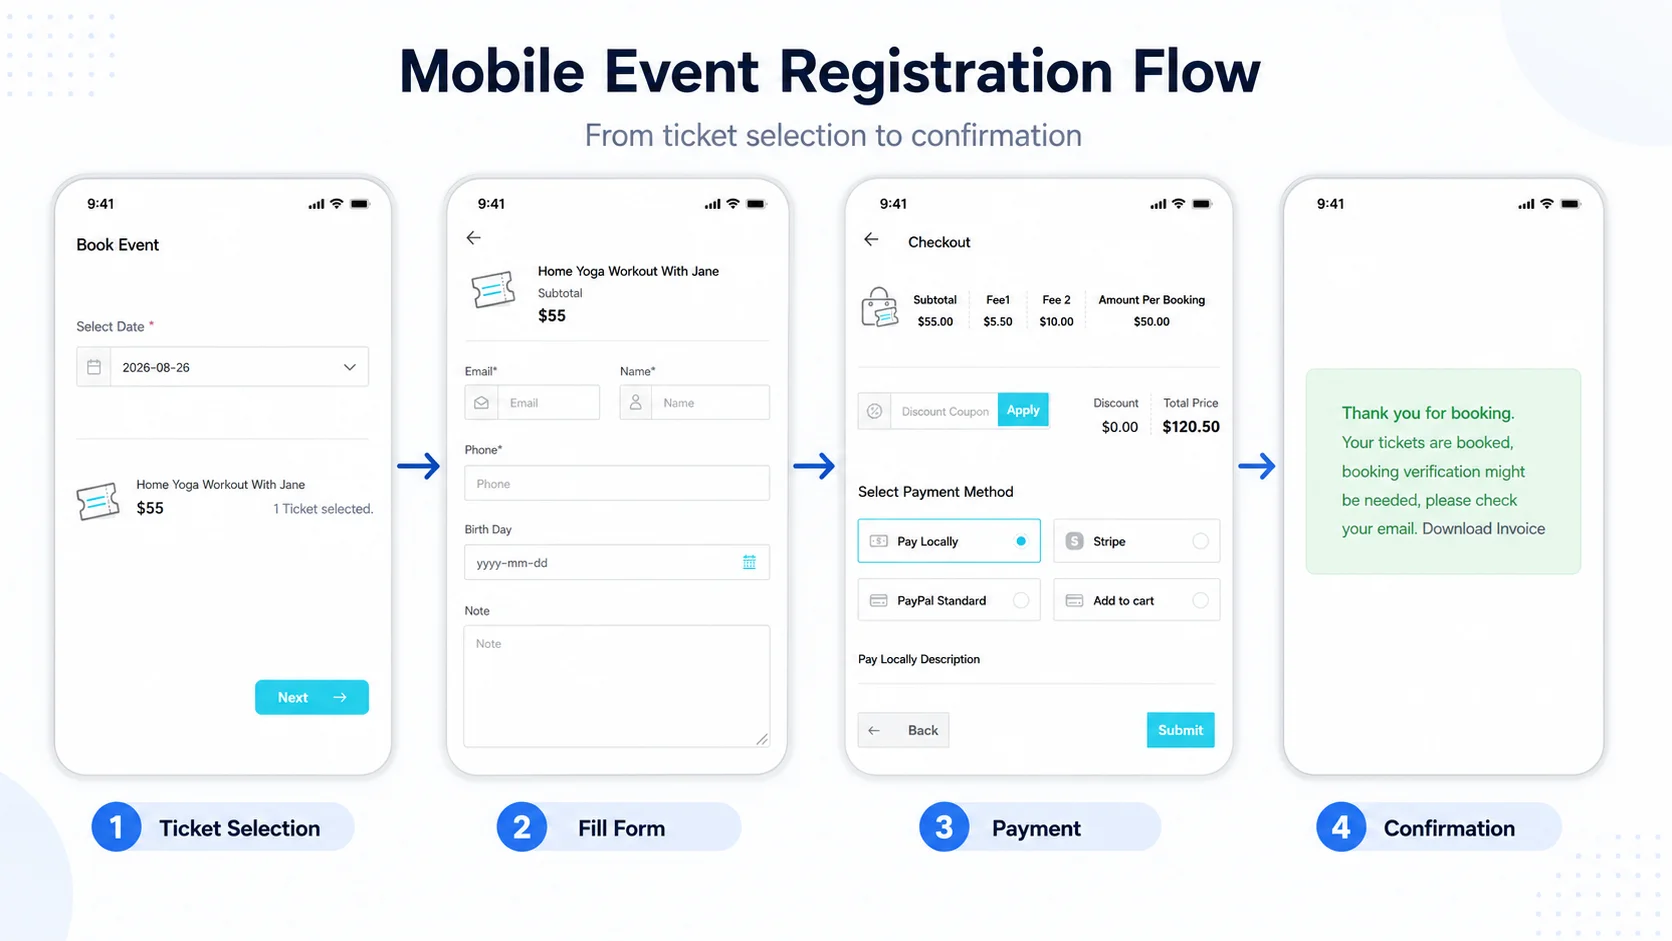
Para realizar una auditoría de registro, es necesario que la reserva esté completa. Los clics en botones y las vistas previas de formularios no demuestran que el pago, las normas de aforo, los correos electrónicos de notificación y los análisis funcionen correctamente de forma conjunta. La lista de verificación del sitio web del evento considera la reserva como un proceso integrado.
Realice estas siete comprobaciones con un ticket de prueba real o con el modo de prueba documentado de la pasarela de pago. Si el sitio utiliza WordPress Events Calendar , verifique las funciones y los complementos habilitados en esa instalación. MEC admite formularios de reserva personalizables, tipos de tickets, correos electrónicos de confirmación, esquemas de eventos e informes de reserva, pero la disponibilidad puede depender de la edición y la configuración.
8. Mantenga una acción de registro clara
Utilice un nombre coherente para acciones como «Registrarse», «Reservar» o «Comprar entradas». Revise la tarjeta del evento, la página individual, el encabezado fijo y el diseño para móviles. Los botones que compiten entre sí para folletos, ponentes, boletines informativos y entradas pueden ocultar la acción principal.
Condición de aprobación: El botón de registro principal es visible sin ocultar el contenido y conduce al evento o suceso correcto.
Para la auditoría del sitio web del evento, registre la página de origen, la etiqueta del botón, el destino y la ocurrencia seleccionada.
9. Selección de ticket y ocurrencia de prueba
Para eventos recurrentes, seleccione una fecha distinta a la siguiente. Modifique la cantidad de entradas, aplique el límite de asistentes y vuelva al paso anterior. Preste atención a las selecciones perdidas o a las reservas asociadas a eventos incorrectos. Pruebe también a eliminar un evento específico en caso de cancelación o reprogramación.
Condición del pase: La fecha, el boleto, la cantidad y el precio seleccionados se mantienen después de finalizar la compra.
Guarde los detalles de la selección y del pedido final junto con la lista de verificación del lugar del evento.
10. Provocar todos los errores importantes del formulario.
Envíe el formulario con un campo obligatorio faltante, una dirección de correo electrónico no válida y un ticket duplicado o no disponible, siempre que el sistema admita estas situaciones. Deberían aparecer mensajes de error junto al campo correspondiente, explicar la solución y conservar la información completada.
Condición para aprobar: El visitante puede identificar y corregir el error sin tener que volver a empezar.
Agregue capturas de pantalla de cada error probado a la auditoría del sitio web del evento y registre si los campos completados se conservaron.
11. Completa una prueba de pago.
Pruebe los métodos de pago activos, incluyendo un pago exitoso y un caso de fallo documentado. Confirme la moneda, los impuestos, las comisiones, el estado del pedido y el total. Compruebe qué sucede si el visitante actualiza la página, no completa la compra o usa el botón Atrás del navegador después del pago.
Condición para aprobar: Un pago crea una reserva con el importe, el estado y la referencia de transacción correctos.
La auditoría del sitio web del evento debe almacenar las referencias de reserva y transacción sin exponer datos de tarjetas ni datos personales.
12. Capacidad de prueba y estados con entradas agotadas
Organiza un evento de prueba con capacidad reducida o utiliza un entorno de prueba. Reserva la última plaza y luego intenta otra inscripción. El sitio web debería evitar la sobreventa, eliminar o deshabilitar las opciones no disponibles e indicar si existe una lista de espera o una fecha alternativa.
Condición para aprobar: La capacidad restante, el formulario de reserva y la etiqueta del evento muestran el mismo estado.
Incluya los valores de capacidad antes y después del evento en el registro de la lista de verificación del sitio.
13. Inspeccione la página de confirmación y el correo electrónico.
La confirmación debe incluir el nombre del evento, la fecha seleccionada, la zona horaria, el lugar o las instrucciones de acceso, los detalles de la entrada, el estado del pago, la información de contacto y la información de cancelación. Pruebe los enlaces y vea el correo electrónico en un teléfono.
Condición para aprobar: El usuario registrado puede actuar en función de la confirmación sin necesidad de volver a la página de ventas para obtener información faltante.
Guarda la captura de pantalla de confirmación y la fecha y hora del correo electrónico en la auditoría del sitio web del evento.
14. Verifique las acciones de cancelación, transferencia y calendario.
Abra el enlace de descarga del calendario o "Agregar al calendario" y compare la fecha, la duración, la ubicación y la descripción con la reserva. Si los inscritos pueden cancelar, transferir o editar una reserva, realice una prueba y verifique el correo electrónico resultante y el cambio de capacidad.
Condición para aprobar: La entrada en el calendario y las acciones posteriores a la reserva actualizan el registro correcto.
En este punto, la sección de registro de la lista de verificación del sitio web del evento debe contener una prueba rastreable desde el primer clic hasta la acción final de calendario o cancelación.
¿Se puede usar la página web del evento en dispositivos móviles y con teclado?
Las comprobaciones de accesibilidad y para dispositivos móviles deben abarcar el calendario, la página del evento y el formulario de inscripción. Una página de inicio adaptable no garantiza que los selectores de fecha, los filtros, los controles de entradas o los mensajes de error funcionen correctamente en pantallas más pequeñas. Esta sección de la lista de verificación del sitio web del evento utiliza tareas reales en lugar de una captura de pantalla de la página de inicio.
Las directrices WCAG 2.2 incluyen criterios para el acceso mediante teclado, el enfoque visible, el contraste entre texto e interfaz, las etiquetas, la identificación de errores, el tamaño del objetivo y el ajuste de texto. Utilice análisis automatizados para encontrar candidatos y, a continuación, pruebe las tareas manualmente.
15. Prueba la página del calendario y del evento con anchos reducidos.
Abre listas, vistas mensuales y de eventos individuales en tu teléfono. Gira el dispositivo, amplía el texto y consulta nombres largos de eventos, horarios de varios días, direcciones de lugares, tablas, mapas y elementos fijos.
Condición de aprobación: El contenido se reorganiza sin ocultar información ni forzar el desplazamiento horizontal para una lectura normal.
En la auditoría del sitio web del evento, anote el dispositivo, la ventana gráfica, la orientación y zoom o la configuración de tamaño de texto utilizada.
16. Compruebe los filtros, los controles de fecha y la paginación.
Aplica un filtro de categoría o ubicación, avanza a otro mes, abre un evento y regresa a los resultados. Verifica que el filtro y la posición de desplazamiento se mantengan. Asegúrate de que un resultado vacío explique lo sucedido y ofrezca una opción para restablecer la configuración.
Condición para aprobar: Los visitantes pueden filtrar, borrar y volver a consultar los resultados sin perder su posición inesperadamente.
Agregue la secuencia de filtros y la URL del resultado a la lista de verificación del sitio del evento para que los desarrolladores puedan reproducir el fallo.
17. Completa el viaje con un teclado.
Desde la barra de direcciones, utilice Tab, Mayús+Tab, Intro, Espacio, las teclas de flecha y Escape según corresponda. El indicador de enfoque debe permanecer visible, seguir un orden lógico y nunca quedar atrapado dentro de un calendario, ventana modal, mapa o campo de pago.
Condición de aprobación: Se puede acceder a todos los controles necesarios para el registro, comprenderlos, operarlos y salir de ellos mediante un teclado.
Registre el primer control bloqueado y la secuencia de teclas en la auditoría del sitio web del evento.
18. Asocie las etiquetas y los errores con sus respectivos campos.
Inspeccione las etiquetas del formulario, las instrucciones de los campos obligatorios, el comportamiento de la función de autocompletar y los mensajes de validación. El texto de marcador de posición no es una etiqueta permanente. No se fíe únicamente del color para identificar un error o un ticket seleccionado.
Condición de aprobación: Un lector de pantalla o un usuario visual puede determinar el propósito, el estado y la corrección de errores de cada campo.
Para cada fallo, la lista de verificación del sitio del evento necesita la etiqueta del campo y el texto exacto del error.
19. Compruebe el contraste, el enfoque y los objetivos táctiles.
Los botones de revisión sobre las imágenes de los eventos, los estados de los boletos deshabilitados, los enlaces dentro de las tarjetas, las flechas del calendario, los contornos de enfoque y los iconos de cierre son puntos problemáticos comunes en las cuadrículas de calendario.
Condición de aprobación: El texto y los controles siguen siendo perceptibles, el foco es evidente y las acciones táctiles no requieren pulsaciones de precisión.
Cierre la sección de accesibilidad de la auditoría del sitio web del evento con capturas de pantalla o grabaciones cortas que muestren el estado de fallo.
¿Puede Google rastrear y comprender las páginas de eventos?
Las comprobaciones de búsqueda deben centrarse en las URL que merecen aparecer en los resultados de búsqueda, la información del evento visible en dichas URL y los datos estructurados que la describen. Esta parte de la lista de verificación del sitio web del evento pregunta si Google puede acceder a una página coherente. Un resultado en verde no garantiza un resultado enriquecido ni una buena posición en los resultados de búsqueda.
20. Confirmar la indexabilidad y las URL canónicas.
Inspecciona la URL de un evento actual en Google Search Console. Verifica la respuesta HTTP, las reglas de robots, el valor meta de robots, la página renderizada y la etiqueta canónica. Repite la prueba con un evento caducado y cualquier URL de calendario o filtro que reciba impresiones de búsqueda.
Condición de aprobación: Cada página de evento que se desea indexar es accesible, indexable y canónica con respecto a la URL prevista. Las URL filtradas y duplicadas siguen una política de indexación explícita.
Almacene la fecha de inspección, la declaración canónica, la selección canónica y el estado de indexación en la auditoría del sitio web del evento.
21. Compruebe el mapa del sitio y los enlaces internos contextuales.
Asegúrese de que las páginas de eventos actuales aparezcan en el mapa del sitio XML y sean accesibles mediante enlaces rastreables desde el calendario, la página de categoría, el contenido relacionado o la página del lugar. Un cuadro de búsqueda por sí solo no es una ruta de rastreo fiable.
Condición de aprobación: Un evento actual está presente en el mapa del sitio correcto y está vinculado desde al menos una página indexable relevante.
Una útil lista de verificación para sitios de eventos registra tanto la URL del mapa del sitio como una ruta de rastreo contextual.
22. Controlar el archivo, el filtrado, la recurrencia y las URL duplicadas.
Enumera las URL generadas por temas de calendario, fechas, categorías, ubicaciones, paginación, filtros de búsqueda y ocurrencias recurrentes. Decide qué patrones tienen un valor de búsqueda único. Consolida o impide la indexación de duplicados sin bloquear las páginas que los visitantes necesitan.
Condición de aprobación: Existe un único propietario claro para cada fragmento de información del evento, y las URL de los parámetros o de las recurrencias no compiten accidentalmente.
Adjunte la decisión sobre el patrón de URL a la auditoría del sitio web del evento para que un cambio posterior en el calendario no vuelva a crear duplicados.
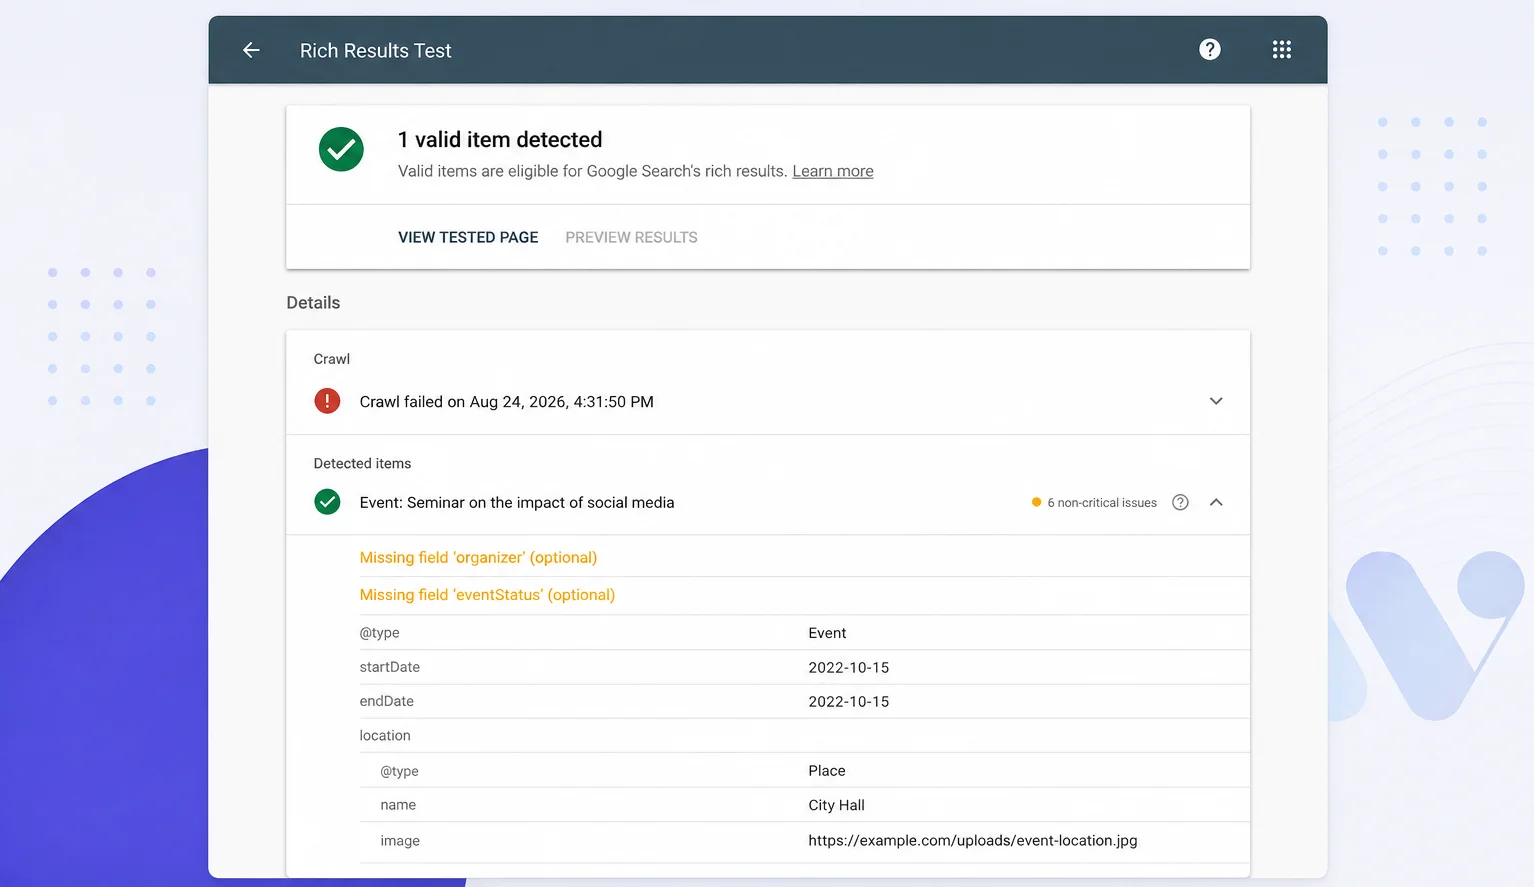
23. Validar los datos estructurados del evento contra la página.
La documentación de Google sobre datos estructurados para eventos indica a los propietarios de sitios web que añadan las propiedades necesarias, sigan las directrices, validen los resultados con la prueba de resultados enriquecidos e inspeccionen las URL implementadas. Compare el marcado con el título visible, las fechas, la zona horaria, la ubicación, la imagen, las ofertas, la disponibilidad y el estado del evento.
Condición de aprobación: La prueba de resultados enriquecidos no reporta errores críticos y todos los datos resaltados son visibles y precisos en la página del evento.
Guarda el resultado de la prueba y los valores de página comparados en la auditoría del sitio web del evento.
24. Gestionar eventos vencidos, cancelados, pospuestos y reprogramados.
Comprueba qué información reciben los visitantes y los motores de búsqueda tras un cambio en un evento. Mantén una página de eventos pasados útil cuando tenga valor permanente, actualiza su estado con precisión y proporciona un siguiente paso claro. Evita redirigir todos los eventos caducados a la página de inicio.
Condición de aprobación: El estado visible, la disponibilidad de reservas, el marcado del evento, los enlaces internos y el comportamiento HTTP coinciden.
Finaliza la sección de búsqueda de la lista de verificación del sitio del evento con un evento actual y un evento que haya cambiado o haya caducado.
Para reparaciones detalladas después de estas comprobaciones, utilice el Webnus guiar a Calendario de eventos SEOEste artículo debería diagnosticar el problema y dejar el deepLa implementación se realiza con esa guía.
¿Está la instalación de WordPress preparada para el tráfico de eventos?
Las comprobaciones de estado de WordPress protegen la experiencia del evento de fallos derivados de actualizaciones, contenido multimedia pesado, scripts de terceros, controles de acceso débiles y planes de recuperación inexistentes. La lista de verificación del sitio web del evento considera estos sistemas como dependencias del registro. Pruebe los cambios en el entorno de pruebas cuando un problema con las reservas o el calendario pueda afectar a una campaña en producción.
25. Revisar las actualizaciones, las copias de seguridad, la preparación y la recuperación.
Registra las versiones actuales del núcleo de WordPress, el tema, el plugin de eventos, el complemento de reservas, la integración de pagos y PHP. Confirma que las copias de seguridad incluyan la base de datos y los archivos subidos, y luego verifica cuándo se realizó la última prueba de restauración. Si una copia de seguridad nunca se ha restaurado, se asume que existe.
Condición de aprobación: Las actualizaciones requeridas tienen responsables, existe una copia de seguridad reciente que se puede restaurar y los cambios de alto riesgo se prueban fuera del entorno de producción.
En caso de auditoría del sitio web, indique la fecha de la copia de seguridad, la ubicación de almacenamiento, la fecha de la prueba de restauración y el propietario de la versión sin revelar las credenciales.
26. Mide las tres páginas que contienen el recorrido del evento.
Pruebe el calendario o el archivo, un evento individual y la página de reserva o pago en dispositivos móviles. Utilice los datos de campo disponibles y los datos de laboratorio para diagnosticar páginas individuales. Las métricas actuales de Core Web Vitals incluyen Largest Contentful Paint, Interaction to Next Paint y Cumulative Layout Shift, según la documentación de Web Vitals.
Verifique las imágenes de eventos de gran tamaño, los scripts del calendario, los mapas incrustados, los widgets de chat, los scripts de pago, la carga de fuentes y el movimiento del diseño alrededor de los controles de entradas. Registre la URL, el dispositivo, la fecha de la prueba y el hallazgo principal en lugar de copiar una puntuación general en el informe.
Condición de aprobación: Las páginas probadas siguen siendo utilizables mientras se cargan, responden a las entradas y actualizan su diseño. Las métricas que no cumplen con los requisitos tienen una causa específica que se debe investigar.
Agregue las tres URL probadas y su contexto de campo o laboratorio al registro de la lista de verificación del sitio del evento.
La guía independiente para mejorar el rendimiento de los sitios web de eventos de WordPress debería incluir todo el proceso de reparación.
27. Reducir el riesgo de seguridad y mantenimiento.
La guía oficial de seguridad de WordPress recomienda software actualizado, fuentes confiables, acceso limitado, copias de seguridad y monitoreo regular. Elimine los plugins y temas que no utilice, revise las cuentas de administrador, use autenticación reforzada y confirme el uso de HTTPS en el registro y la administración.
Requisito para superar la prueba: Solo deben permanecer activos el software necesario y compatible, así como las cuentas autorizadas, y el equipo debe saber cómo detectar y solucionar un problema.
Mantenga los hallazgos de seguridad confidenciales fuera de la auditoría del sitio web del evento público. Registre únicamente el propietario, la gravedad y la ubicación restringida de la evidencia en la lista de verificación compartida.
¿Se puede medir qué sucede después de que alguien hace clic en Registrarse?
Las comprobaciones analíticas deben seguir el mismo proceso que la prueba de registro. Una simple visualización de página no permite saber si alguien seleccionó una entrada, realizó el pago, completó una reserva o recibió una confirmación. Esta última parte de la lista de verificación del sitio web del evento compara los eventos registrados con los registros reales de reservas y pagos.
28. Definir y probar los eventos de registro.
Mapea las acciones importantes: visualización de la página del evento, clic en el botón de registro, selección de boleto, inicio del formulario, inicio del proceso de pago, registro o compra exitosa y visualización de la confirmación. Utiliza nombres y parámetros que distingan los ID de los eventos, las ocurrencias, los tipos de boletos, las monedas y los valores cuando corresponda.
Condición de aprobación: Una prueba de funcionamiento reproduce los eventos esperados en el orden correcto, con identificadores de eventos y de billetes utilizables.
Asigne cada nombre de evento a la pantalla o acción que lo activa en la auditoría del sitio web del evento.
29. Compruebe si hay conversiones faltantes o duplicadas.
Realice una reserva exitosa y compare el registro de reserva, el registro de pago, la confirmación, la etiqueta de salida y el evento de análisis. Una actualización, una visita posterior o un reintento de webhook no deberían generar otra compra ni una conversión de registro.
Google Analytics documenta que los eventos de comercio electrónico requieren implementación y recomienda usar Realtime o DebugView para verificar los eventos a medida que ocurren. Para la parte analítica de la prueba, utilice la guía oficial de eventos de GA4 .
Condición para aprobar: Un registro completado genera una conversión con el evento, boleto, valor, moneda y referencia de transacción correctos.
Agregue la marca de tiempo de análisis y la referencia de transacción a la lista de verificación del sitio del evento y, a continuación, confirme que al actualizar la página no se vuelva a enviar.
30. Asigne un propietario y una fecha para la nueva prueba.
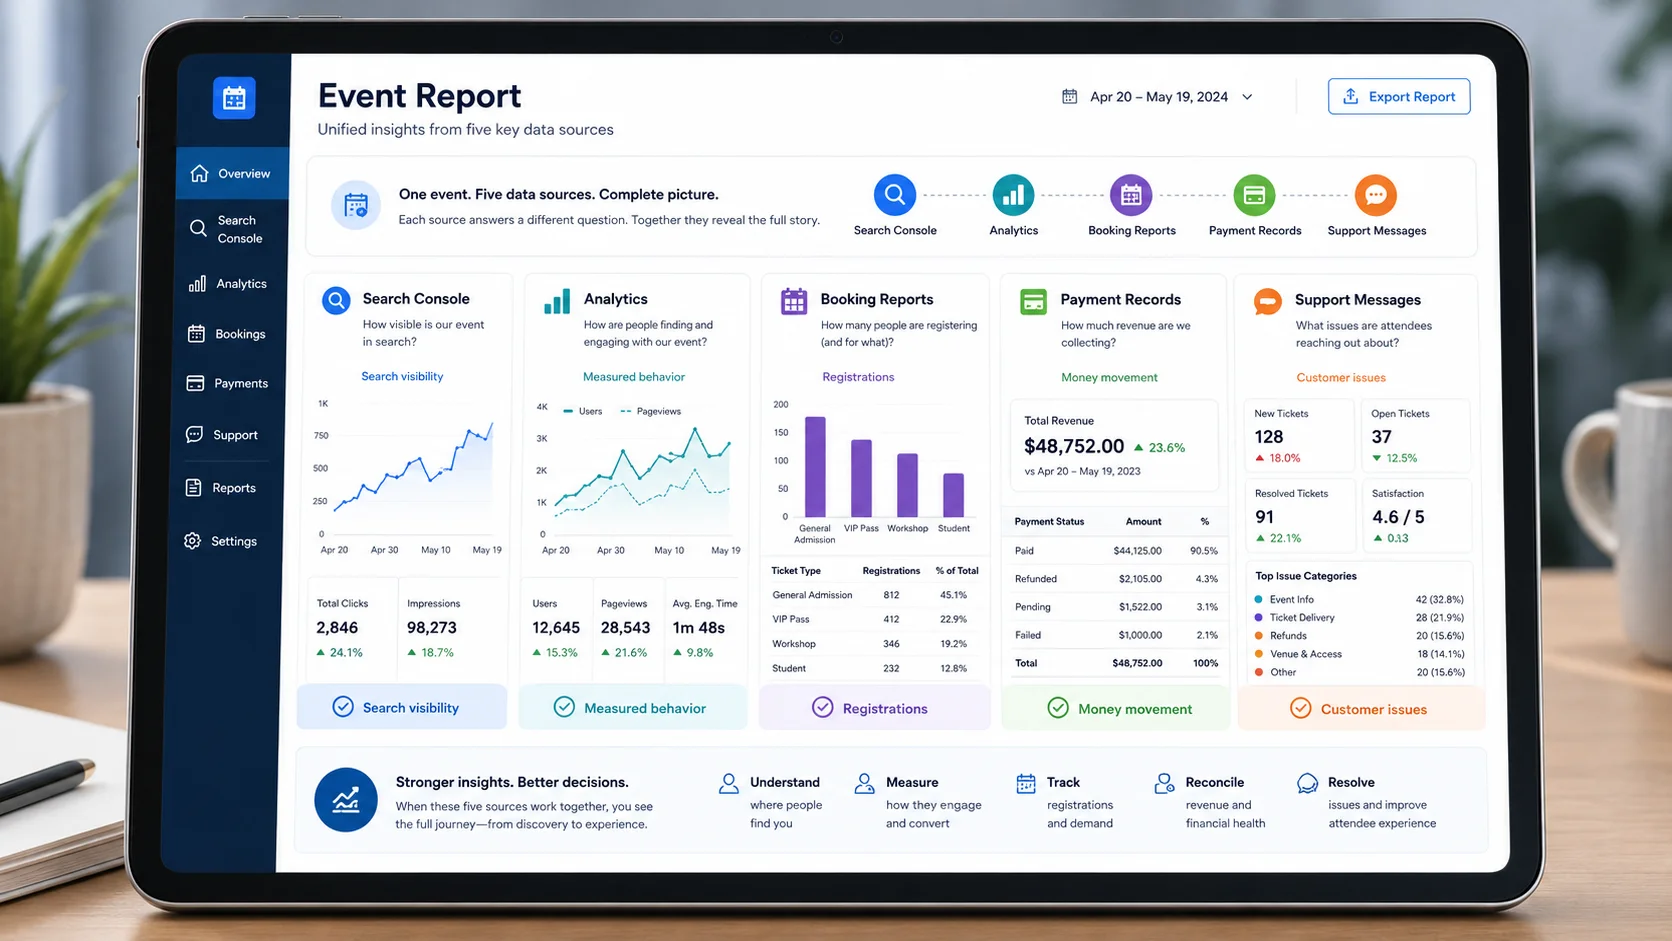
Combina Search Console, análisis, informes de reservas, registros de pagos y mensajes de soporte. Cada fuente responde a una pregunta diferente. Search Console muestra la visibilidad de las búsquedas; análisis muestra el comportamiento medido; el sistema de reservas muestra las inscripciones; los registros de pagos confirman el movimiento de dinero.
Utilice los KPI de ROI de eventos solo después de que se haya completado el proceso de cobro. Un panel de control demasiado elaborado, basado en compras duplicadas o confirmaciones faltantes, puede inducir a error al equipo.
Condición para aprobar: Cada resultado rojo o ámbar tiene un propietario, evidencia, una fecha límite y una nueva prueba programada.
La auditoría del sitio web del evento, una vez finalizada, debería vincular cada resultado medido con la evidencia de la reserva y el equipo responsable de la reparación.
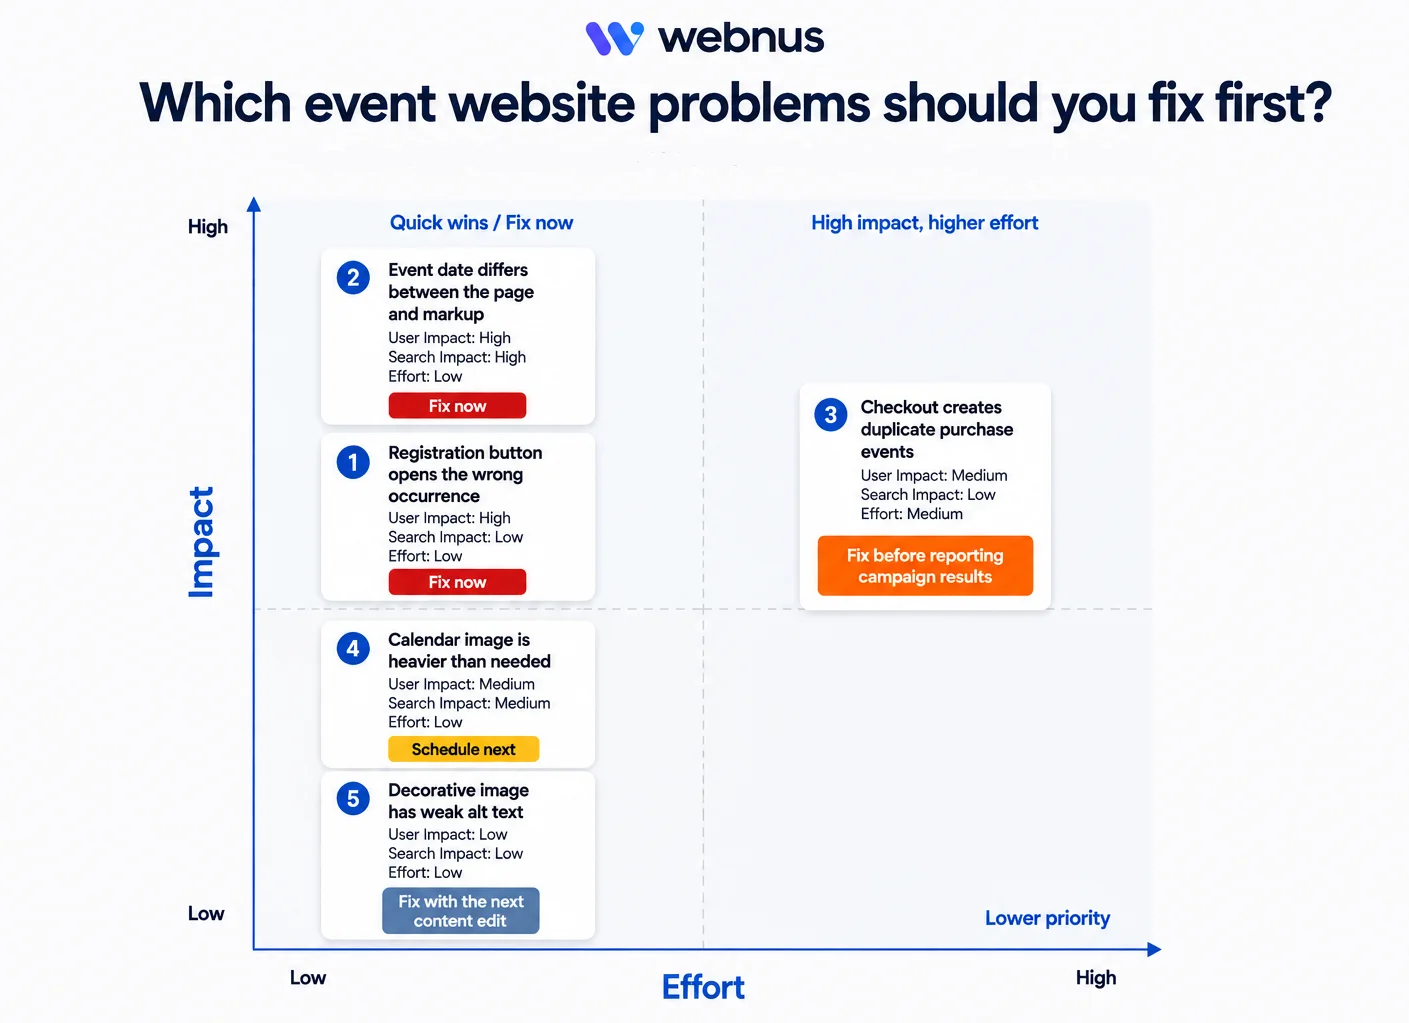
¿Qué problemas de la lista de verificación del sitio web del evento debería solucionar primero?
Prioriza según la consecuencia y luego según el esfuerzo. Un paso de pago erróneo merece atención antes que una imagen principal ligeramente sobredimensionada, incluso si la advertencia en la imagen es más fácil de ver en una herramienta de auditoría.
| Encontrar | Impacto del usuario | Impacto de la búsqueda | Esfuerzo | Prioridad |
|---|---|---|---|---|
| El botón de registro abre la instancia incorrecta. | Alto | Bajo | Bajo | Reparalo ahora |
| La fecha del evento difiere entre la página y el marcado. | Alto | Alto | Bajo | Reparalo ahora |
| El proceso de pago crea eventos de compra duplicados. | Media | Bajo | Media | Solucionar el problema antes de informar los resultados de la campaña. |
| La imagen del calendario es más pesada de lo necesario. | Media | Media | Bajo | Horario para la próxima vez |
| La imagen decorativa tiene un texto alternativo débil. | Bajo | Bajo | Bajo | Solucionado con la próxima edición de contenido. |
La auditoría más exhaustiva del sitio web del evento genera una lista corta de reparaciones pendientes. Además, conserva la evidencia. Cuando el equipo repite la lista de verificación del sitio web después de una actualización de un complemento o antes de una campaña de venta de entradas, puede ver qué cambió en lugar de partir de la memoria. La lista de verificación del sitio web del evento resulta más útil en la segunda ejecución, ya que la evidencia anterior revela regresiones.
¿Con qué frecuencia se debe repetir la lista de verificación?
Ejecuta la lista de verificación completa del sitio web del evento antes del lanzamiento, después de una migración o una actualización importante de un complemento, y cada vez que se publique un cambio en el registro o el pago. Repite las verificaciones de mayor riesgo antes de grandes campañas promocionales. Programa revisiones más sencillas para los detalles actuales del evento, las páginas caducadas, las copias de seguridad y el seguimiento. Guarda cada ejecución en el mismo registro de auditoría del sitio web del evento para que las fechas y las regresiones permanezcan visibles.
| Sincronización | Comprobación de repetir |
|---|---|
| Antes de publicar un evento | Detalles, formato, fecha, zona horaria, ubicación, precio, enlace de registro y marcado del evento. |
| Antes de una campaña de pago o una notificación push de correo electrónico | Recorrido móvil, capacidad, pago, confirmación, análisis y disponibilidad de la página |
| Después de una actualización de WordPress, del tema, del calendario, de las reservas o de los pagos | Visualización del calendario, registro, correo electrónico, datos estructurados, velocidad y registros de errores. |
| Mensualmente durante una temporada activa | Anuncios caducados, enlaces rotos, actualizaciones, copias de seguridad, Search Console e informes de reservas. |
| Tras una cancelación, aplazamiento o cambio de lugar | Detalles visibles, estado de la reserva, correo electrónico de notificación, estado del evento, archivo de calendario y enlaces internos. |
Comience su próxima revisión con un registro real. Este abarca más sistemas que cualquier otra prueba individual y proporciona al equipo evidencia concreta en cuestión de minutos. A continuación, utilice la lista de verificación del sitio web del evento para analizar aspectos como el descubrimiento, la accesibilidad, el estado de WordPress y la medición. Guarde el resultado en la auditoría del sitio web del evento, asigne el primer fallo (marcado en rojo) y establezca la fecha para la nueva prueba.
Preguntas frecuentes
1. ¿Qué páginas debería analizar una auditoría del sitio web de un evento?
Prueba el archivo o calendario del evento, una página de evento individual en vivo y todo el proceso de registro hasta la confirmación. Agrega un evento vencido o modificado cuando sea posible. Esta lista de verificación del sitio del evento abarca la búsqueda y el filtrado, la información del evento, la reserva y el pago, la comunicación posterior a la reserva y la gestión del estado.
2. ¿Necesito datos estructurados de eventos en un sitio web de eventos de WordPress?
Los datos estructurados de eventos ayudan a Google a interpretar los detalles del evento y a mostrar las páginas relevantes en las búsquedas. Sin embargo, no garantizan una visualización especial. El marcado debe aparecer en la página del evento correspondiente, seguir las directrices de Google, superar la validación y coincidir con las fechas, la ubicación, las ofertas, la disponibilidad y el estado que los visitantes pueden ver.
3. ¿Puede un plugin completar automáticamente la lista de verificación para sitios web de eventos de WordPress?
El recorrido principal del asistente requiere pruebas manuales y un registro de auditoría del sitio web del evento. Un plugin puede generar calendarios, formularios de reserva, notificaciones, informes o marcado de eventos. Sin embargo, no puede confirmar que la información del evento sea correcta, que se haya realizado un pago real, que los correos electrónicos lleguen, que la navegación con teclado funcione o que los análisis registren una conversión. Los escaneos automatizados pueden complementar la lista de verificación del sitio web del evento.
4. ¿Cuánto tiempo debería durar una auditoría del sitio web de un evento?
El tiempo necesario depende del número de tipos de eventos, rutas de registro, métodos de pago e integraciones. Comience con un evento representativo y una reserva completa. Amplíe la lista de verificación del sitio del evento cuando la prueba revele variaciones como fechas recurrentes, acceso híbrido, entradas para grupos, reembolsos, múltiples monedas o diferentes flujos de trabajo de confirmación.