
Website security isn’t only about firewalls and strong passwords. A large share of real-world attacks happen inside the visitor’s browser, where injected scripts can steal data or hijack a session.
It also includes data protection on the Internet and setting up a defense against malicious code or other code injection attacks.
This article focuses on a security measure, content security policy.
Content security policy is primarily built for the client side of web applications. The security measure offers significant protection for modern browsers from malicious content.
Keep reading to learn more about this security feature and how to set it up.
What Is Website Content Security Policy?
A content security policy (CSP) is a security standard. It offers security to websites and applications against various attacks like cross-site scripting (XSS). CSP is an HTTP response header that improves the security of web pages on major modern browsers.
The content security policy header works by restricting the content sources (like scripts and images) that a web page can load and be loaded from.
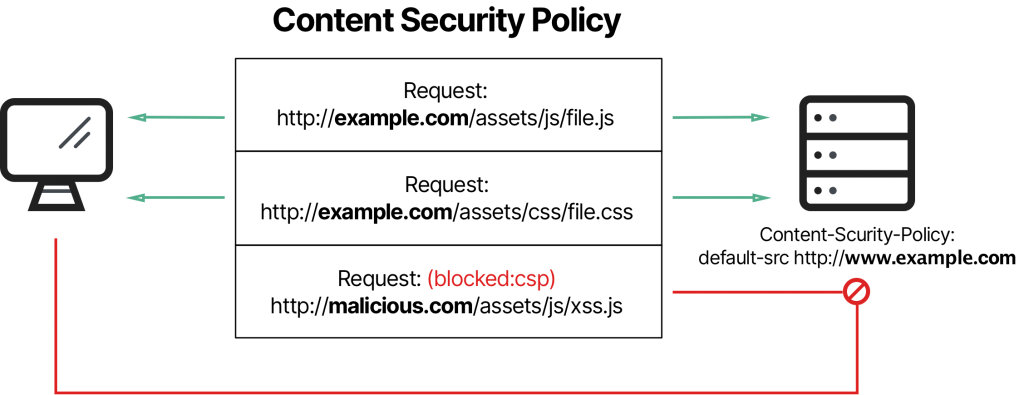
If you implement the content security policy HTTP response header on a browser that doesn’t support it, the browser ignores it. Also, it defaults to the same-origin policy (another form of protection against malicious code). However, the browser can still work with a server that supports CSP and vice versa.
Note that CSP is an additional layer of security against different types of vulnerabilities. The keyword here is “additional.” In other words, you must still protect your web page using other security measures.
It’s also worth mentioning that CSP doesn’t stop your web page from getting attacked. It effectively detects these attacks and significantly reduces their exploitation risk.
Importance of Website Content Security Policy
You implement the content security policy header to help you control the content sources that your site can load. CSP implementation can be used on any website, whether it’s an e-commerce site or a blog.
It helps to:
Mitigate XSS Attacks
We already mentioned CSP could help mitigate XSS attacks. But what exactly are these, and how can CSP help?
XSS is a vulnerability that allows attackers to send malicious code into web pages. XSS vulnerability on your website opens doors to attacks like data theft and site defacement. XSS has been on the OWASP Top 10 list of web application risks for years, and it remains one of the most frequently reported vulnerability types in WordPress plugins.
CSP protects against XSS attacks by restricting inline scripts. It also prevents your webpage from loading remote scripts, i.e., scripts from arbitrary servers.
CSP also protects your website from XSS attacks by controlling HTML form submission. So, even if visitors are sharing credit card details to buy a product or are filling out LLC membership certificates online, their data remains protected. Basically, CSP restricts where the data from these forms go. Additionally, CSP restricts the HTML object tag.
CSP also mitigates XSS attacks by enabling server administrators to specify the domain names the browser should regard as valid sources of executable scripts.
Ultimately, thanks to CSP, attackers are prevented from injecting malicious scripts.
Prevent Clickjacking
Although CSP was primarily introduced to mitigate the attack surface of XSS attacks, it has also been developed to offer protection against web application attacks like clickjacking.
In clickjacking, the attacker tricks a user into clicking a button or link on a webpage disguised as something else.
Unless you employ the services of identity theft protection companies, you can fall into the hands of clickjacking attackers. You won’t realize it until they’ve done severe damage, like transferring money or purchasing products online.
In the past, the X-Frame-Options header was the standard defense against clickjacking. CSP’s frame-ancestors directive (introduced in CSP Level 2 and part of the current Level 3 draft) does the same job with more flexibility, and modern browsers give it priority. Many sites still send both headers for older browsers.
CSP level 2 contains an anti-clickjacking frame-ancestors directive. The frame-ancestors directive specifies the URL of the parent page that is allowed to embed a web page in a frame, iFrame, or object on the current resource.
Essentially, you’re restricting the pages that can embed the current page in a frame. An example of how you can use the frame-ancestors directive is:
content-security-policy: frame-ancestors ‘self’ ‘\*.internxt.com’ ;
You can also use the frame-ancestors directive with default-src directive and script-src directives to reduce clickjacking attacks.
What Other Attacks Does CSP Prevent?
CSP can also enforce HTTPS. List only https:// sources in your policy, and add the upgrade-insecure-requests directive so the browser automatically loads any leftover http:// resources over HTTPS. (The older block-all-mixed-content directive is now deprecated, because browsers block or upgrade mixed content on their own.)
Other vulnerabilities you can tackle with CSP include:
- Dynamic Javascript code using eval()
- Unassigned inline Javascript in <script> tags
- Dynamic CSS using CSSStylesheet.insertRule()
- Unassigned inline CSS statements in <style> tags
How to Set up a Content Security Policy
Setting up CSP is an essential step in protecting your web application. You can set up a CSP defense for your website in three ways.
Content-Security-Policy Header
This method involves sending the content-security-policy HTTP response header from the web server. For example;
Content-security-policy: …
Ensure you configure the header in all HTTP responses.
Content-Security-Policy Meta Tags
In cases when you can’t use the CSP HTTP response header, you can still configure CSP for your website by using the “HTTP-equiv” meta element in the HTML file. Here’s how a line of CSP meta tag looks:
<meta http-equiv=”content-security-policy” content=”…”>
This method presents limitations to the CSP features you can use. For example, you can’t use framing protection or CSP violation logging endpoint.
Content-Security-Policy- Report-Only Header
This header tells the browser to report policy violations without blocking anything. Reports are sent to the endpoint you define with the report-to directive (paired with a Reporting-Endpoints header). The older report-uri directive is deprecated but still widely supported, so many sites include both for now. For example;
content-security-policy-report-only: script-src ‘self’;
report-to csp-reporting-endpoint
The main difference between this header and the regular CSP HTTP response header is that the former doesn’t enforce the policy. But browsers permit sites to use both the “content-security-policy” header and the “content-security-policy-report-only” header.
Details of Implementation
You need to decide which directives to include in your security policy. Directives are rules that regulate the types of content accessed by the user’s web browsers, such as images, script files, and stylesheets.
This step comes before you write your website content and ensure your site visibility. These last two things are pretty easy to do even for newbies launching a site. One of the most common generative AI use cases is content creation. So all you need to do is insert the right prompts, and AI will create the quality content you’re looking for.
With the many free SEO resources and tools available, you can also perform all the SEO work yourself to boost your site’s visibility, although it’s still better to leverage the services of a manufacturing, legal, or SaaS SEO agency with vast experience and expertise for the best results.
On the other hand, creating specific rules for each domain and subdomain of your website is far more difficult for a beginner. You start by learning about the available rules and issues. You then choose which should be included on your list and take the appropriate action (if authorized) or not (if banned). That’s why some prefer to hire developers for the job.
But if you’re up for the challenge, let’s take a closer look at the CSP directives we mentioned in previous sections to help you navigate this aspect of your site:
Fetch Directives
You include fetch directives in your response header field to specify the locations your browser can trust and load resource types from. Most fetch directives fall back to default-src. This means that if any fetch directive is not listed in the response header field, the directive values are taken from the default directives.
Examples of fetch directives include “child-src,” “font-src,” and “img-src.”
Document Directives
Document directives in your CSP response header field tell the browser the properties of documents the policy applies to.
For instance, the “base-URI” directive limits the URLs that the document base element can use. Another example is the “sandbox” directive, which restricts the actions the page can perform. Document directives don’t fall back to default-src directives.
Navigation Directives
Navigation directives control where a document can send users or data. The main ones are “form-action,” which limits the URLs forms can submit to, and “frame-ancestors,” which controls which sites can embed your page. (A proposed “navigate-to” directive was dropped from the specification and never shipped in browsers.)
Ensure you update your security policy on a regular basis to ensure your site doesn’t become vulnerable to emerging threats.
Testing Policy
CSP can work against a website if not set correctly. This is where testing comes in.
Report-only mode is an effective method of testing whether a CSP is working correctly. Report-only mode provides insights into the number of CSP violations that would have occurred if the policy were enforced but does not block anything.
This testing method helps website owners understand where their policy will likely fail. As a result, they can tweak it accordingly.
Various tools are available for testing a website’s CSP in report-only mode. One of the most popular tools is the CSP Evaluator.
This tool allows you to enter a URL. The tool then checks whether a CSP header exists. It will also display whether the CSP is adequately configured or not. At the same time, it analyzes the policy, flags potential issues, and guides you on how to improve it.
The following screenshot shows some of the tool’s suggestions:
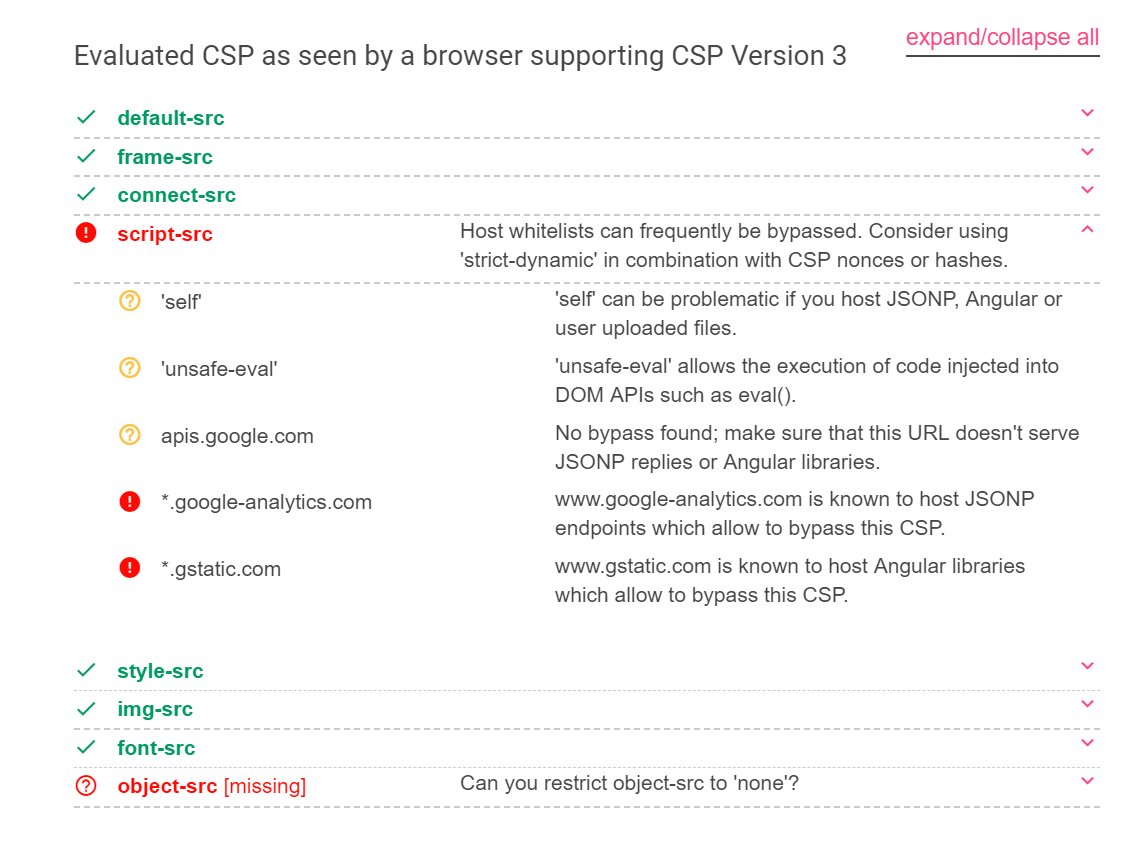
You can also use scanners such as the MDN HTTP Observatory (the successor to Mozilla Observatory) or CSP Tester. They work like CSP Evaluator: they check your headers, grade your policy and recommend improvements.
Extensions like Google’s CSP Tester and CSP Debugger can also help you test your CSPs.
They track the written and video content loaded on a web page and the sources it came from, highlighting any CSP violations.
These extensions are available for both Chrome and Firefox browsers. They can be used to test, debug, and validate your CSP on your website. They can also generate reports on the effectiveness (or lack thereof) of CSPs.
Do’s and Don’ts of CSP Usage
CSP is an effective tool that can help you minimize the risks associated with web application security. However, like all security tools, CSP has its own do’s and don’ts. It’s essential to understand it so you can use it effectively.
So, here are some rules:
Use a nonce-based policy with ‘strict-dynamic’. With this setup, only scripts carrying the correct one-time nonce (or hash) run, and any scripts they load are trusted automatically. That makes a strict policy practical on sites that use tag managers or load scripts dynamically, without maintaining a long allowlist of domains.
Inline scripts are scripts written directly inside the HTML instead of loaded from separate files. Under a strict policy, an inline script runs only if it carries the valid nonce or a matching hash, so injected code without them is blocked.
However, the inline code is not recommended. The inline directive permits using inline scripts and styles within your HTML code. This is risky because it allows hackers to inject malicious code into your content. Instead, use the ‘nonce-value’ and ‘hash-value’ attributes to allow inline scripts and styles from trusted sources.
Don’t use ‘eval()’ either. The ‘eval ()’ directive permits the execution of scripts that have been dynamically generated. It can bypass CSP and execute arbitrary code, which presents a significant security risk.
If your website relies heavily on inline scripts and styles or third-party libraries and plugins, you may need help implementing CSP.
You can use a tool like the Content Security Policy Builder to help you build a customized CSP that considers the specific needs of your website and third-party libraries and plugins.
Adding a CSP to a WordPress Site
On WordPress, you can send the header from your web server (Apache .htaccess or Nginx config), from a CDN such as Cloudflare using a response header rule, or with a security plugin that supports custom headers. Whichever method you use, keep these points in mind:
- Start in report-only mode. Themes, page builders, analytics and payment scripts load from many sources, and a strict policy can break checkouts or forms on day one.
- Watch out for page caching. A nonce must be different on every response. If a full-page cache serves the same HTML to everyone, nonces stop being secret, so use hashes or an allowlist on cached pages, or generate nonces at the CDN edge.
- Review after updates. New plugins and third-party embeds often need new sources, so recheck your violation reports after major changes.
Content Security Policy Examples
CSP can be implemented in various ways, depending on the specific needs of a website. Here are a few examples of CSP policies to help you better understand:
- To configure your CSP header to allow scripts, CSS, AJAX, and images from the current origin without loading other resources;
Content-Security-Policy: default-src ‘none’ ; script-src ‘self’ ; connect-src ‘self’ ; img-src ‘self’ ; style-src ‘self’ ; frame-ancestors ‘self’ ; form-action ‘self’ ;
- To configure a moderately strict policy in the response header field;
script-src ‘nonce-r4nd0m’ ‘strict-dynamic’ ;
object-src ‘none’ ; base-uri ‘none’ ;
- The CSP configuration for lockdown strict policy;
script-src ‘nonce-r4nd0m’
object-src ‘none’ ; base-uri ‘none’ ;
It’s important to note that while implementing CSP helps enhance the security of your website, it should be used in conjunction with other security measures, such as strong authentication protocols, regular software updates, and domain registration with reputable providers, to ensure comprehensive protection against cyber threats.
You can learn more about nonce attributes for CSP on MDN. You can also learn from this reference guide.
In Closing
Security on the web is not something to be trifled with. People can lose their money and face threats (among other things) from cyber attacks like cross-site scripting and clickjacking. Hence, a content security policy should be a necessary layer of protection for all web applications.
Assessing your incident response policies, including the systems you have for detecting cyber security threats, like breach and attack simulations, and how you’ll effectively deal with them should they arise.
Still, regarding security, you must take precautions when you use the internet to avoid falling prey to attackers.
By familiarizing yourself with the different types of policies and protocols, you can better protect, not just your website, but your audience who might have shared their personal information on your site.