WordPress 6.7: Ultimate Guide to Create & Develop Pages – Easy Guide
A robust and intuitive framework for building and maintaining websites is WordPress 6.7. It gives both developers and non-technical users the means to create visually appealing, useful, and responsive websites (if you have a responsive WordPress theme) with its new features and capabilities.
With an emphasis on WordPress 6.7's fresh attributes and website building considerations, this post will walk you through the process of creating and developing pages on the platform.
WordPress is a platform powering a major part of the internet. The CMS has grown from humble beginnings into a giant and continues to grow.
For the uninitiated, however, having a WordPress site poses some challenges.
The first challenge is how to customize the site according to preferences.
It’s a tough job if you go about doing it yourself without knowledge of code.
To make the development experience easier for you, we’ve developed a short guide on how you can develop a WordPress website.
Development & Creation of a Website – What Are the Vital Features?
WordPress 6.7 offers a wide selection of tools for creating websites that are suitable for a beginner and an experienced web development agency. WordPress is a pioneer in web development because of the following important features and technologies:
User-friendly interface
With its simplified navigation and easily available choices for creating, updating, and managing pages, the WordPress dashboard is still user-friendly.
WordPress 6.7 has improved the block editor (Gutenberg), giving users even more options for creating pages with reusable and dynamic content blocks.
Responsive design
Mobile-first strategies are essential for modern web design. Tools for making sure your website is responsive and optimized for devices of all sizes are included in WordPress 6.7.
Customization options
Full Site Editing (FSE), which enables users to alter the entire website, including headers, footers, and sidebars, straight from the block editor, is now supported by WordPress themes.
For various page types, sophisticated theme templates are offered, guaranteeing uniformity and branding throughout the website.
SEO and performance optimization
Improving the visibility of your website is simple thanks to built-in SEO tools and compatibility with well-known plugins like Yoast SEO and Rank Math.
WordPress 6.7's performance enhancements, which make use of features like lazy loading, optimized images, and less JavaScript dependencies, guarantee quicker load times.
Security and stability
With hosting and caching options, WordPress can expand well whether you're creating a blog or a massive e-commerce website.
Version 6.7 security updates fix shortcomings, and users can install plugins like Wordfence or Sucuri to further improve security.
Amalgamation with modern technologies
A contemporary and captivating user experience is guaranteed by WordPress's compatibility with frameworks like HTML5, CSS3, and JavaScript.
Designers can link third-party tools or construct custom applications using its support for REST API connectivity.
Steps to Develop and Create Pages on WordPress 6.7
STEP 1: Setting up a website on WordPress 6.7
Make sure your WordPress 6.7 installation is finished and set up correctly before you start developing pages:
Select a Hosting Company: Go with a reputable hosting company that works with WordPress, such Bluehost, SiteGround, or WP Engine.
Install WordPress: One-click WordPress installation is available from the majority of hosting companies. To set up your website, follow the instructions.
Choose a Theme: Select a theme that complements the goal of your website by going to the Appearance > Themes section. WordPress 6.7 themes are more accessible due to its Full Site Editing optimization.
Install Plugins: Include necessary plugins such as Contact Form 7 for forms, WooCommerce for e-commerce, or Elementor for page building.
STEP 2: Designing pages on WordPress 6.7
Now that the foundation is in place, you can start making pages:
Navigate to Pages: To begin building a new page, select Pages > Add New from the dashboard.
Utilize the Block Editor:
For creating pages, the block editor offers a drag-and-drop interface. Blocks for text, pictures, videos, buttons, and other elements can be added.
Adjust the settings for each block to suit your preferred style.
Leverage Patterns: WordPress 6.7 offers enhanced block patterns that let you add pre-made header, call-to-action, and gallery layouts.
Save Draft or Publish: When the page is prepared to go live, either save your work as a draft or publish it.
STEP 3: Customizing webpages
Complete Editing of the Site:
To alter the overall layout, including page templates, navigate to Appearance > Editor and open the Site Editor.
To ensure uniformity, adjust global standards like font, color, and spacing.
Advanced Plugin-Based Design:
For more sophisticated design possibilities, use page builder plugins such as Beaver Builder or Elementor.
Easily add interactive features, unique grids, or animations.
Installing Elementor
From your WordPress dashboard, visit the Plugins section and from the search box type in Elementor.
The search results will give out a variety of plugins related to Elementor.
The one you need to download is from Elementor.com. Download, install, and activate the plugin.
Once you’ve done that, it’s time we move on the next section.
Creating a WordPress Page with Elementor
Go to Pages > Add New and create a page titled Home.
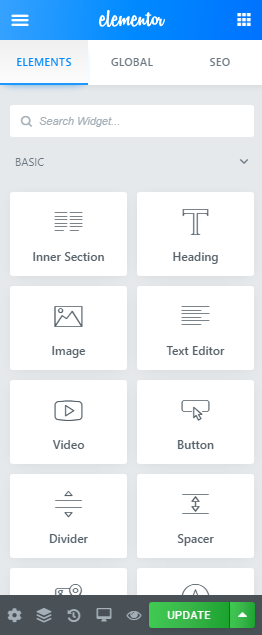
Because of Elementor, you will see a button below the editor that reads Edit with Elementor.
Click on it to fire up Elementor.
To get the most of Elementor, you should remove the default layout to ensure you start building from scratch.
To do that, you need to go to the Hamburger icon located at the top-left of the page, click on it and visit settings.
From there, you will see a section called template.
Click on the drop-down and select Page Builder Full-Width.
This will remove the default layout of the page and leave you with an almost blank page.
Now, you can customize the theme according to your own preferences by adding a new section.
For the sake of convenience, however, you can use a template from pre-existing themes.
If you have a premium theme like the Deep Theme, you can perform customizations to it as well.
Overall, the use of templates makes the development processes for non-techies a lot easier.
Once you’ve selected a template, you just have to click on insert and upload the template on to Elementor.
You can edit almost everything within the template.
From reducing opacity, buttons, changing the content, colors, font, and more.
With Elementor, you can customize just about anything.
Tweak around with the functions provided by the builder until you’ve reached the right layout for your website.
In addition to that, you can also create and customize a contact us and about section for your site.
Afterwards, you can create a navigation menu and add a link to them on your site. Here’s how you can do that.
Creating “About Us” Page
The process is similar to how you will create any page on WordPress.
From your WordPress dashboard, visit Pages > Add New and title the page as “About Us” page.
Now, click on the “Edit with Elementor” button to start editing.
At this point, you’ll see a pretty bland page.
Now you can add the title of About Us at the very top of the page or below and image depending on your requirement.
Once you’ve done that, you need to select a layout where you can add the About Us content relevant to your website.
Now, you can add further customizations to the content but for now, it’s enough to make your site good.
Creating a “Contact Us” Page
Contact pages lie at the heart of the website experience.
How else can you enable your users to reach out to you? From retargeting and outreach, there are plenty of benefits of having a contact us page.
With Elementor, you can add a contact us page with ease.
First of all, you need to create a new page by going to Pages > Add New and name it as “Contact” or “Contact Us”.
Don’t click on the Edit with Elementor button just yet. For a contact page, you need a contact form.
To add a form to your website, you need to have a plugin like WP-Forms that lets you create forms. Once you’ve downloaded WP-Forms, it’s time you create a form.
When you’re done, save it, go back to your contact page and click on the Edit with Elementor button. What you will essentially see is an empty page.
Now, you can play around with it by adding styles, Google maps, changing fonts, and all.
Once you’ve done everything, it’s time you move on to integrate the Contact Form using the Add Widget.
You can even further customize the layout of your form to make it stand out with your site.
Now that we’ve developed three basic pages, it’s time we create a menu and organize it on Elementor.
Adding a Menu to WordPress
This part is relatively easy.
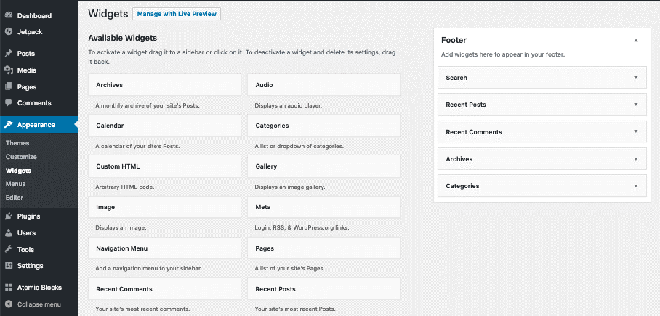
All you have to do is visit Appearance > Widgets and create a menu from there.
Once you’ve done that, start adding the pages you created to the menu.
When you’re done, save your changes, and then go back to Elementor.
If you’ve created a primary menu, Elementor will pick it up and you will have a header navigation detailing all your website pages.
WooCommerce and Elementor
If you have an eCommerce store on WordPress, you can customize it using Elementor as well.
Similar to how we edited the website above, we can edit a WooCommerce website with ease.
In addition to editing it with Elementor, you can even add wholesale functionality to WooCommerce using an all-in-one solution like B2BWoo eCommerce Plugin.
STEP 4: Optimizing webpages
SEO
Use SEO plugins to improve keywords, meta descriptions, and page names.
Make effective use of heading tags (H1, H2, H3) to raise your website's search engine rankings and readability.
Performance:
Compress pictures using plugins like Smush or ShortPixel.
Reduce load times by minifying the JavaScript and CSS files.
Accessibility
Make sure your website complies with accessibility standards, which include employing high contrast colors and supplying alt text for images.
STEP 5: Launching your website
Make sure your website is fully tested before launching:
Verify Responsiveness: Check how your pages look on desktop, tablet, and mobile devices by using the preview function.
Check for functionality by making sure all forms, links, and interactive components function as intended.
Use Analytics: To monitor user behavior and obtain information after launch, install tools such as Google Analytics.
Conclusion
So, you’ve reached the end of this article.
WordPress 6.7's powerful features and user-friendly design make creating and developing pages a breeze. Creating a website has never been easier or more satisfying than with WordPress 6.7.
We hope that this basic guide gave you the starting point to developing a WordPress website without needing any code.
We could have talked more, but for the sake of convenience, we feel that this information would be sufficient to not overwhelm the user.
Recommended Posts

10 Must-Have WordPress Plugins for Every Successful Website in 2025
September 11, 2025


