Ultimate 2023 Website Migration Checklist
Website migration is one of the things where you need to be careful. If you don’t do it right, your website might not be properly migrated or you will face some huge downtime. Downtime means your website won’t be accessible for people.
It would be great if you got proper steps of the things to keep in mind, right? You are at the right place. We will now see the proper website migration checklist to follow. This will cover all the important things to keep in mind while migrating your website.
The main focus here will be to see the list of things to follow. Moreover, we will also see a small technical summary. So, it will be easier for you to follow the checklist.
Website Migration Checklist
It is a checklist to keep in mind and not a technical tutorial.
Know Why you are Migrating
This might sound stupid at first but you will need it (we will get into that later on). There could be various reasons to migrate to a website. The main reasons include the following.
- You want to change the hosting provider or domain name
- Rebranding can be one of the options
If you are rebranding, you will also need to keep an eye on the logos, URLs, etc. The website migration checklist will cover all the things you should know when you are migrating the website.
Backup your Website (Most Important in Website Migration Checklist)
The first thing that you need to do is to backup your website. It is highly recommended that you backup your website to a third-party cloud such as Google Drive or Dropbox. Further, you can also backup to your local machine. It is not at all recommended to keep the backup files in your hosting account (especially if it is about to expire).
Don’t forget to backup your database and emails. You can go to PhpMyAdmin to backup the database. Most of you would be using a WordPress plugin to do the backup process. So, the plugin will backup the database too. You can use Updraft to backup the WordPress website in Google drive.
Plan your Migration
Now, your next task in the website migration checklist is to plan your migration. You need to see many things here.
Among all the things, your first task is to find the low time of your website. Low time means a couple of hours when you have the least number of visitors. We will give you all the tips so that your website won’t go down. However, it is still recommended to do this process when the visitors are the least. Therefore, just in case, if the website goes down, it won’t affect many visitors.
Don’t worry more about changing the DNS. If you have read other tutorials about migration, they might have suggested you change the DNS and nameserver first. However, you don’t need to do that at first. That step is to be done at the last.
Lastly, if you are changing your host, you need to make sure that your old host hasn’t expired yet. Do not change the hosting on the last day, do it 1 or 2 days ahead of the expiration date. By doing this, your website won’t face downtime.
Copy the Files to the New Host (Checklist to Migrate Hosting Provider)

Assuming you have already chosen your hosting provider, you can now copy the files to the new host.
If you haven’t chosen a new host yet, here is a list of fast hosting providers offering free website migrations to their customers. You can just contact them and they will do the migration process for you.
Coming back to the website migration checklist, your next job is to copy the files to the new host. You can do it manually by creating a zip from the old host and uploading the zip to the new host. You can then extract the file. Don’t forget to copy the database. You can go to PhpMyAdmin, choose your database, and then click on the export button. Thereafter, you can just import it by doing the same steps.
Moreover, you can use migration plugins such as Duplicator, or All in one wp migration, etc. Further, you can also backup your website using Updraft and then restore the files in the new server. You can check out the respective tutorial on the plugin. We will focus on the checklist rather than the technical aspects.
You also need to change the credentials. Head over to the wp-config.php file in the main server and change the username and password. You can get all the things from your hosting.
Change the DNS (Domain Name Server)
Now, once the files are transferred, your next job is to change the domain name server that is the DNS of your domain name. You can head over to the website where your domain name is hosted.
Change the DNS from there. You will see an option called a domain name server. You can change the domain name server now.
Go to the new host and you will find the nameserver to point. You can copy those nameservers on the domain name. Your job is almost done.
Now, here is the deal. After you hit the close button, it will tell you to wait for anywhere between 24 to 48 hours until the nameserver will take effect. So, you need to wait.
Here is the interesting part. Until the nameserver changes, the data from the old host will load. We have not deleted that website. So, the data will be totally fine. Once the nameserver changes, the data from the new website will load. As you have copied the website there, you will face almost no issue and zero downtime.
Once the process is completed, you can remove the website from the old host. Please wait at least 72 hours before you delete it. This will make sure that the website works completely fine. If your old hosting is about to expire, then you don’t need to do anything here. It will automatically get expired and your account will be deleted. Make sure you have a backup of all the things.
Emails and Domain Forwarders
When migrating the website, this is one of the common mistakes that people make. They forget to migrate the emails and domain forwarders. So, this should be the next step in our website migration checklist. That is, here you need to check whether the emails and domain forwarders are set right or not.
Change Domain Name

The step in our website migration checklist is to change the domain (if applicable). For the people who want to change the domain name or they want to shift their WordPress installation from the main domain to the primary domain, you need to do this.
This is the step where we will change the domain name. Most people do it by going to Settings > General and changing it there. It is easy but your website will down. Here, you need to point the nameserver to the current hosting before changing the domain. This step is NOT recommended at all. The reason is that this will impact your SEO.
Instead, what you need to do is, you can add the new domain to your hosting account by going to “Addon Domains”. Now, follow the steps that we mentioned above and migrate your files to the new one. You can use the Duplicator plugin as it will guide you everywhere and allow you to change the domain name.
Replace the Domain Links
The above step will replace your WordPress URL. But, what about the internal links and the places where you added your website URLs?
That’s where you need to use the Search and Replace plugin to replace all the entries of the old domain to the new domain. It will take a few minutes to do the entire procedure. Therefore, you don’t need to worry here.
So, the next step is to change all the domain links. If you want, you can also change the watermarks in the images.
Redirection in .htaccess
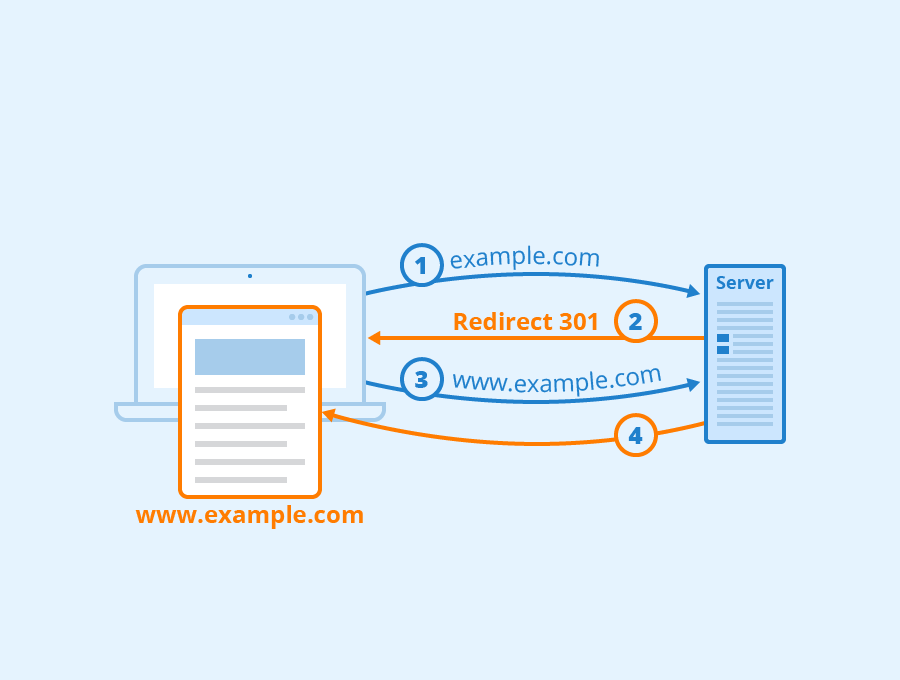
When you are setting the redirection from the old domain to the new one, make sure that you use 301 redirects. In WordPress, you need to modify the .htaccess file to create the redirection.
If someone opens your old website, you need to redirect them to the new one automatically.
If you are changing your brand and rebranding your website, you need to make sure that you have removed all the pages that have anything to do with the branding. You can remove the links and don’t redirect these pages. You can set an exceptional rule in .htaccess about this. This only applies if you want to rebrand your website and discard the old brand.
Many people also keep the old domain with them. So, you won’t lose any of the visitors.
Analytics and Configurations
If you are using analytics, make sure you set up analytics in the new domain. If you are not using it, you should start using it. Along with Google Analytics, make sure you configure the third-party tools properly. This also includes CDN and SSL.
Website migration includes the configuration of many things. However, as you are using WordPress, most of the things will be already done for you.
Tell Google about the Changes
Google is like your boss when you are handling a website. If you make any changes, you need to inform your boss.
So, don’t forget to inform Google about the change you made. Search console and webmaster tools allow you to inform Google about this.
We bet you forgot about updating the sitemap, right? So, update it before you forget it.
Please note that these changes will affect your SEO for a short time. In simpler words, it will be temporary. Until Google fetches and makes changes in its database, you will face some issues. So, don’t worry if your rankings are dropped.
Backlinks and Citations
The thing to check is backlinks and citations. There aren’t many things you can do when it comes to backlinks. However, you can surely change the backlinks where you are in control.
Further, you need to change the URL in citations. If you have submitted your website to directories, you can change the link there also.
Test the Site
Once you do all the things, you need to test your website. Don’t just check one particular page, check all the pages of your website. Sometimes, your WordPress homepage would be working fine but you won’t be able to see other pages. In such a situation, you can head over to Settings > Permalinks and just click on the save button without making any changes. This will recreate the .htaccess file and your website will work fine.
Talking about testing, you also need to tally a couple of pages. This will ensure that the links are the same. You can copy a URL of your old website and just change the domain name. See if it is working or not. Further, you can also see if the redirection is working or not. This will ensure that the website is perfectly well.
Inform your Followers

Once the testing part is over, we are here at the last point of the website migration checklist. This is where you inform your visitors about it.
Most of you would have already told your visitors about it. This is where you send an email notification to your subscribers, post it on social media handles, community, and all the places where you are connected with your followers.
While you are doing all these things, you can also change the website URL in all the profiles of yours. Change the URLs in social media handles.
That’s pretty much it.
Final Words
To conclude, these are some of the important website migration checklist points to remember when you are migrating your website. This checklist covers all the points to keep in mind whether you want to change the hosting or you are planning to change the domain name.
Recommended Posts

Make Your Website More Interactive – 5 Awesome Tips!
November 23, 2022

4 Powerful Strategies to Kick off Your Website Optimization in 2023
September 6, 2022
