Advanced Speaker Addon
The Advanced Speaker addon enhances your organizing experience by providing dedicated pages for each speaker. Utilize shortcodes to effortlessly display lists of speakers wherever you desire, offering a seamless integration into your website. This addon introduces a myriad of options, allowing you to tailor the features of your shortcode to meet specific requirements. Additionally, you can conveniently showcase events associated with a particular speaker under the shortcode.
Advanced Speaker Addon Preparation
Installation
In the first step, ensure that both MEC (Modern Events Calendar) and the Advanced Speaker addon are installed and activated.
Read Also:
How to install MEC and Addons?Activating Speakers
Please head over to MEC Settings > Event Module and make sure to enable the Speaker feature.

Advanced Speaker Addon Settings
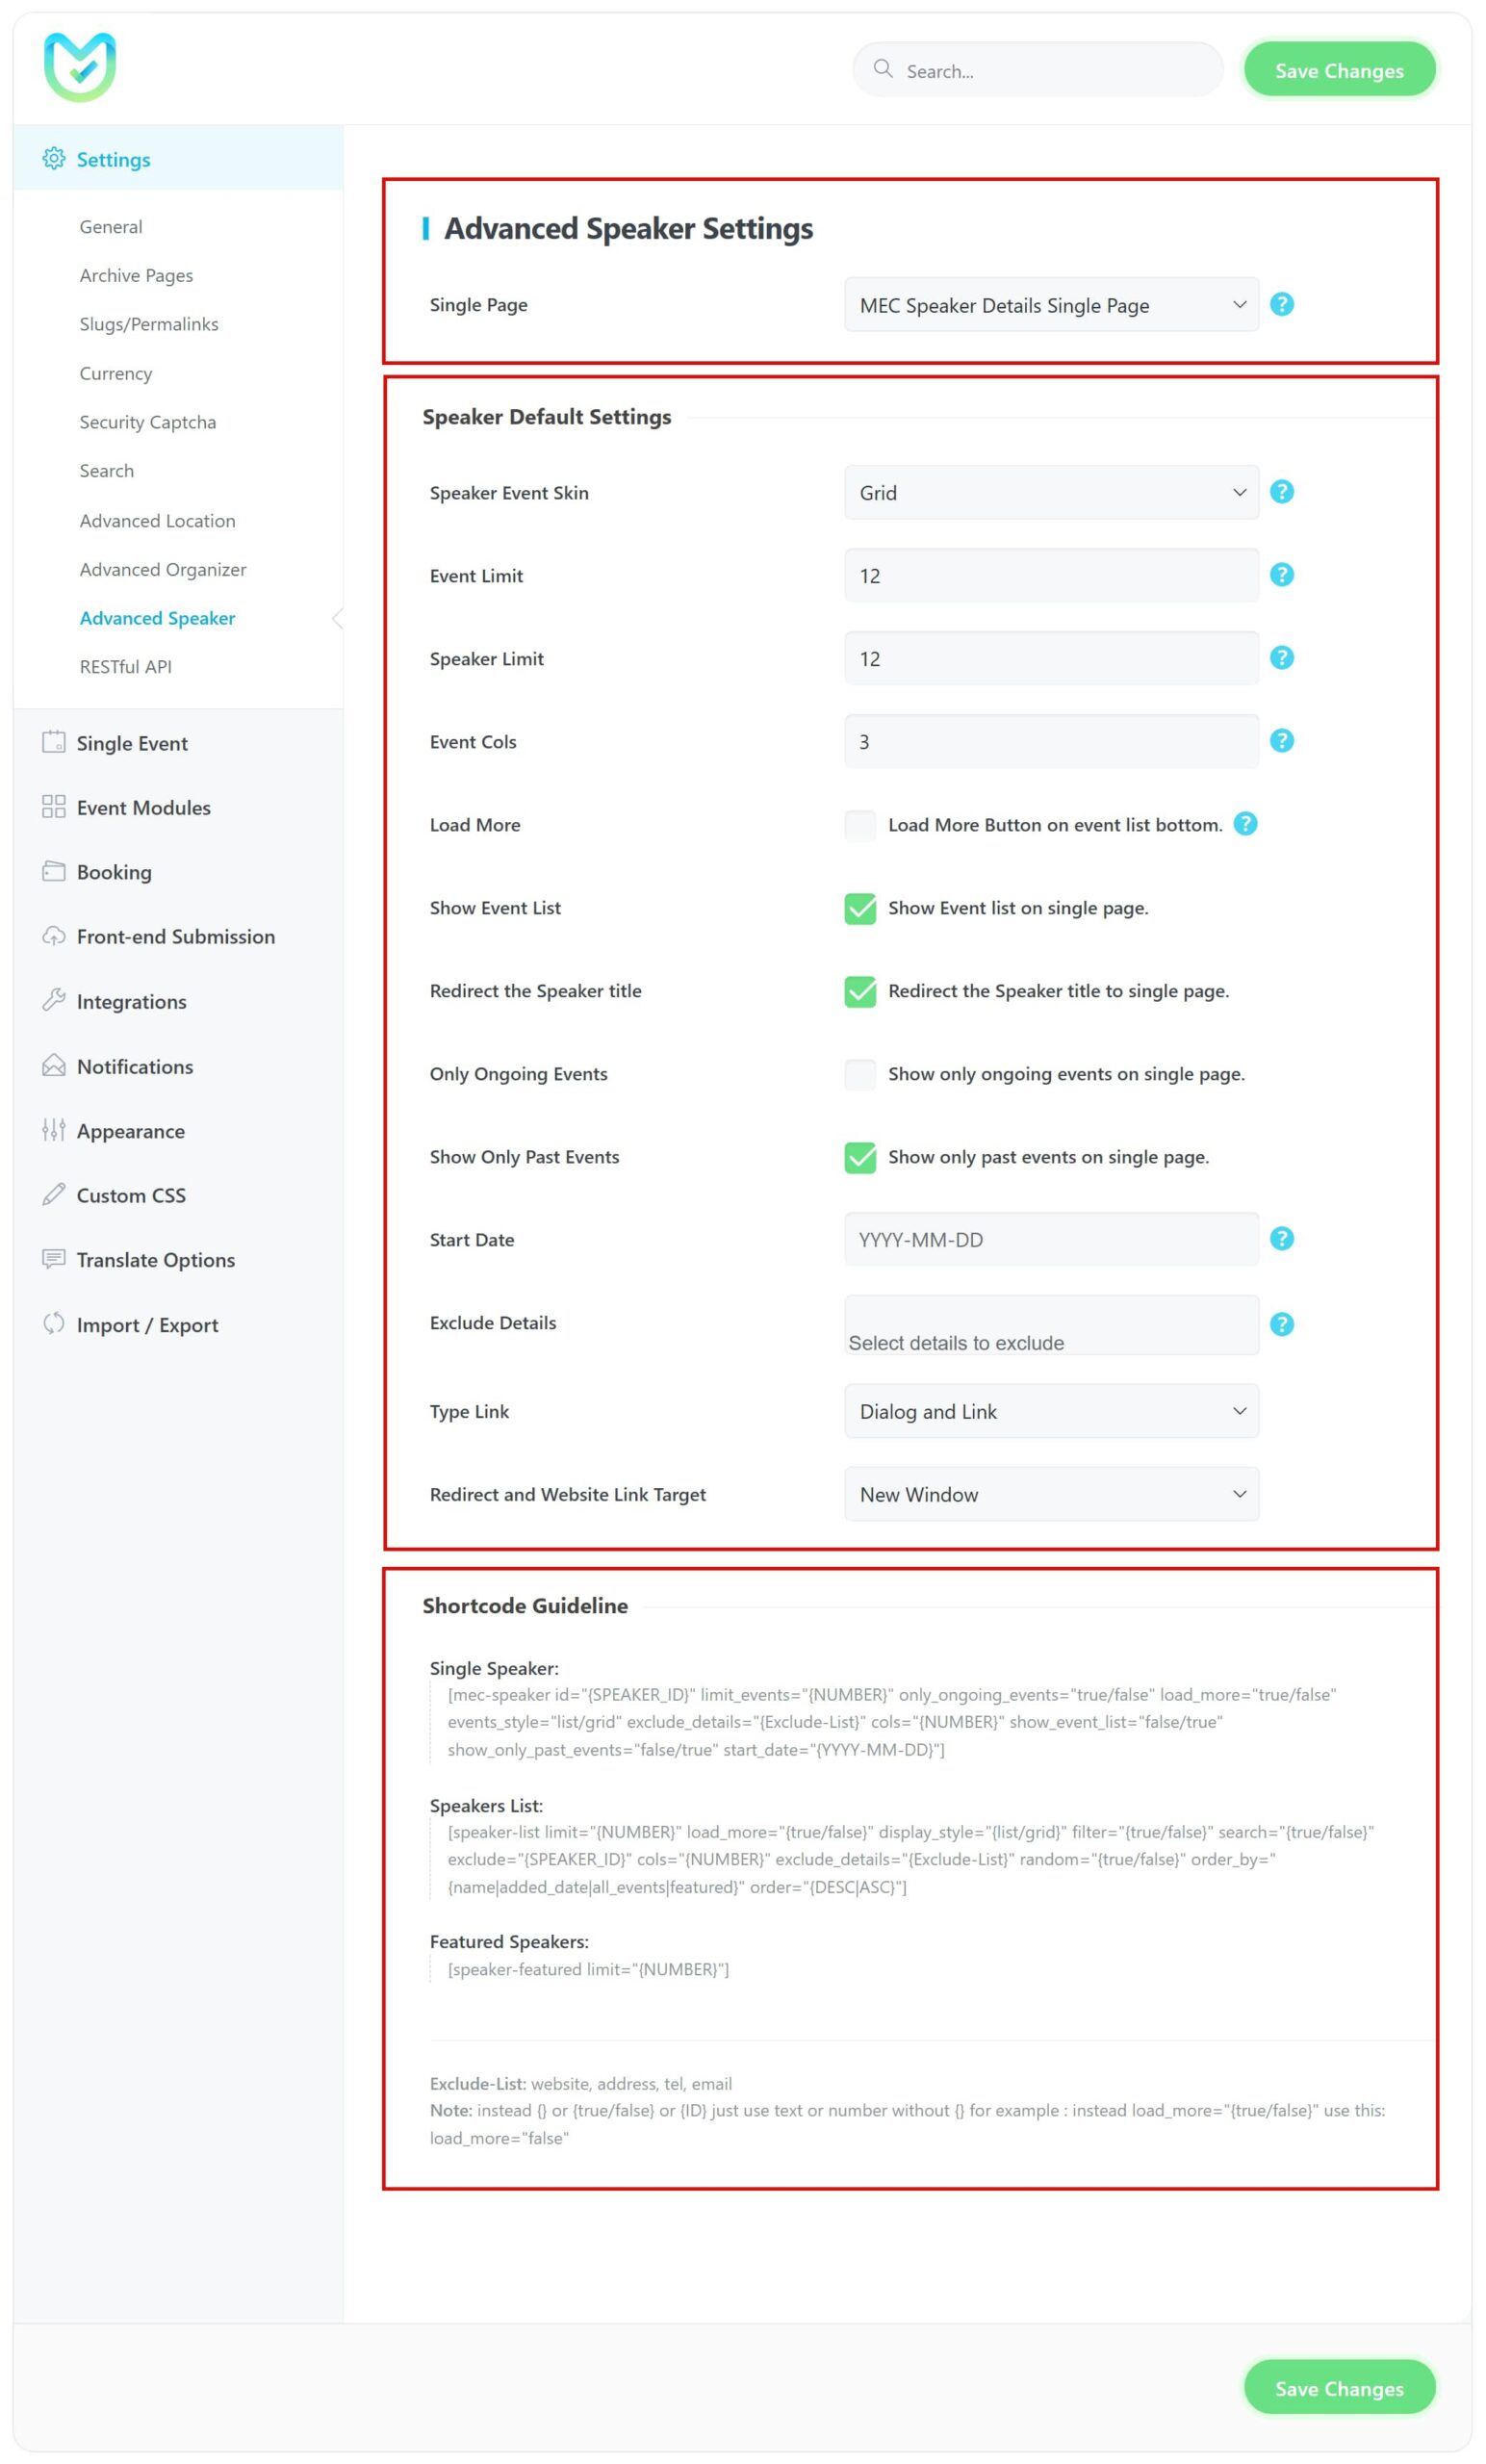
After installing the Advanced Speaker Addon, you will see a new menu in MEC’s settings. In the pictorial guide below, you can see the explanations under each section.

1. Single Page
In this step, choose a page featuring a designated shortcode (selecting the destination page). Although this page starts empty, clicking on the Speaker’s title link redirects you to it. Ensure the page is well-maintained and includes the [advanced-Speaker-single-public] shortcode. Following installation, this page is automatically activated, and you have the option to modify its default title.
2. Speaker Default Settings
Shortcodes come with various options. If no specific options are set, they will function with default settings. Customize details options based on your preferences.
Speaker Skin
Choose a skin to display the Speaker list.
Speaker Event Skin
Choose a skin to display the Speakers’ event list.
Event Limit
The number of Events to be displayed on the Speaker’s event list.
Speaker Limit
The number of Speakers to be displayed on the Speaker’s list page.
Event Cols
Define the number of columns to display on the Speaker’s event list.
Load More
Shows Load More Button on the event list page.
Show Event List
Show the Event list on a single page.
Only Ongoing Events
Show only ongoing events on single page.
Show Only Past Events
Show only past events on single page.
Start Date
Filter the display of events from this date onwards.
Exclude Details
Hide details such as Job title, Tel, Email, Website, Facebook, Instagram, LinkedIn, Twitter(X).
Redirect the Speaker Title
Redirect the Speaker title to a single page.
Type Link
Show the speaker within a link, Dialog, or both.
Redirect Link Target
Opens the events in a new window or the current window.
3. Available Shortcodes
In the Advanced Speaker Addon, there are three types of shortcodes:
- Single: For showing a single event with its properties.
- List: For showing all the available items.
- Featured: For showing those items with checked featured value.
How to use Advanced Speaker shortcodes
To integrate shortcodes, simply copy and paste the code onto the desired page. The main shortcode template is in [Speaker-list] format, and default options are applied if no custom settings are specified.
Each option functions individually on the main shortcode, like an ID. In the shortcode (which is like this: id=”{Speaker_ID}), in the {Speaker_ID}, you should just put a number. This number is available in the taxonomy list.
If, for instance, to show load more options, it is as load_more=”{true/false}“, you should put a numerical value in the {true/false} section without the {}. Ultimately, this option should be like load_more=”false” or load_more=”true“.
4. Shortcode Guideline
[mec-speaker]
Attributes:
Here’s a clear summary of the [mec-speaker] shortcode attributes and what each one does:
- id=”{SPEAKER_ID}” → Display a specific speaker by their ID.
- limit_events=”{NUMBER}” → Limit the number of events shown per speaker.
- only_ongoing_events=”{true/false}” → Show only ongoing events for the speaker.
- load_more=”{true/false}” → Enable or disable the “Load More” button for the speaker list.
- events_style=”{list/grid}” → Display the speaker’s events in a list or grid layout.
- exclude_details=”{Exclude-List}” → Hide specific speaker details, e.g., Job title, Tel, Email, Website, Facebook, Instagram, LinkedIn, Twitter(X).
- cols=”{NUMBER}” → Number of columns per row (works only in grid layout).
- show_event_list=”{true/false}” → Enable or disable showing the speaker’s associated events.
- show_only_past_events=”false/true” → Display only past events if set to true.
- start_date=“{YYYY-MM-DD}“ → Filter the display of events from this date onwards.
[speaker-list]
Attributes:
Here’s a clear summary of the [speaker-list] shortcode attributes and what each one does:
- limit=”{NUMBER}” → Number of speakers in the list
- load_more=”{true/false}” → Enable/disable the “Load More” option
- display_style=”{list/grid}” → Display speakers in a list or grid layout
- filter=”{true/false}” → Enable/disable filter options
- search=”{true/false}” → Enable/disable search option
- exclude=”{SPEAKER_ID}” → Exclude a specific speaker by ID
- cols=”{NUMBER}” → Number of columns per row (grid layout only)
- exclude_details=”{Exclude-List}” → Hide details such as Job title, Tel, Email, Website, Facebook, Instagram, LinkedIn, Twitter(X).
- random=”{true/false}” → Display speakers in random order
- order_by=”{name|added_date|all_events|featured}” → Order speakers by selected option
- order=”{DESC|ASC}” → Ascending or descending order
5. Important Notes:
- Ensure that you both open and close the double quotations, as it is essential.
- Be attentive to spaces to prevent the shortcode from breaking.
- You have the option to set no options. If completely omitted, nothing will happen.
- Avoid using one or both of [] in the shortcode.
- The presence of [] signifies to WordPress that you have executed a shortcode.
- To leverage the features of each Speaker, ensure that the specific Speaker has content.
- To access the widget, navigate to the Appearance > Widgets menu. Your widget will only be displayed if your page builder can recognize it.
- The exclude option allows you to omit specific details from the shortcode items, such as a phone number. To exclude multiple items, use “,” as a separator.
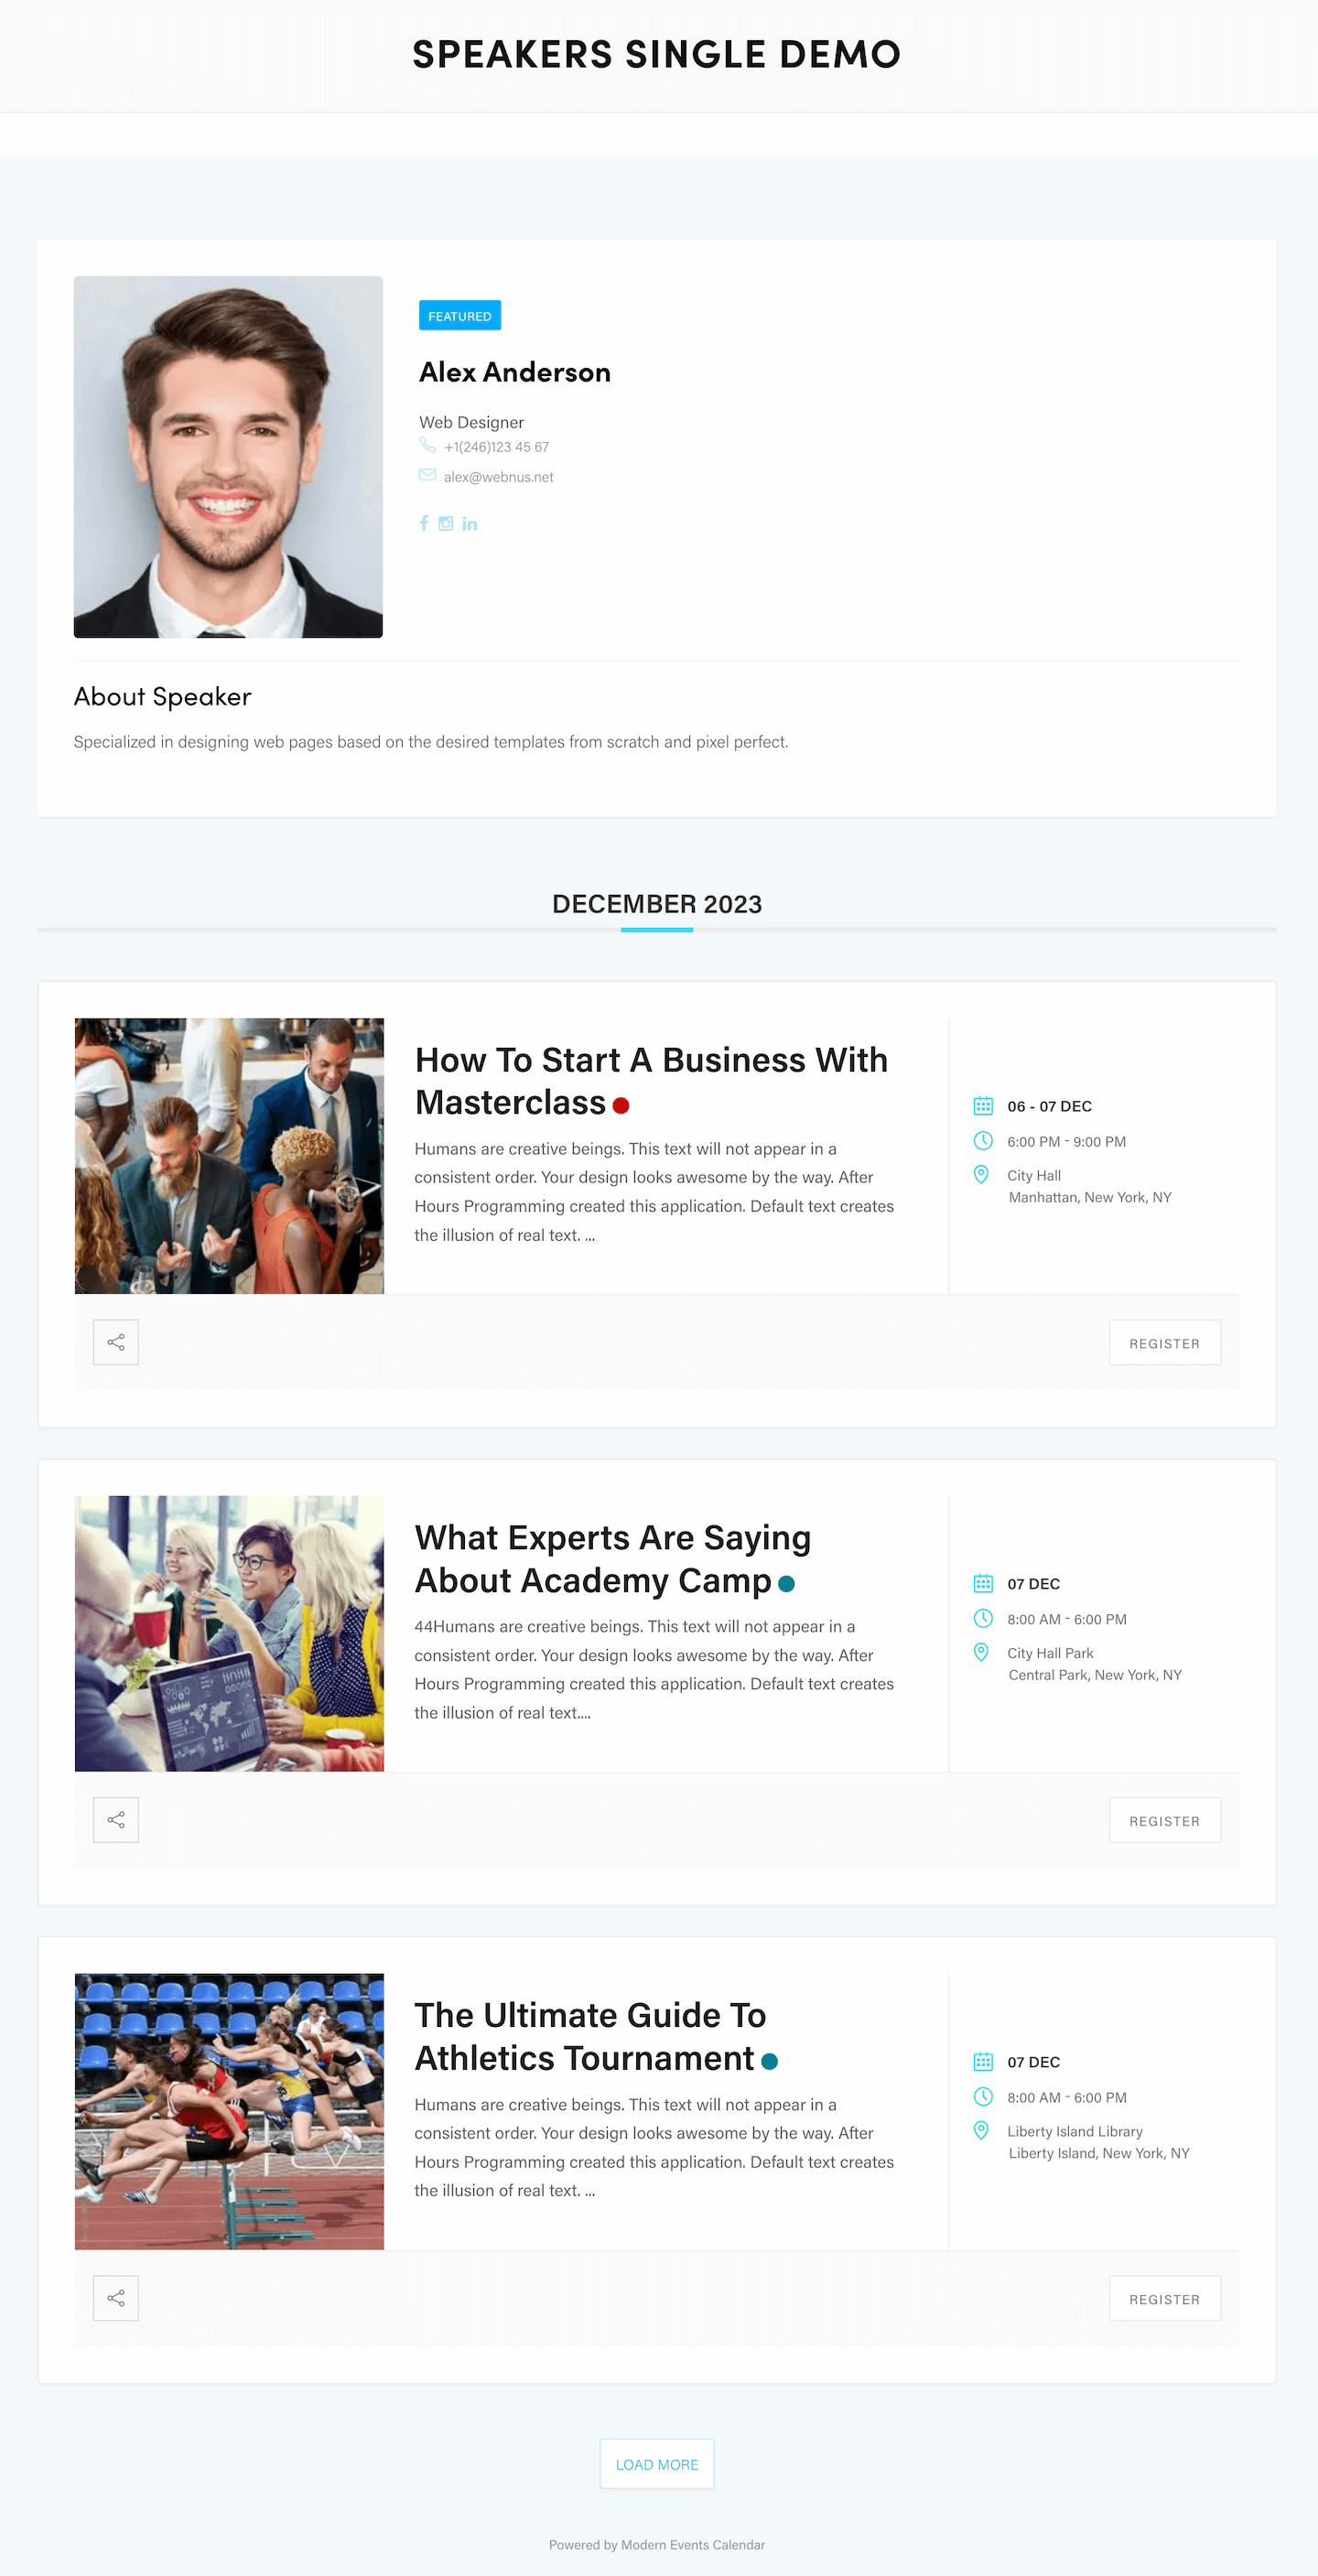
This image displays the ultimate outcome of the single Speaker page.

Report Out Dated Content
If you think the content of this page does not reflect updated information, please let us know.