Event Modules
In MEC, we offer a variety of event modules that you can use to enhance the functionality of your event calendar. In this guide, we will walk you through each module and provide step-by-step instructions on properly displaying the single event page. The modules are:
Speakers, Organizers, Sponsors, Locations, Countdown, Map, Exceptional Days, Local Time, Progress Bar, Event Gallery, QR Code, Weather, Related Events, Social Networks, Export, Next Event, Next/Previous Events, SMS.
Speakers
With the Modern Events Calendar speaker module, you can easily add speaker specifications for your event. This allows you to provide the audience with the necessary contact information for each speaker. To use this feature, you need to go to MEC Settings > Event Modules > Speakers and check the Enable speakers feature option.

To create a new speaker, navigate to M.E. Calendar and select Speakers. To ensure that the speakers’ section appears in the single events sidebar, go to MEC Settings > Single Event > Sidebar and enable the speaker’s option.
Click here to read more about Modern Events Calendar single sidebar.
Then you can search for your speaker’s name under the Speakers section of your event settings page (just like a tag).
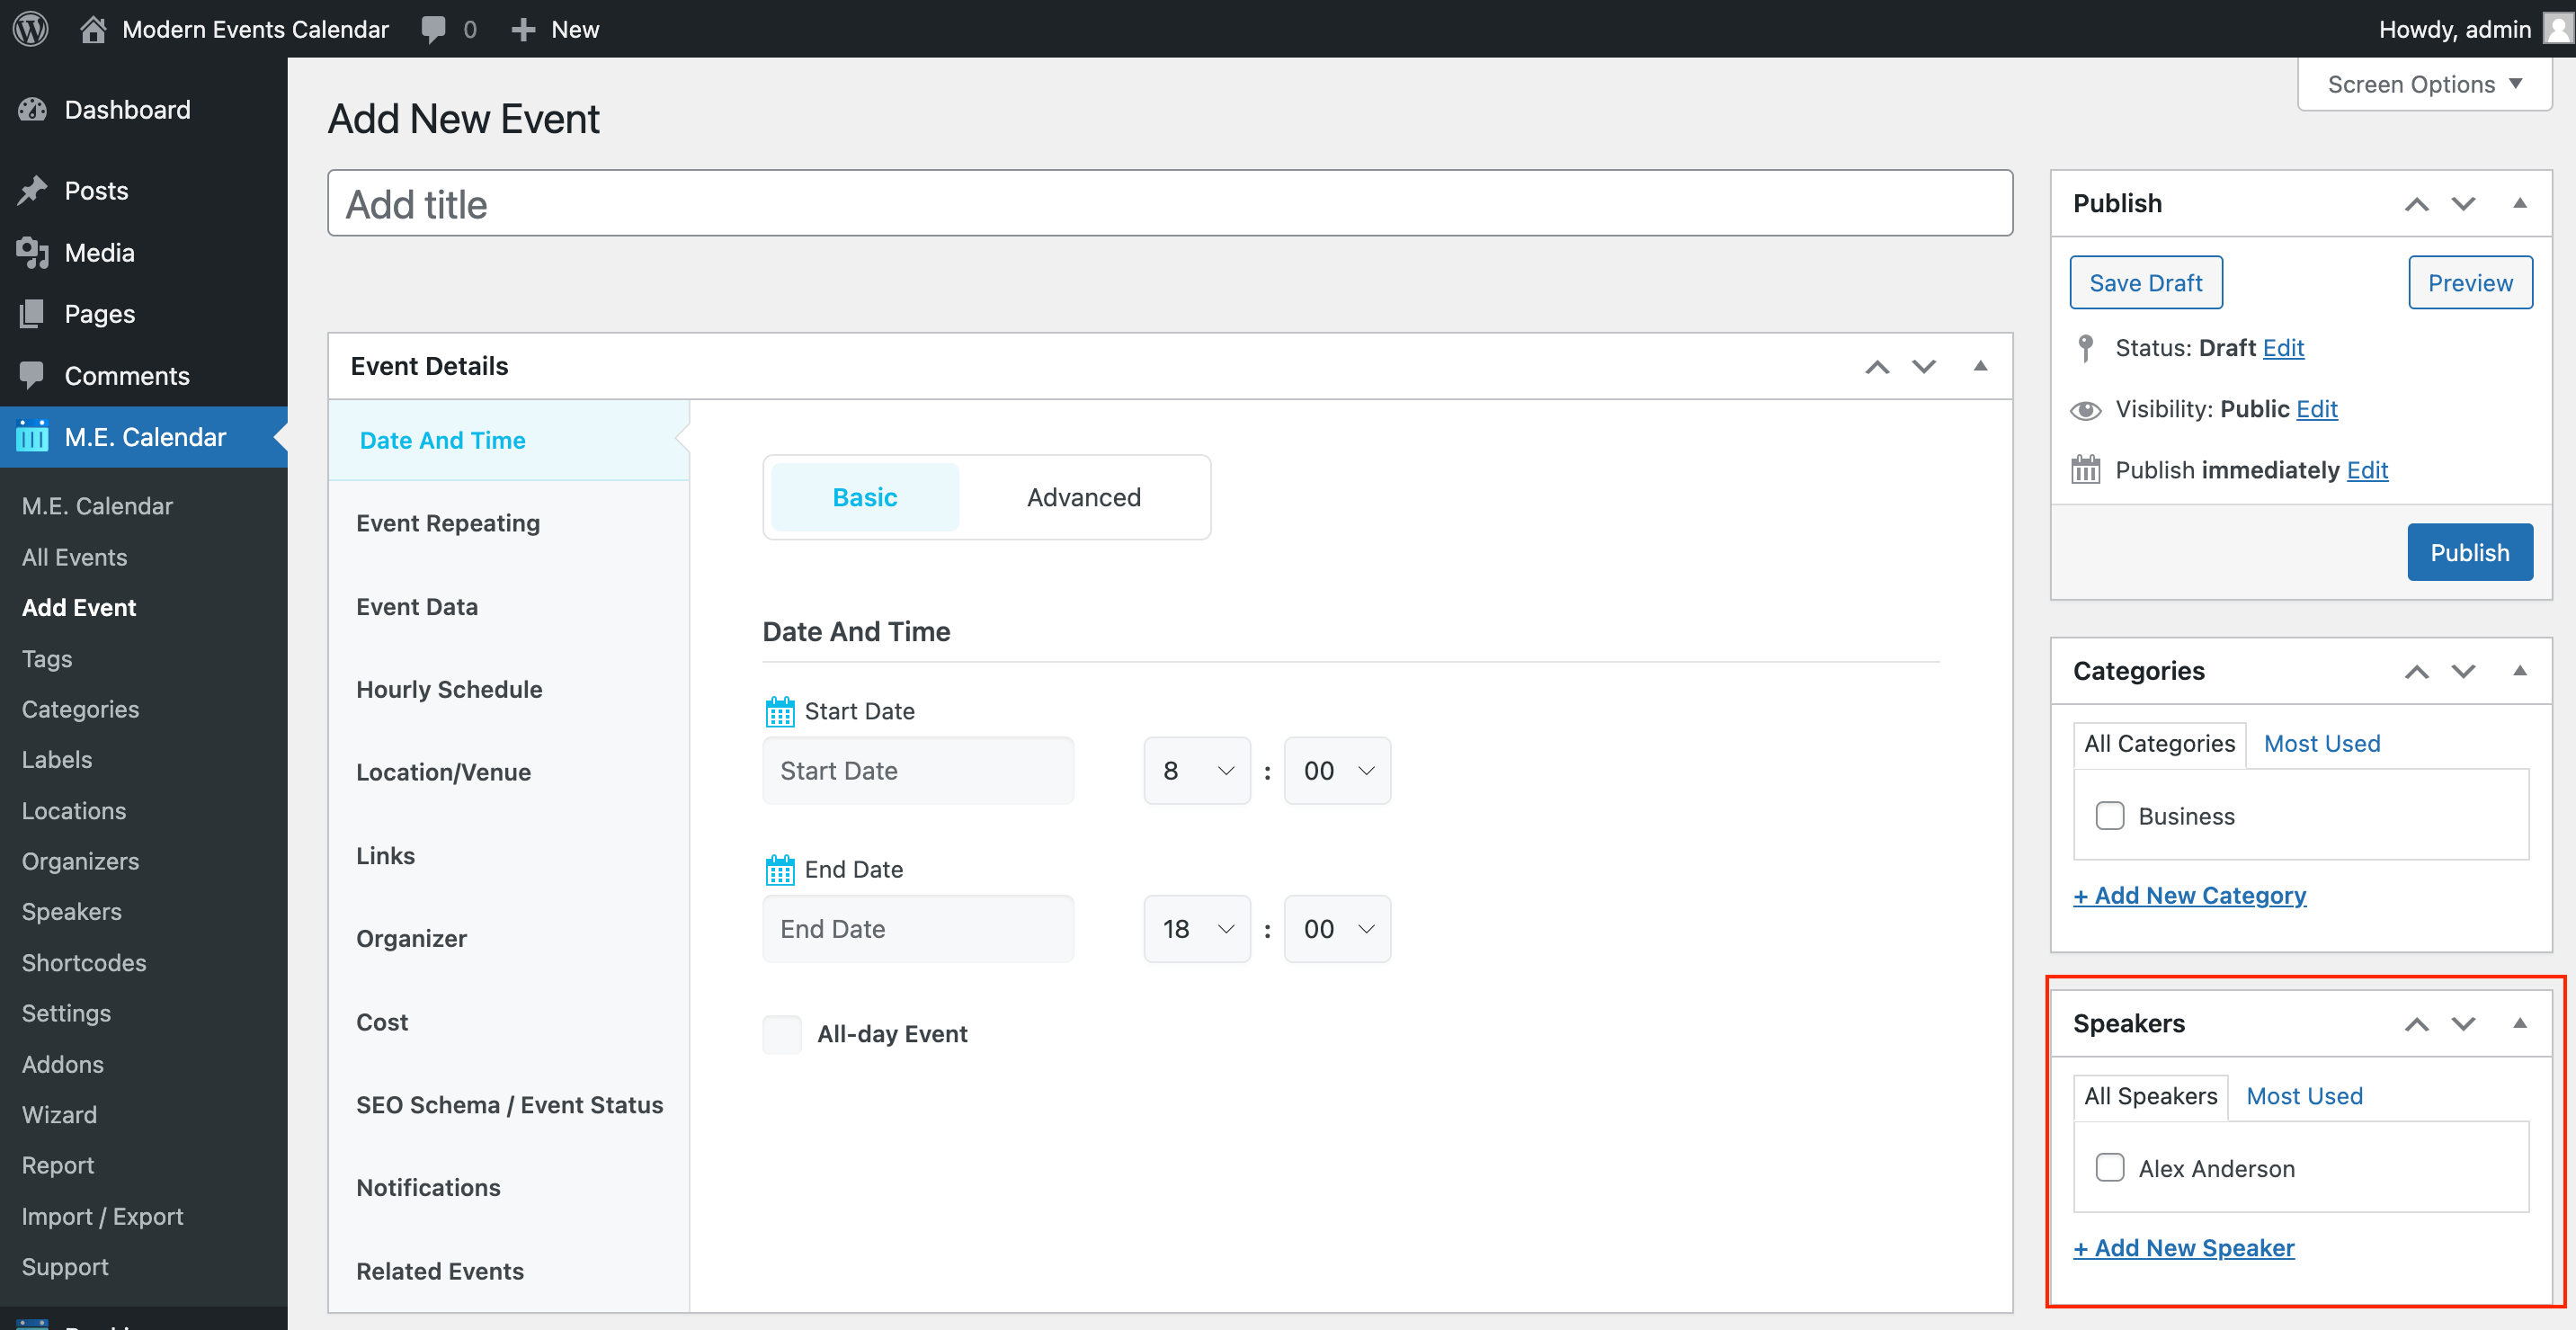
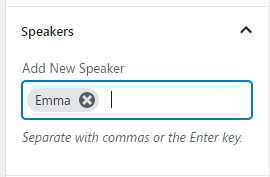
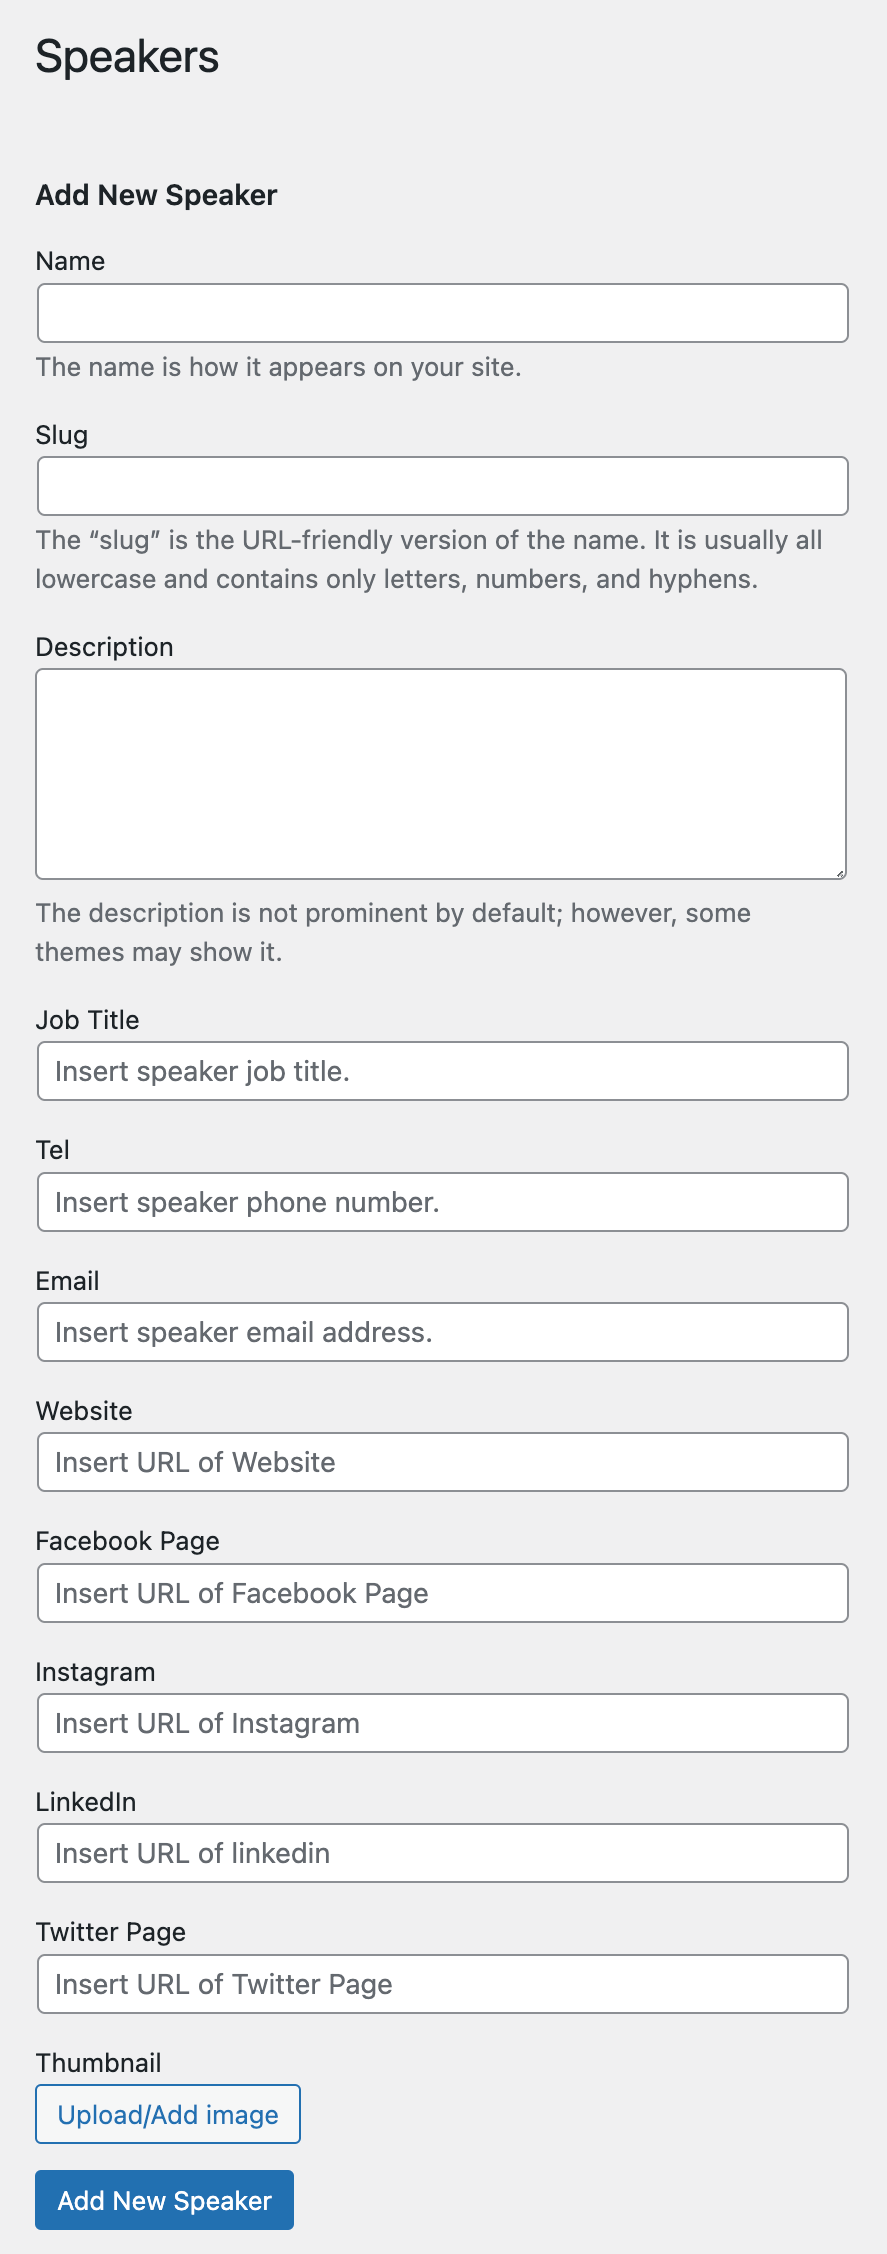
Add / Edit Speaker
Every speaker has the following fields shown in the images:
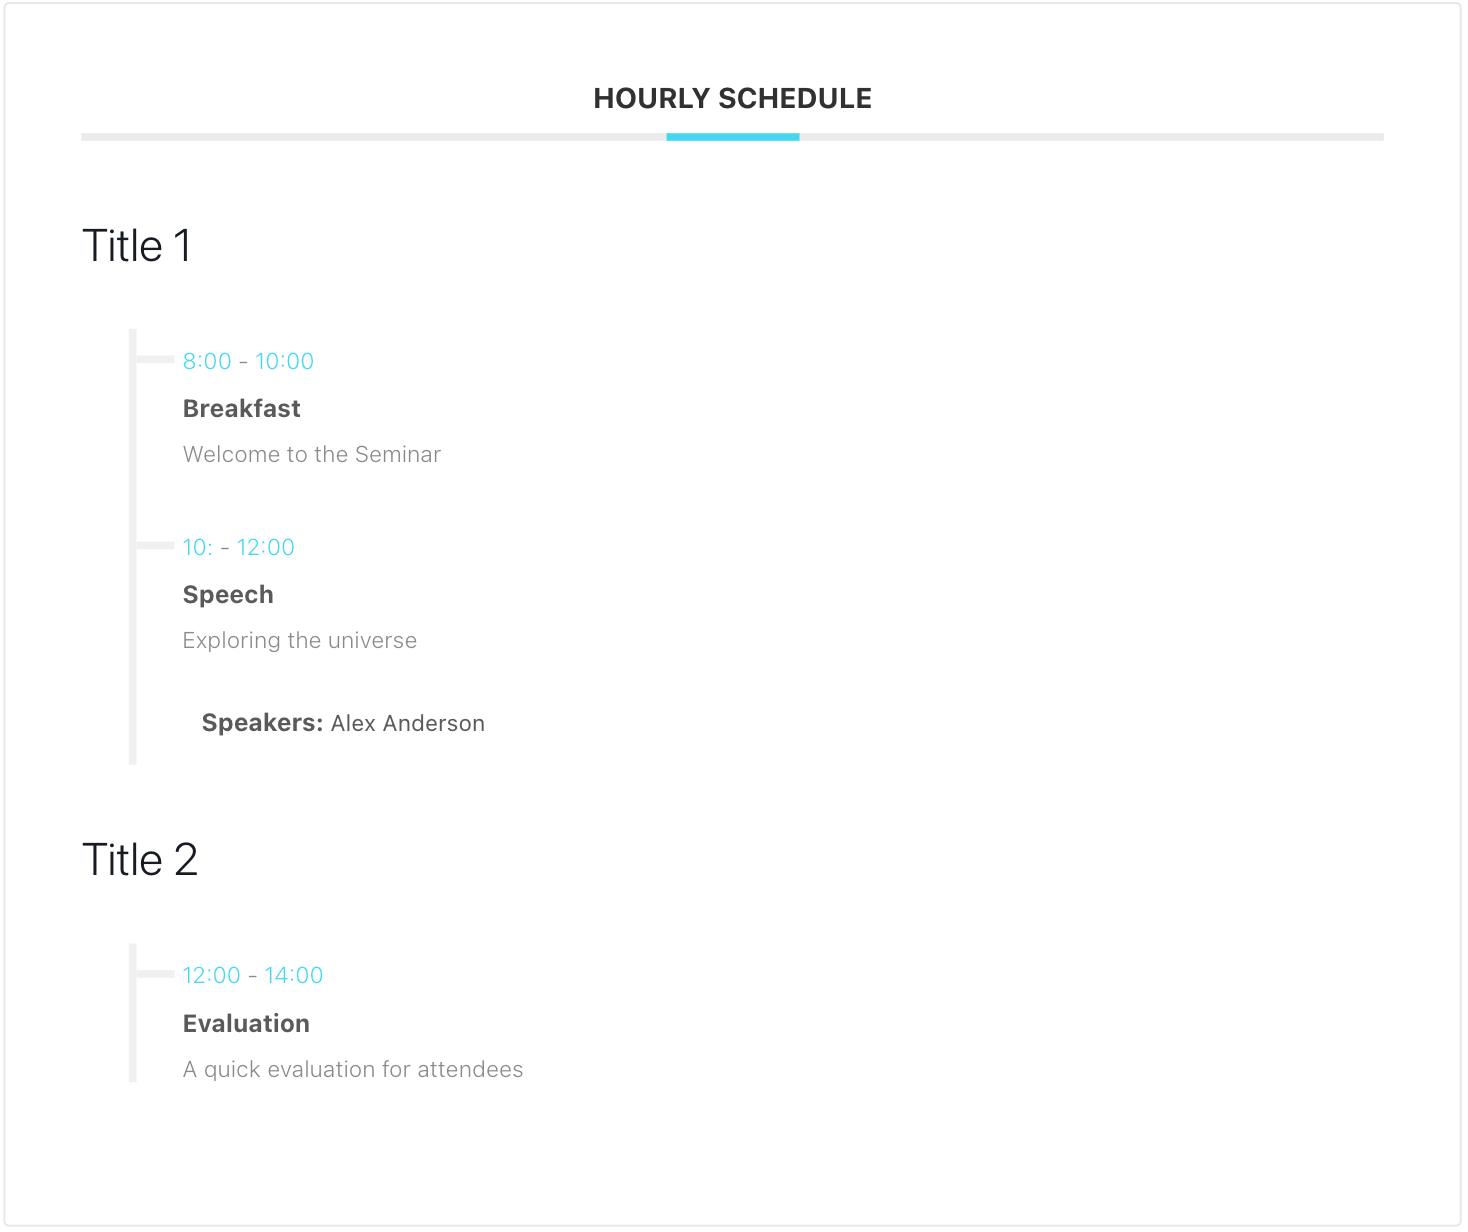
Hourly Schedule
You will also see this option in the hourly schedule menu so that you can add more precise and applicable time frames to the single event.
Organizers
If your event has a specific organizer, then you can easily set it up through this option. You can also add multiple organizers.
How to Add Organizer to An Event in MEC
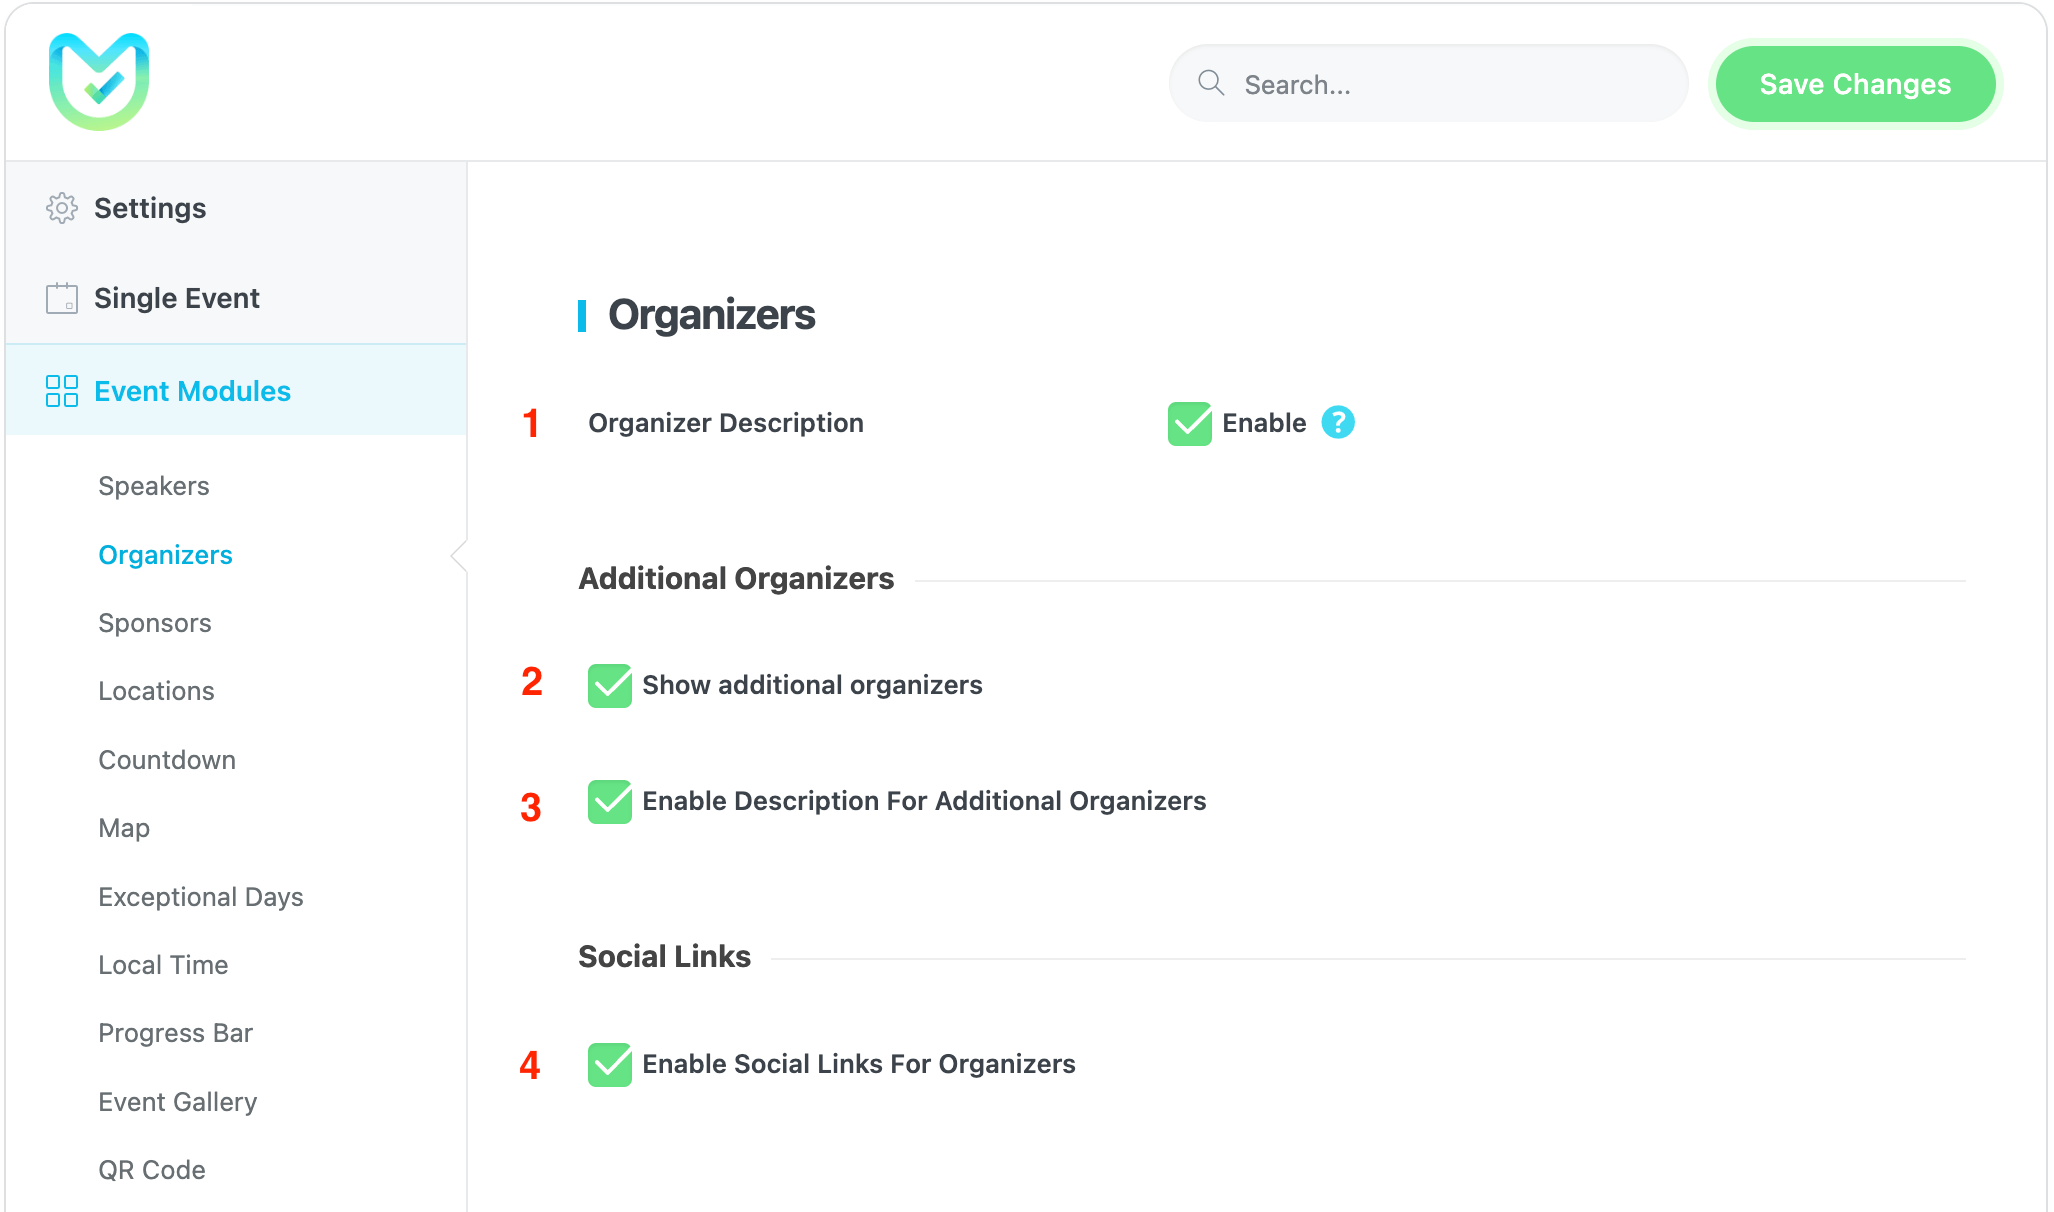
You need to enable the additional organizer option by going to MEC Settings > Event Modules > Organizers:
1. Organizer Description: Enabling this option will add the organizer description textbox to the organizer’s edit page.
2. Show additional organizers option on Add/Edit Events page and Single Event page: This option will display an additional organizer on your single event page.
3. Enable Description For Other Organizers: With this option, you can display additional descriptions for the organizers.
4. Enable Display Social Links For Organizers: This option will display the social media links for other organizers.
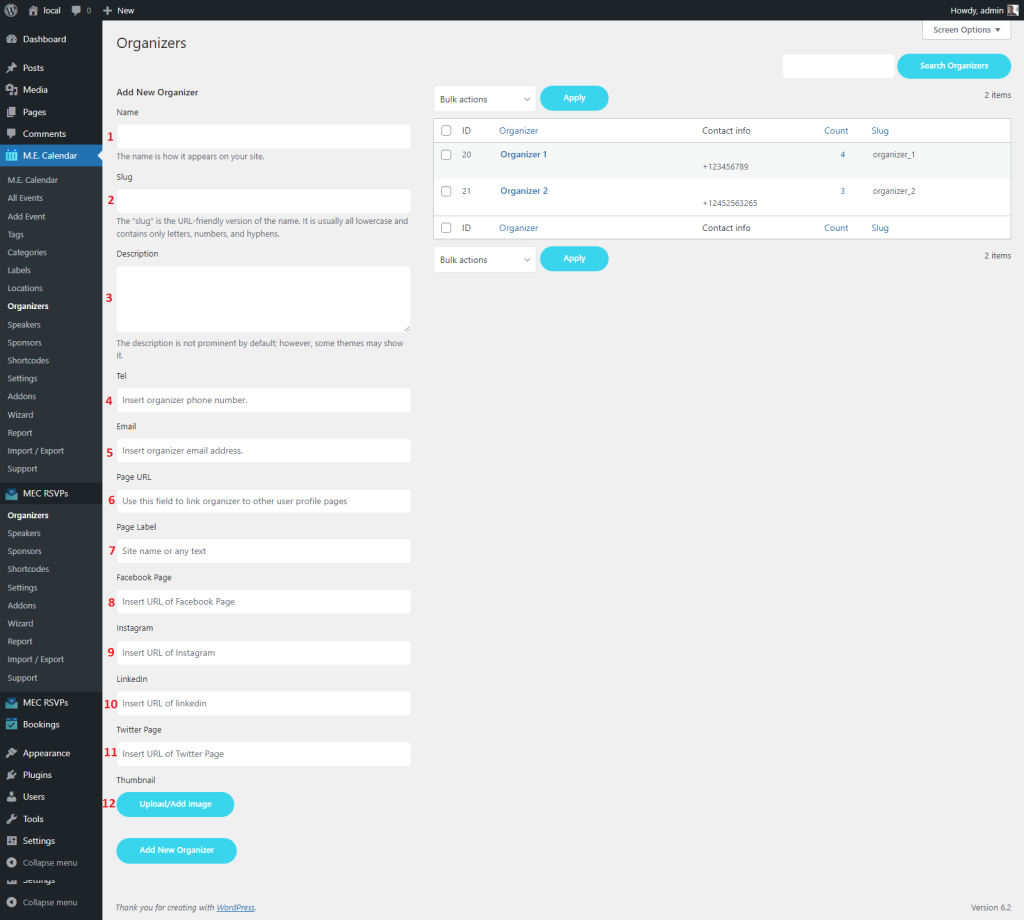
You need to follow the steps below to add an organizer:
1. Enter your organizer’s name in this field.
2. Fill out your organizer’s slug (permalink) here.
3. Description for organizer: To enable this option in the event, you need to enable MEC Settings > Event Modules on the single event settings. You can also navigate to the additional organizer tab to enable this item for additional organizers.
4. Put your organizer’s phone number in this field.
5. Fill out the organizer’s email.
6. Organizer’s page URL (which you can create separately) or any other link.
7. Organizer’s Page Label or any other text.
8. Organizer’s Facebook page URL.
9. Organizer’s Instagram page URL.
10. Organizer’s LinkedIn URL.
11. Organizer’s Twitter page URL.
12. Upload the organizer image.
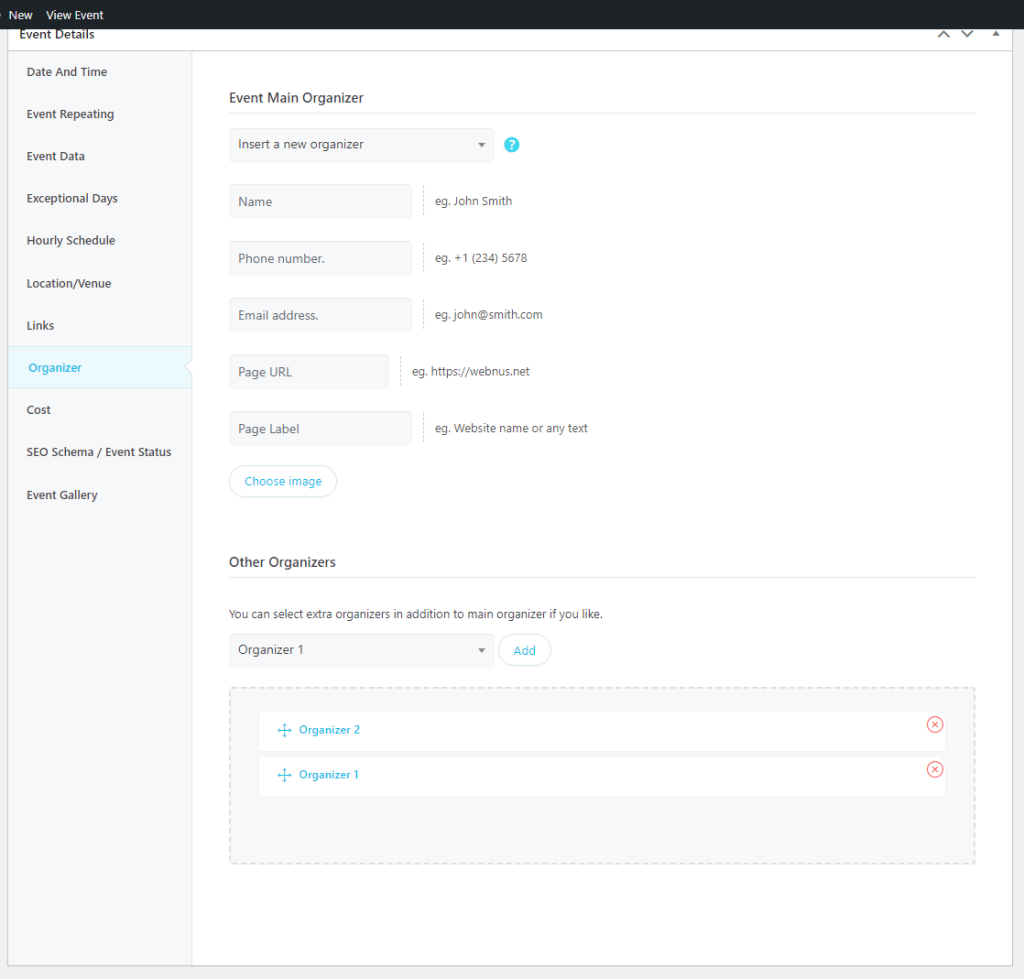
Follow the instructions to assign your organizer to your event:
- To set an Organizer in a single event, navigate to the Organizer tab and set up an Organizer for your event from the list.
- You can choose in the same way for the additional organizers.
- You can also create an Organizer with the information above for the Event Main Organizer.
- Front-end Event Submission works in the same way as above.
- This is also how it is displayed in the events.
- You can also sort the organizers in this section.
Or to insert a new organizer:
You can change the ordering of the additional organizer’s list with drag and drop. The organizer’s section on the single event page should look like this:
Additional Organizers
You can insert your additional organizers by going to Single Event Edit Page > Event Details > Organizers > Other Organizers.
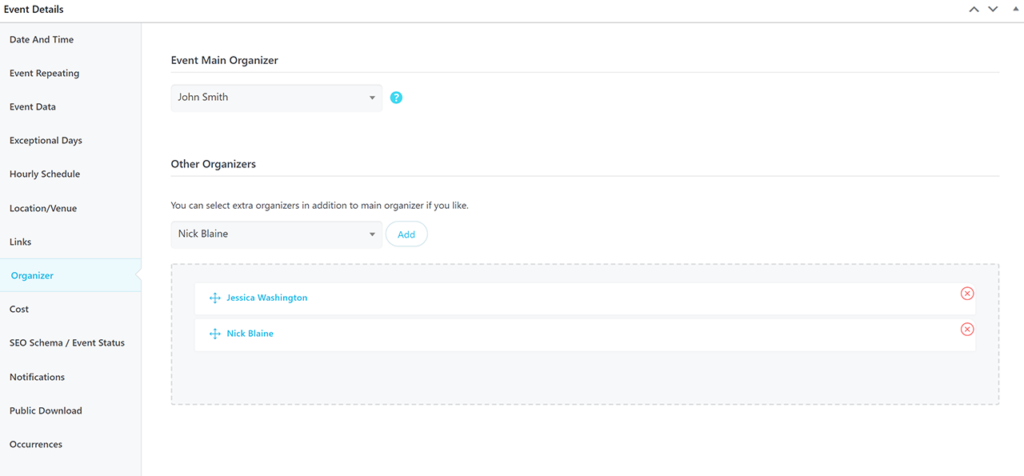
Your additional organizers will be shown as follows on your single event page:
Sponsors
By enabling this feature from MEC Settings > Event Modules > Sponsors, you will be able to add single or multiple sponsors to your event.

After enabling and saving the settings, you should reload the page to see a new menu in the WP Dashboard > MEC.
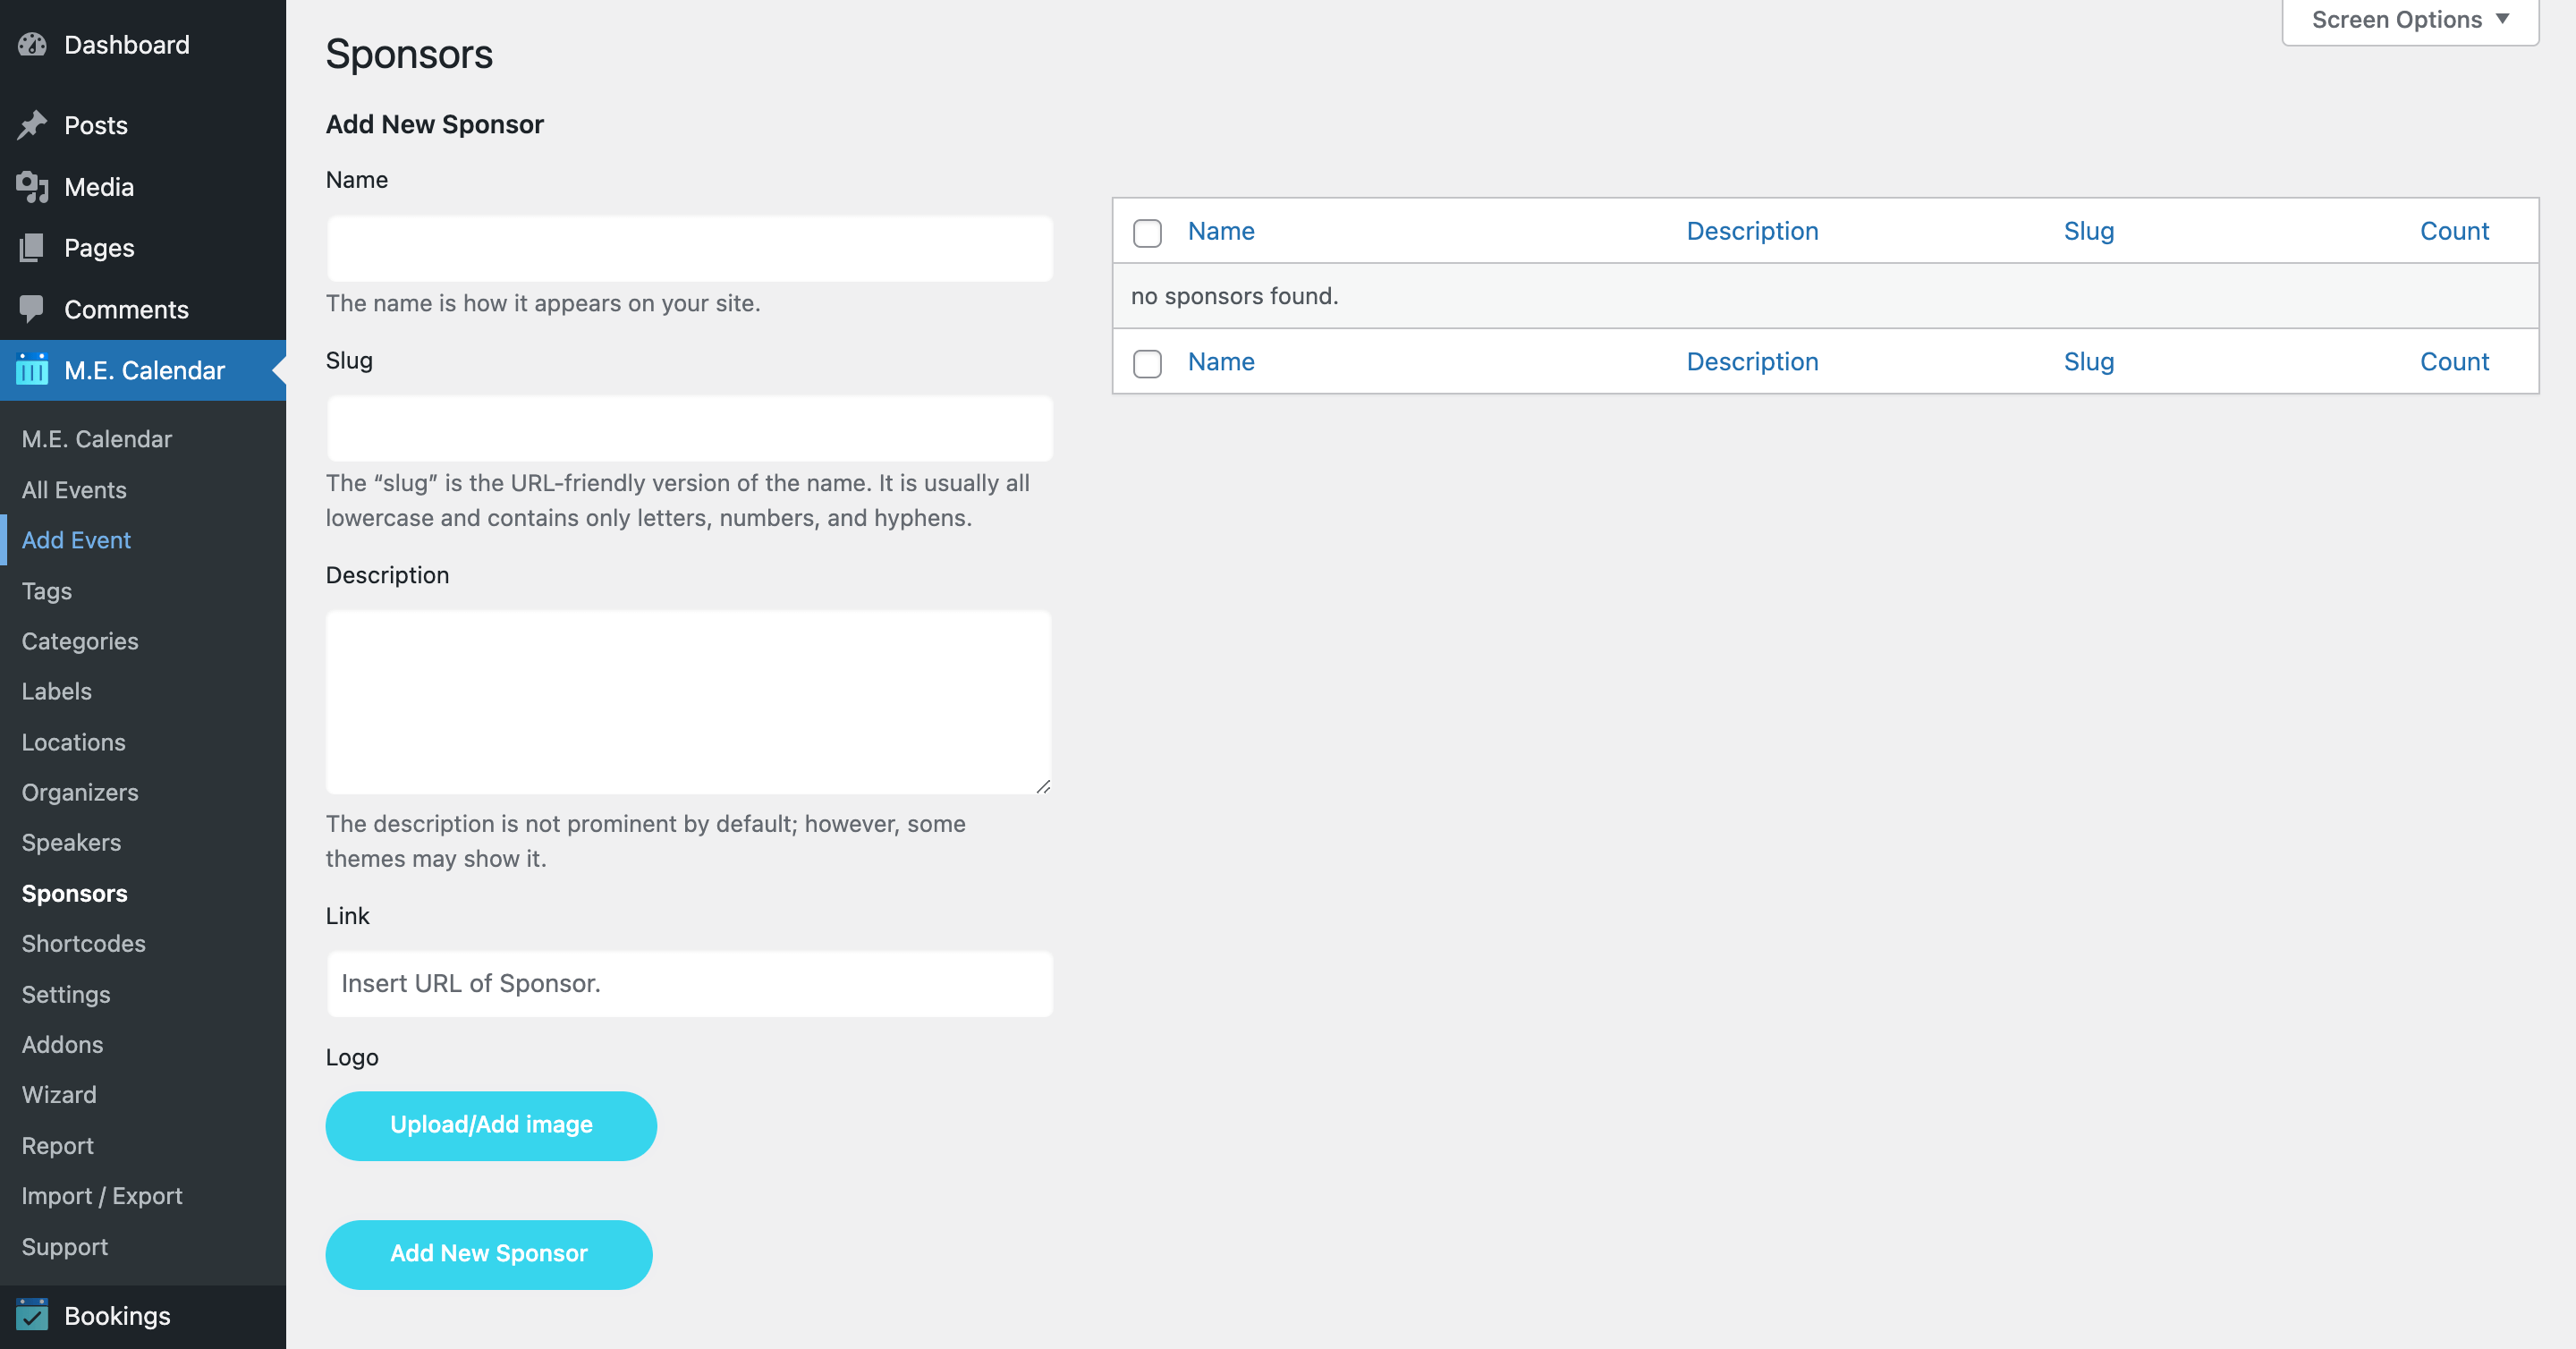
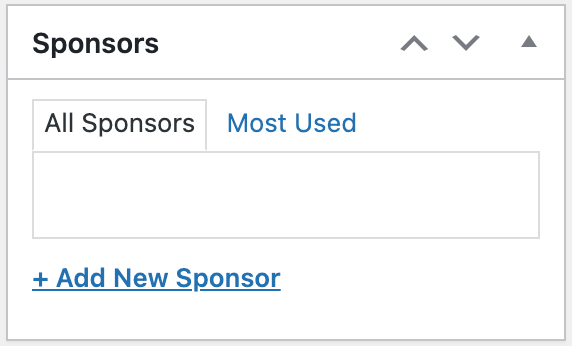
You can add the sponsors here with their names, descriptions, links, and logos. However, it is possible to add the sponsors directly from the single event edit page as well.
Locations
The location section of the Modern Events Calendar is very simple and easy to use. Here we will explain how to add a location and use it multiple times for different events.
This section also includes an important field (Address) for those who want to set up Google Maps API in their event. Of course, if you want to set up an event quickly, you have several options for configuring the location section of each event.
How to Create and Use Location in Modern Events Calendar?
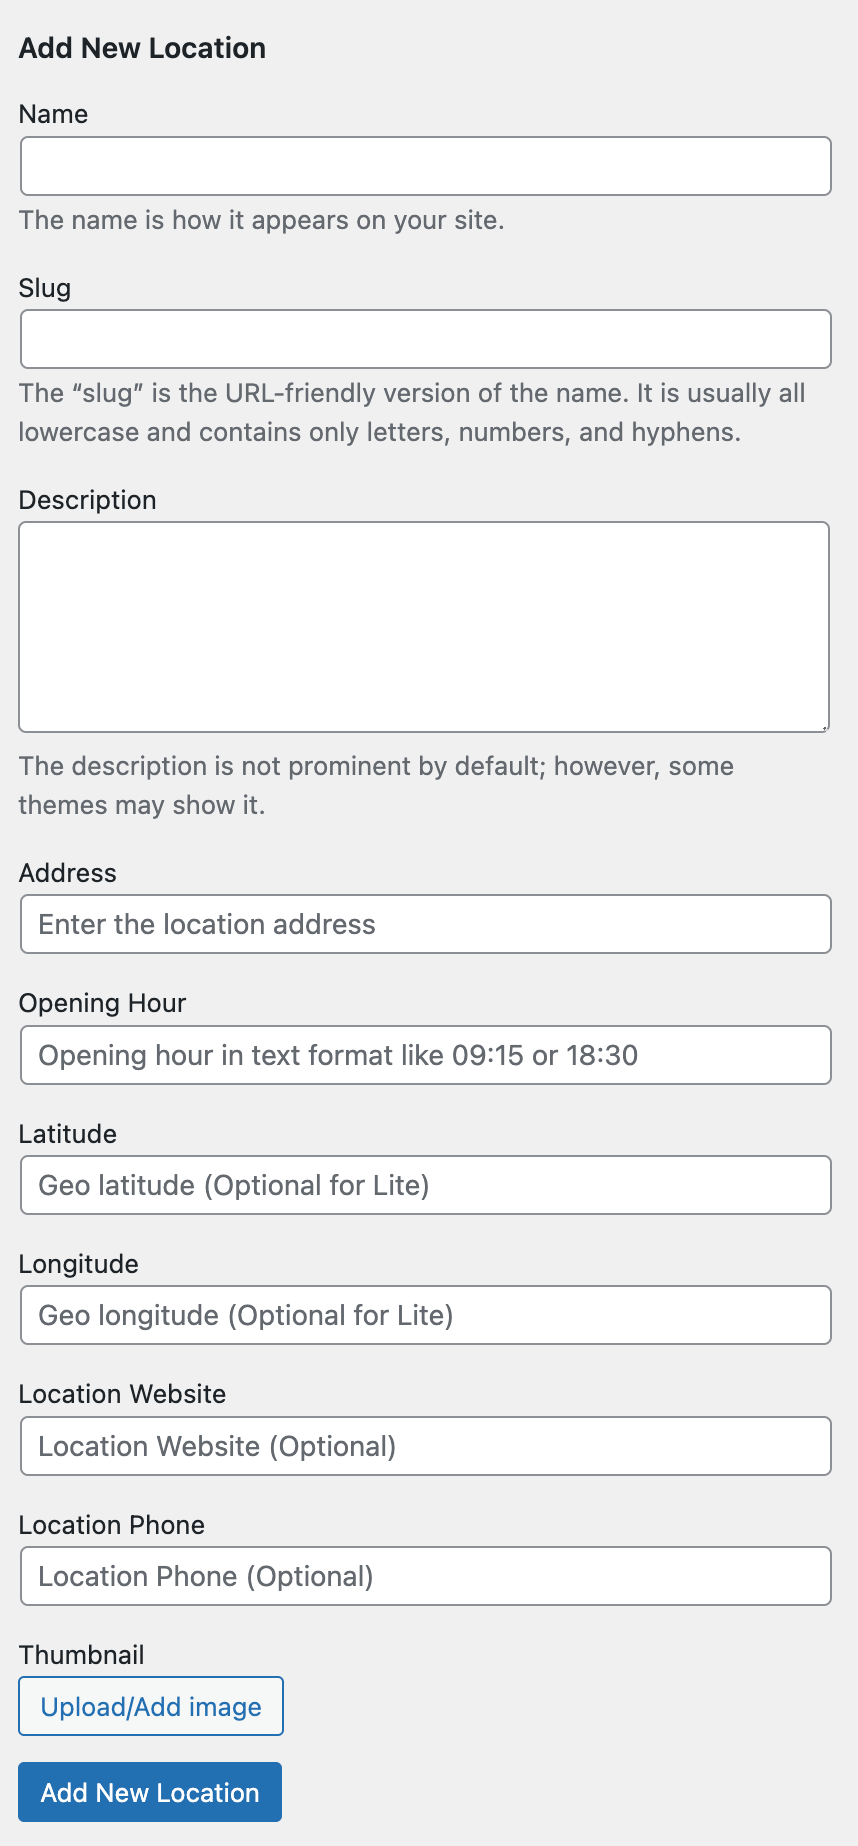
1. Enter your location name.
2. Enter a slug for your location.
3. Enter the description of your location here.
4. Google key, which should be configured in settings, will be using this address to show the map on the front end.
Note: To auto-suggest an address, you should make sure to set the correct Google Map API.
After adding the location to the Location Menu, you can assign it to your desired event.
You can also enter a new location in the event post type manually. Just click on a drop-down and select Insert New Location, as the following example:
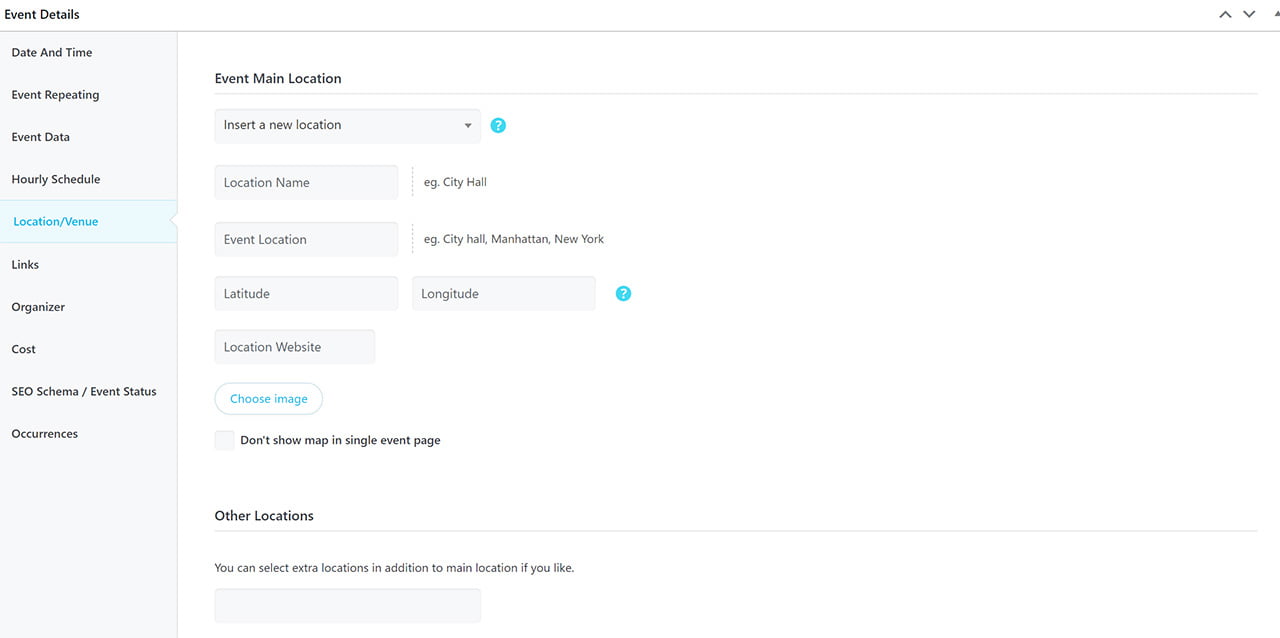
5 & 6. Latitude/Longitude will be filled automatically if you use the Google Map module.
7. Enter your location’s website here.
8. You can set a thumbnail for your location using this option.
There is another way to add a new location. You need to use the Insert New Location option under the Location/Venue tab in Event Details of your single event settings.
Note 1: To auto-suggest an address, You should get the Google Map API through the description of this article. Also, If you need to use OpenStreetMap, note that this feature is not available in MEC PRO, but, you can do this by using Advanced Map Addon and changing the map.
Note 2: You can use the optional Latitude and Longitude fields to record the geographic location of your event. You can also use this free online service to get these coordinates.
Additional Locations
To activate the Additional Locations feature, you need to go to MEC Settings > Event Modules > Locations and activate the Show Additional Locations option on Add/Edit events page and single event page option.
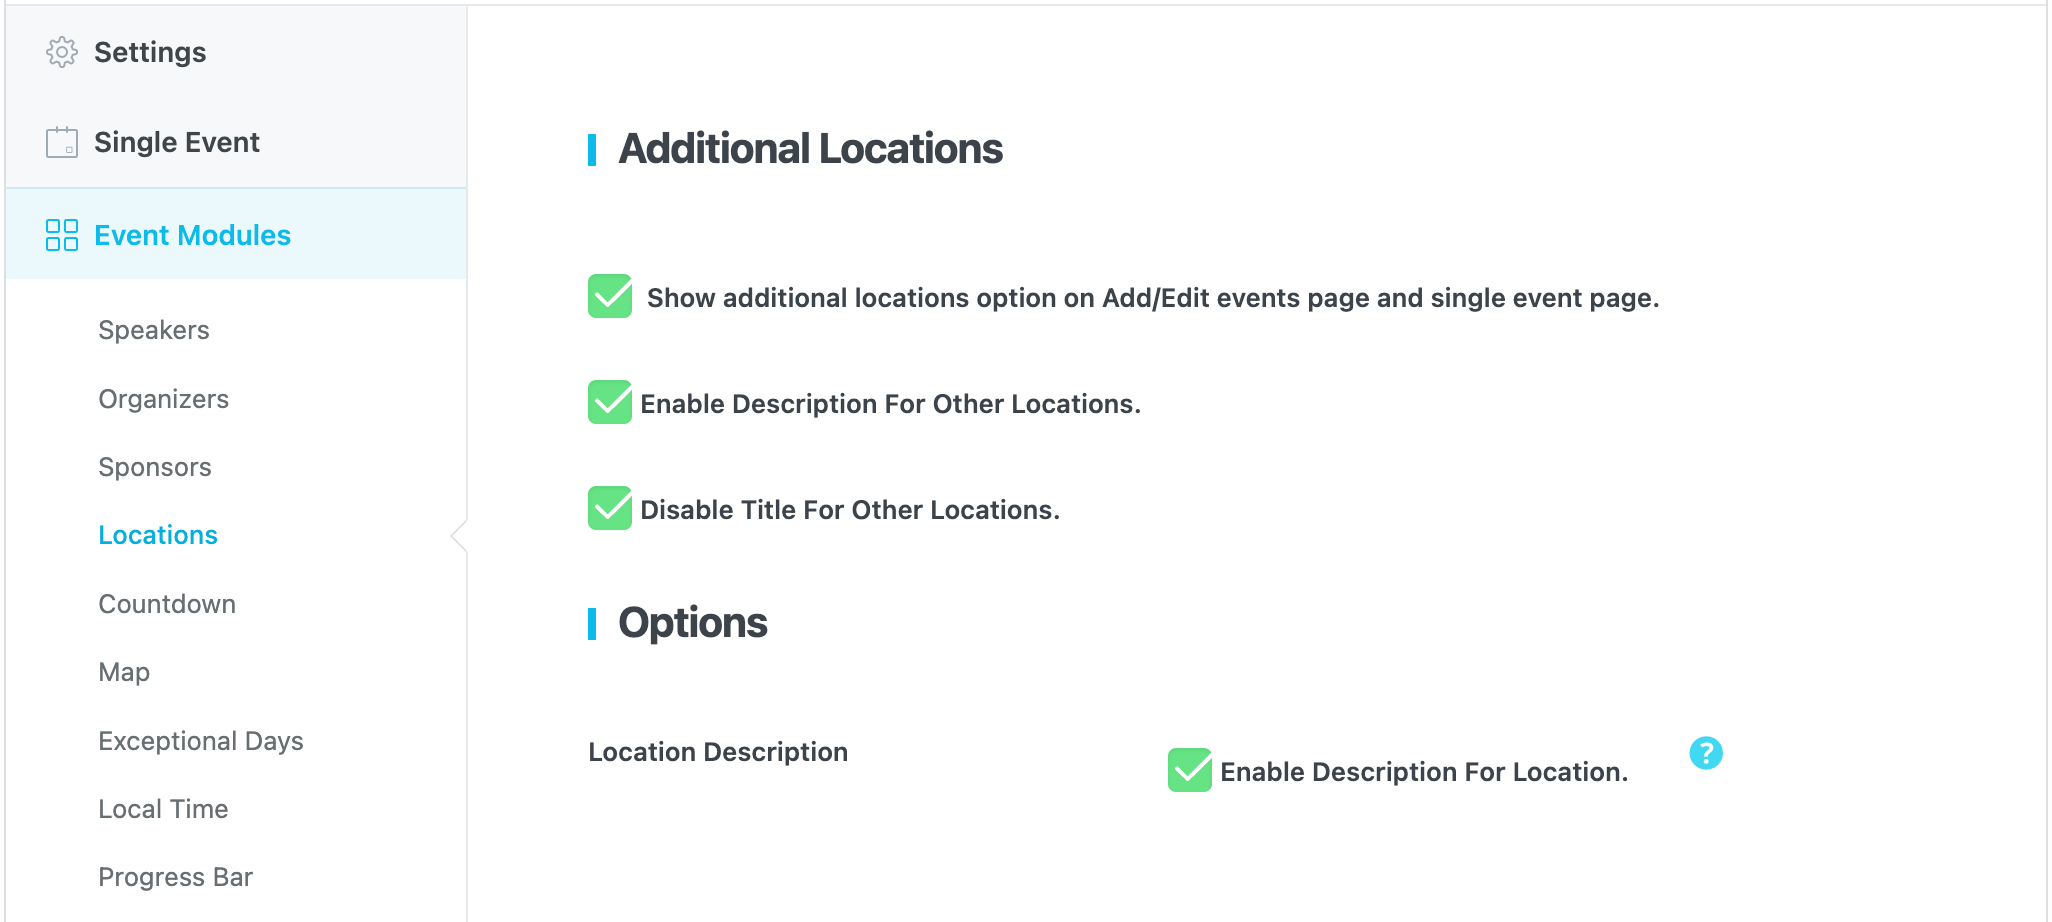
After enabling it, you can enter your additional locations by going to Single Event Edit Page > Event Details > Location/Venue > Other Locations.
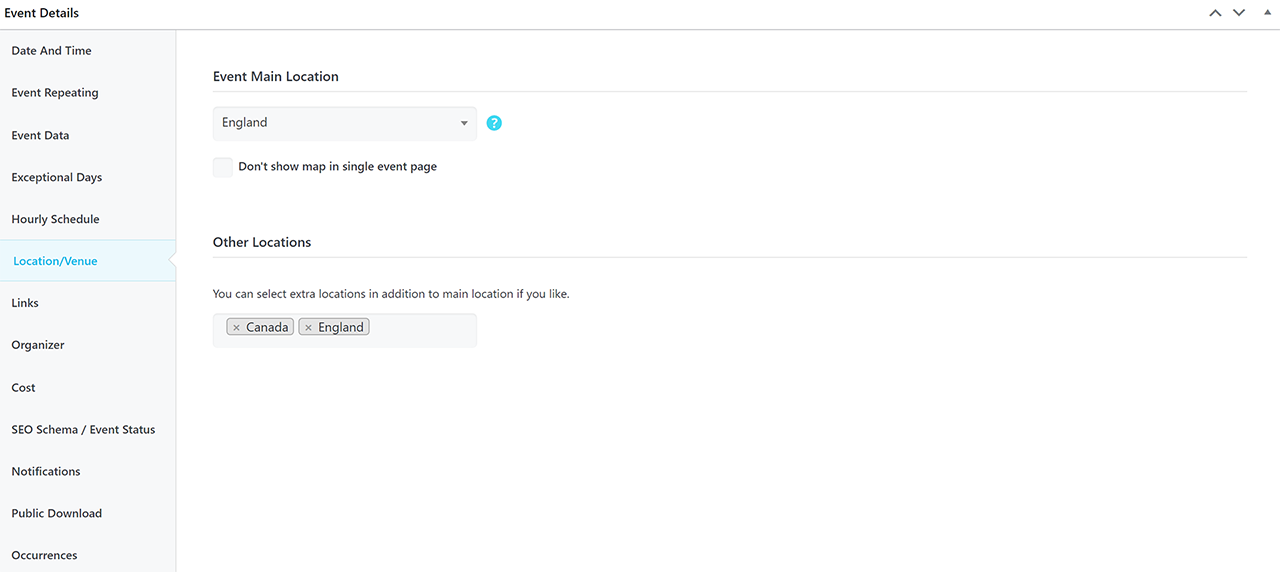
Your additional locations will be shown as follows on your single event page:

Location Description
You can display a description of your locations by enabling this option. (If you also want to add a description for additional locations after activation please save the settings and refresh the page afterwards, then navigate to the additional locations tab)To access custom fields on the frontend event submission form, go to MEC Settings and select Frontend Event Submission. Then, navigate to FES Sections and enable Event Data Fields. This will give you access to the custom fields you’ve created. To access custom fields on the frontend event submission form, go to MEC Settings and select Frontend Event Submission. Then, navigate to FES Sections and enable Event Data Fields. This will give you access to the custom fields you’ve created.
Countdown
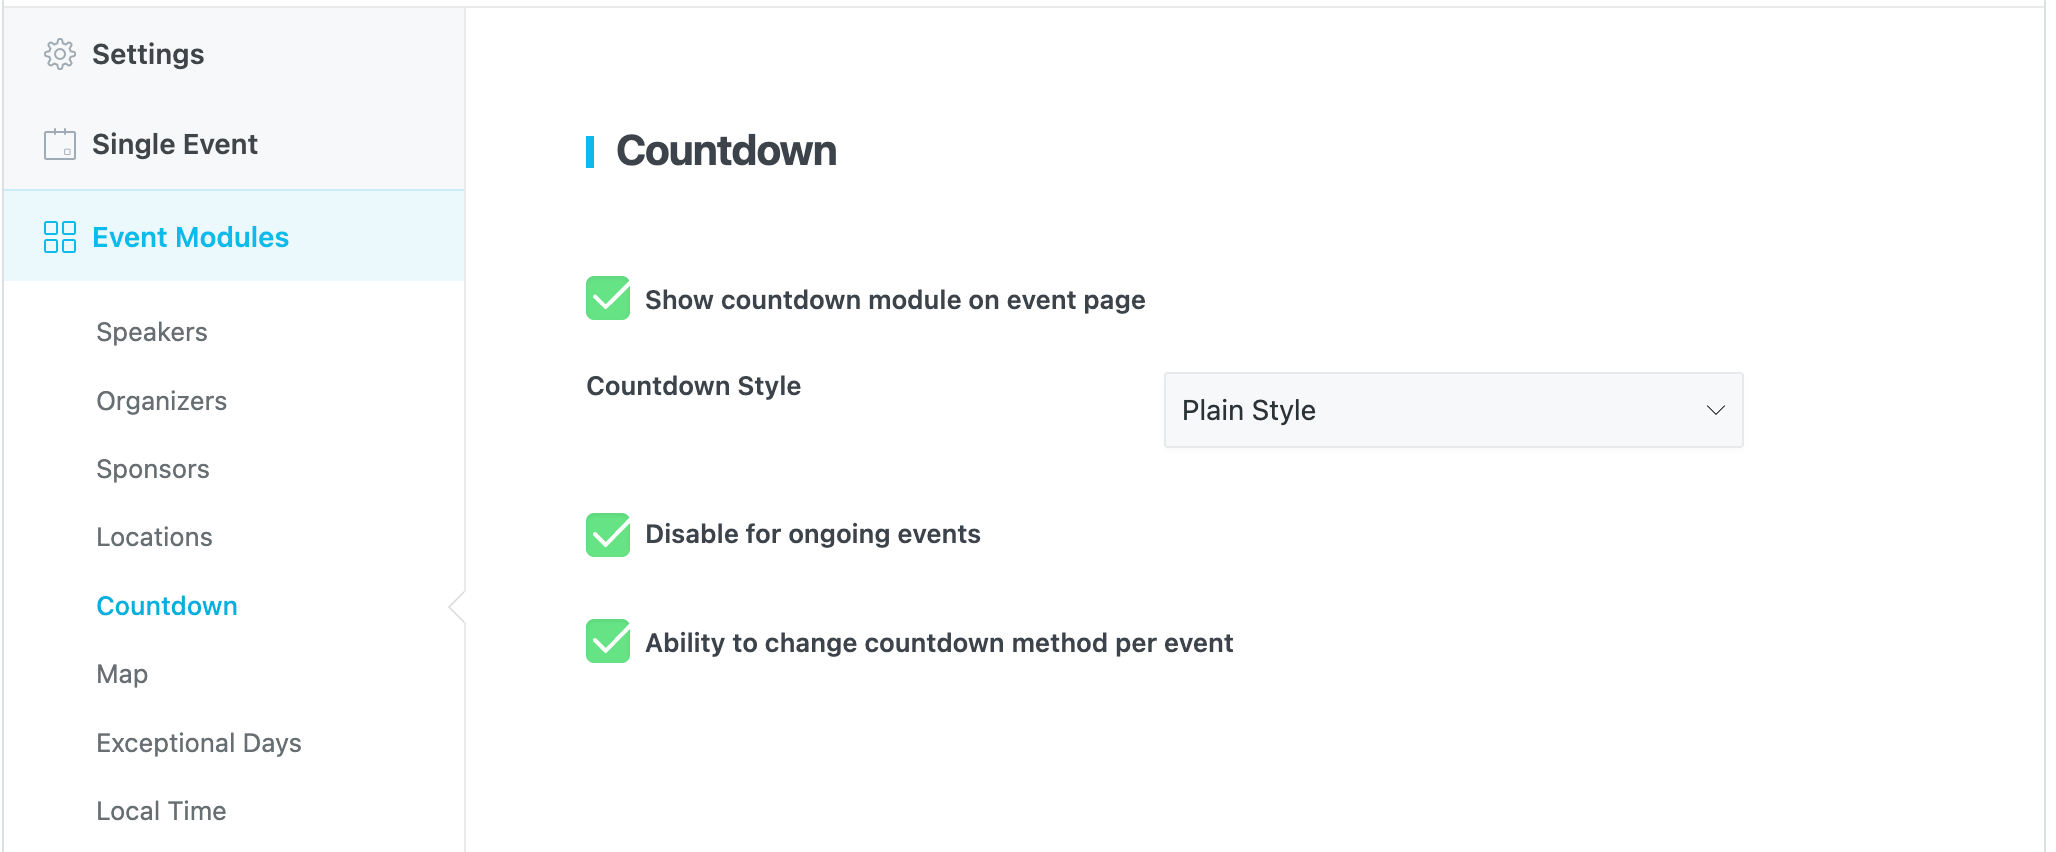
Using countdown options and its widget, you can bring more attention to certain programs and their timeline. You can enable this feature from MEC Settings > Event Modules > Countdown for every program or event with a simple checkmark. There are two styles that you can choose from: Plain Style and Flip Style.

Map
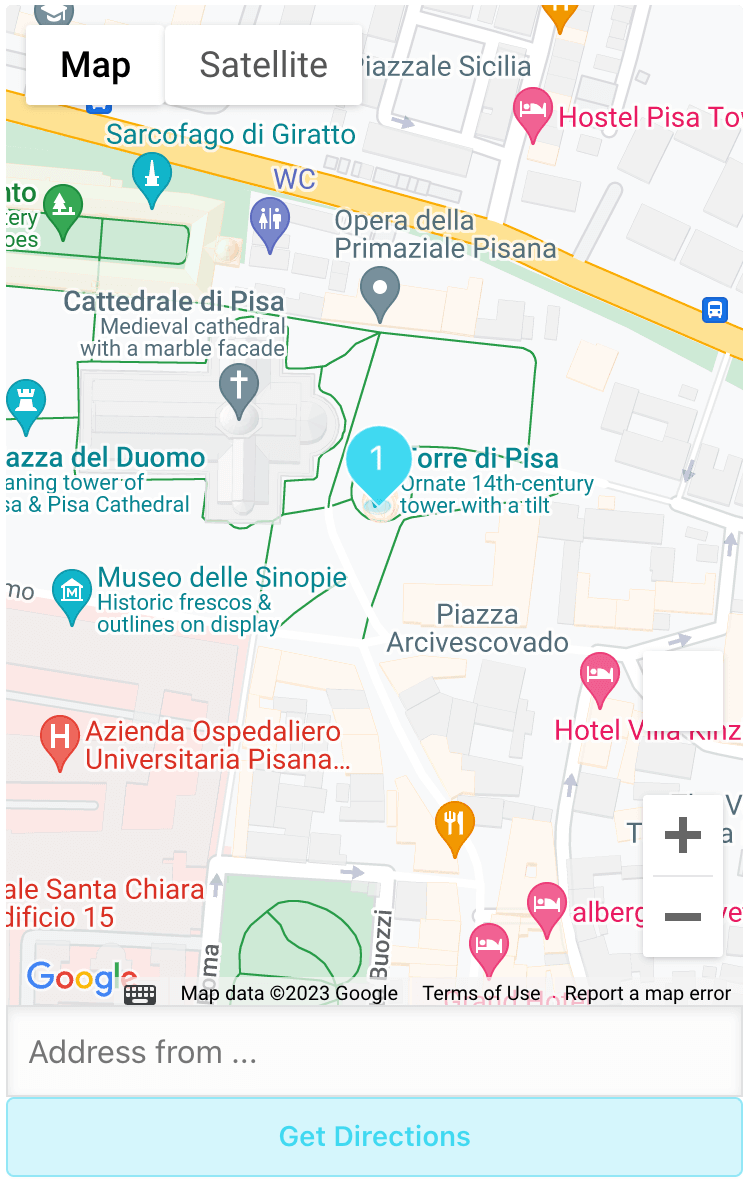
The map module in Modern Events Calendar is set for easy integration with Google Maps. Once the Modern Events Calendar is integrated with it, it will show your event location on a map.
Note: The map module is only available in MEC Pro.
This module needs an API key to interact with Google Maps API and fetch your requested map.
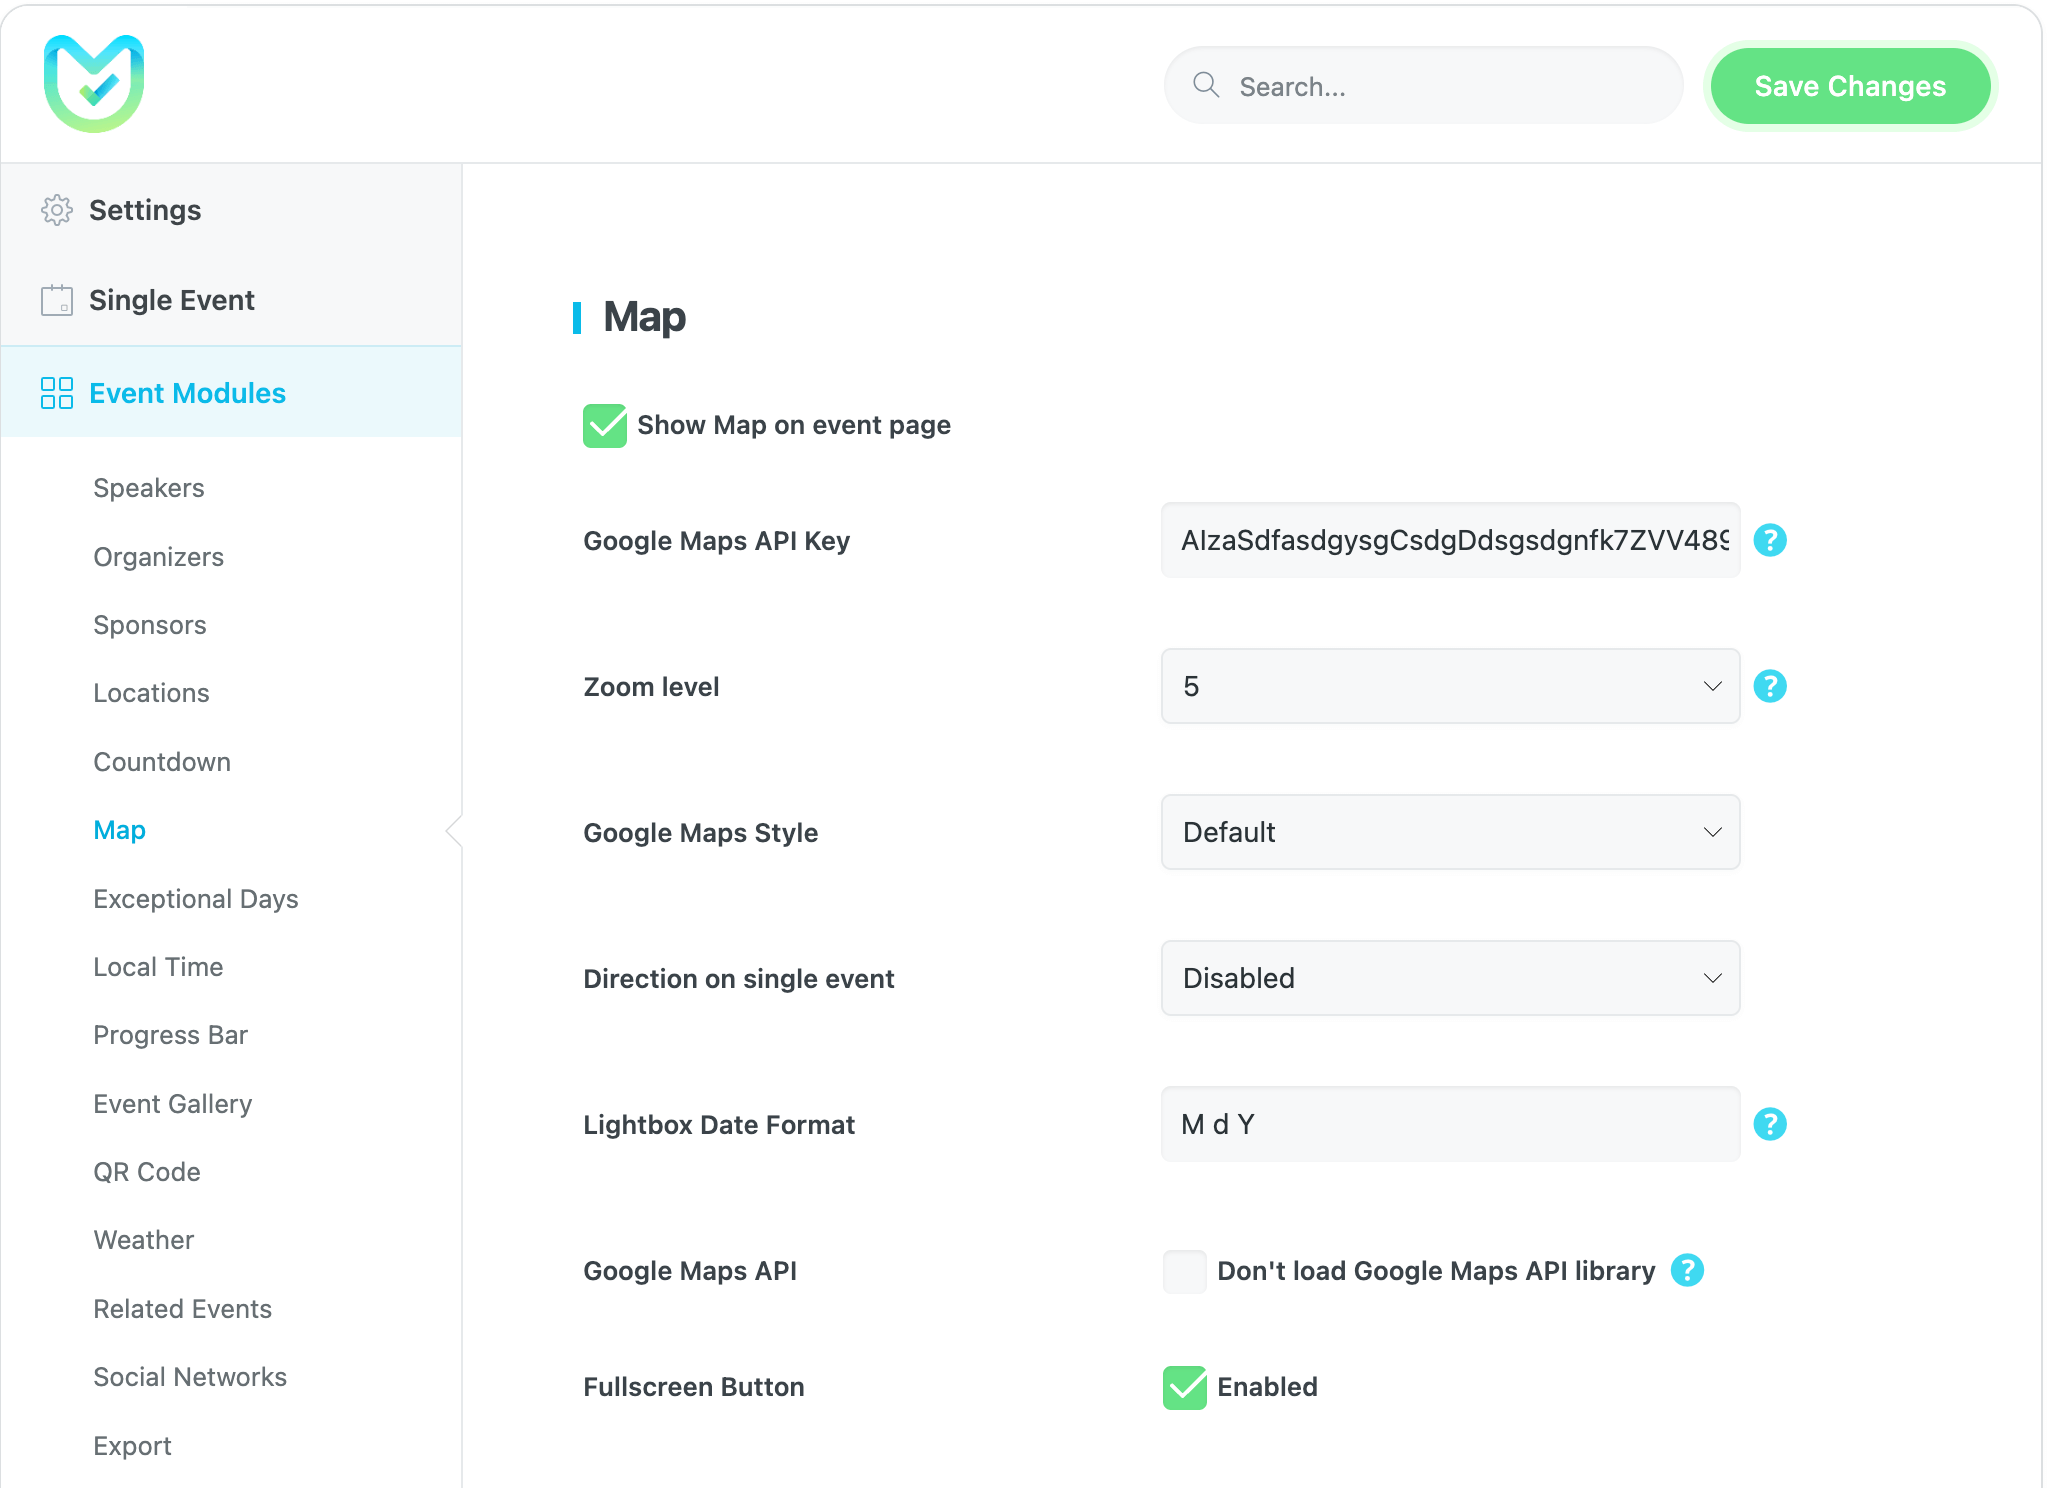
To activate and configure this module, you need to go to MEC Settings > Event Modules > Map and check the Show Map on event page option.
Google Maps API Key
Follow the steps explained in this article in order to receive your Google Maps API key.
- Note 1: You need to enable Maps JavaScript API from Google API Library.
- Note 2: You can enable more APIs from Google API Library, e.g., Place API, Direction API, Geocoding API, Google Calendar, etc. (All in One API)
- Note 3: If you want to use OpenStreetMap instead of Google Maps, you need to purchase and use our Advanced Map addon.
- Note 4: To use GPS coordinates (latitude and longitude), first, you need to enable Google Maps Geocoding API for your API Key and to add GPS coordinates, you can use latlong.net.
You can also use an Address to find it automatically in Google Maps (it works just for enabled Google Maps API).
Zoom level
You can change the zoom level of your map using this option.
Google Maps Style
Set a style for your map to be shown on the single event page. You can find the previews of these styles in this link.
Direction on single event
There are two different styles for showing your exact location on the map.
- Simple Method
- Advanced Method
Lightbox Date Format
Using this field, you can define the date format of your lightbox.
Google Maps API Load
Don’t load Google Maps API library: By activating this option, the Google Maps API library won’t be loaded on your website anymore (this might cause some issues while loading the map).
Fullscreen Button
If you want to have a fullscreen button on your map, you can enable this option.
How to resolve the issue of Google Maps not showing Up In the MEC Plugin Events?
This particular error can have several reasons.
1. Check to see if you have put Google Map API in MEC and settings or anywhere else.
2. Make sure that you don’t have another Google API key in the plugins, your theme, or anywhere else. Please note every site should have only one Google API key. It means if you have put the API in your theme, you don’t need to put it in the setting, MEC, or the plugins.
Note: If you activate Google API on your WordPress plugin or theme by checking this box, MEC will not load API again.
Exceptional days
The Exceptional Days option in Modern Events Calendar is for those events that occur every day of the month or their repetitive schedule requires some days to be excluded
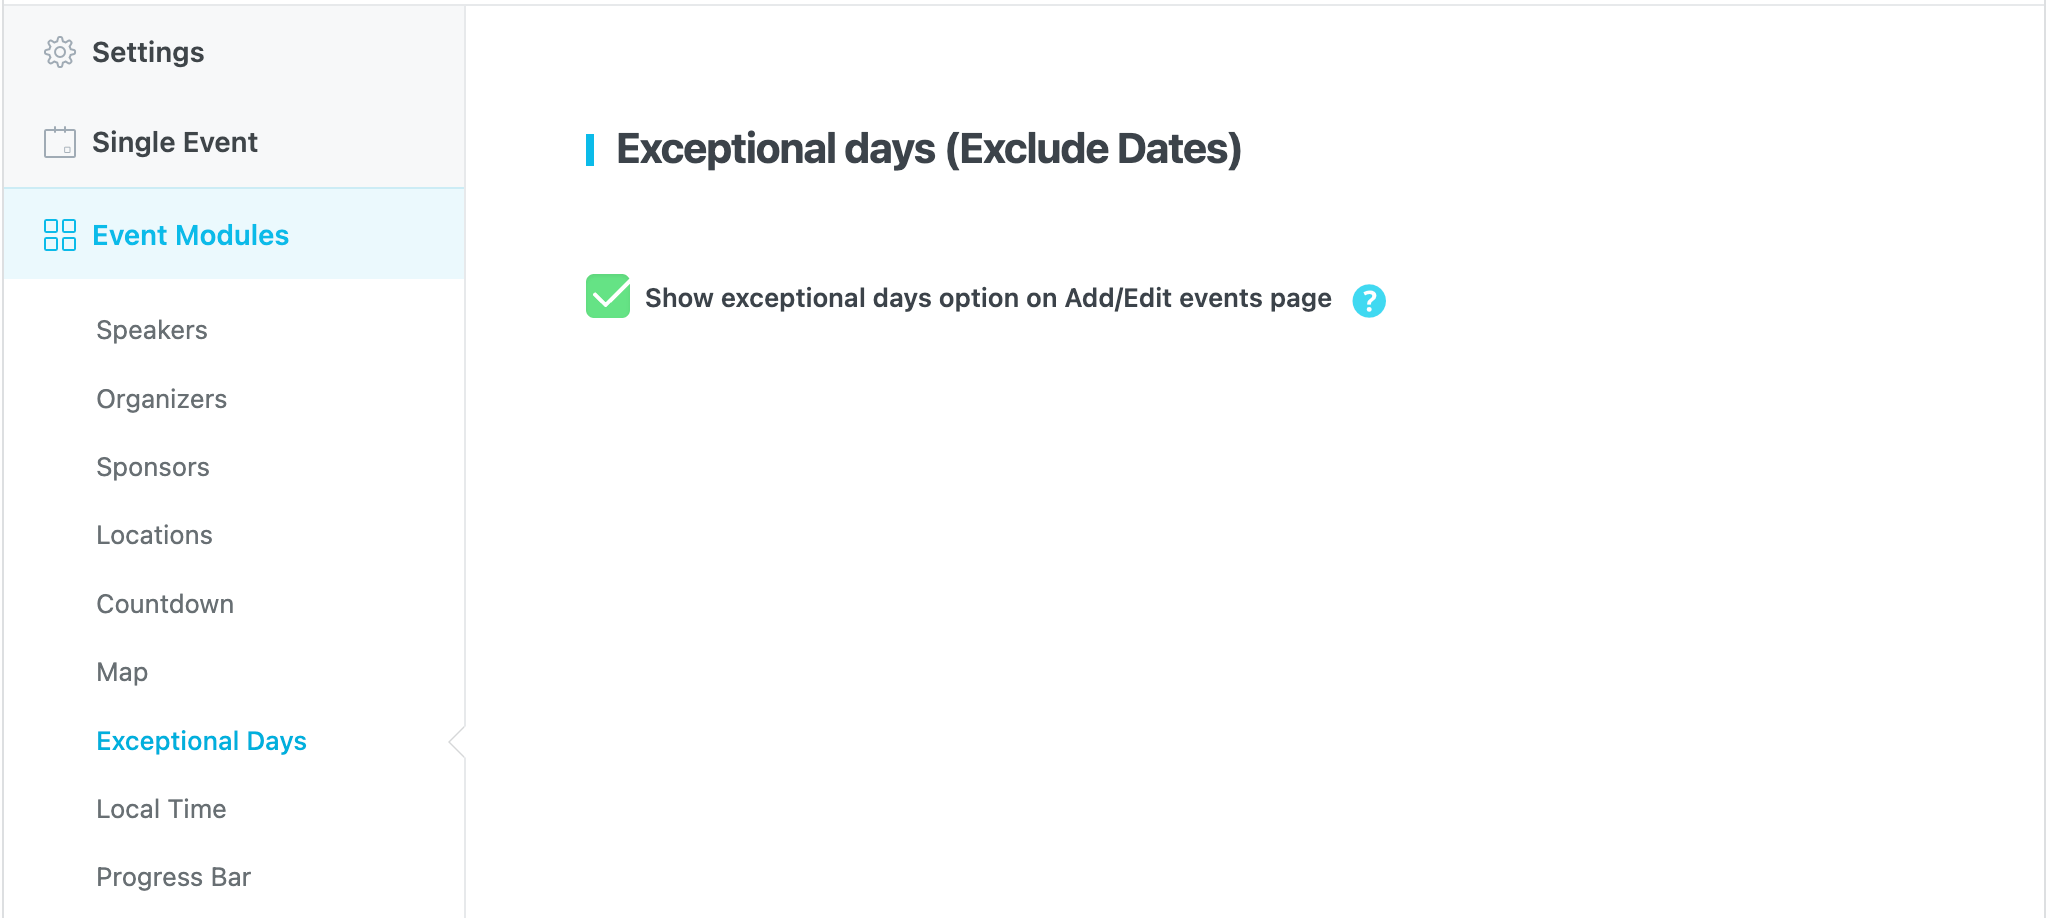
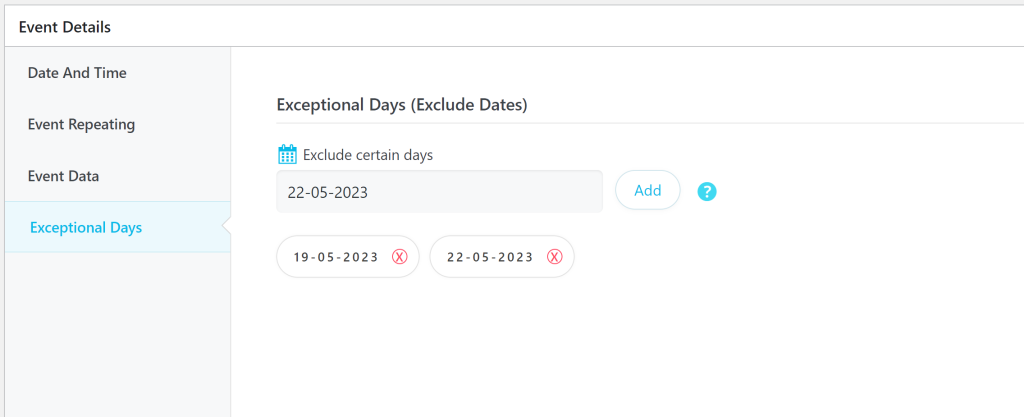
You can enable this option by going to MEC Settings > Event Modules > Exceptional Days and activating the Show Exceptional Days option on Add/Edit events page checkbox. Using this option, you can exclude certain days from the period that your event goes on.
How does it work?
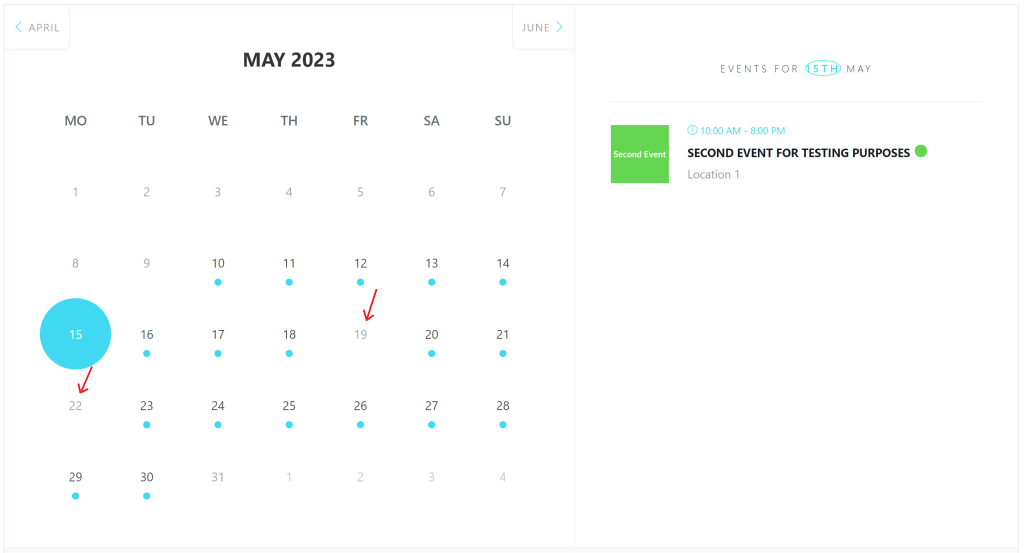
Consider that you have a recurring event that occurs from May 10th to May 30th. But you want to remove two occurrences of that event. May 19th and 22nd.
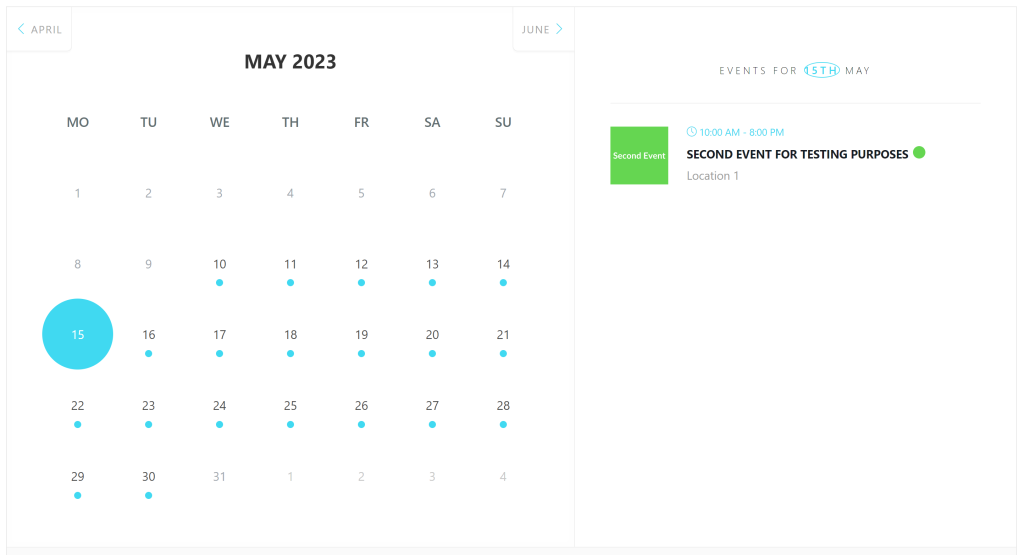
To do so, head over to your event, select the date(s) you want to exclude from the Exceptional Days tab, and then update the event at the end.
Local Time
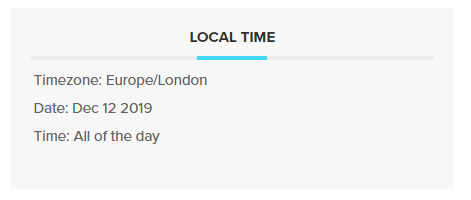
The local Time module in the Modern Events Calendar can be used to let the visitors of your website view your events based on their local timezone. To enable this module, you need to go to MEC Settings > Event Modules > Local Time and check the Show event time based on local time of visitor on event page option.

This will be the preview of the MEC Local Time module on a single event page:
Progress Bar
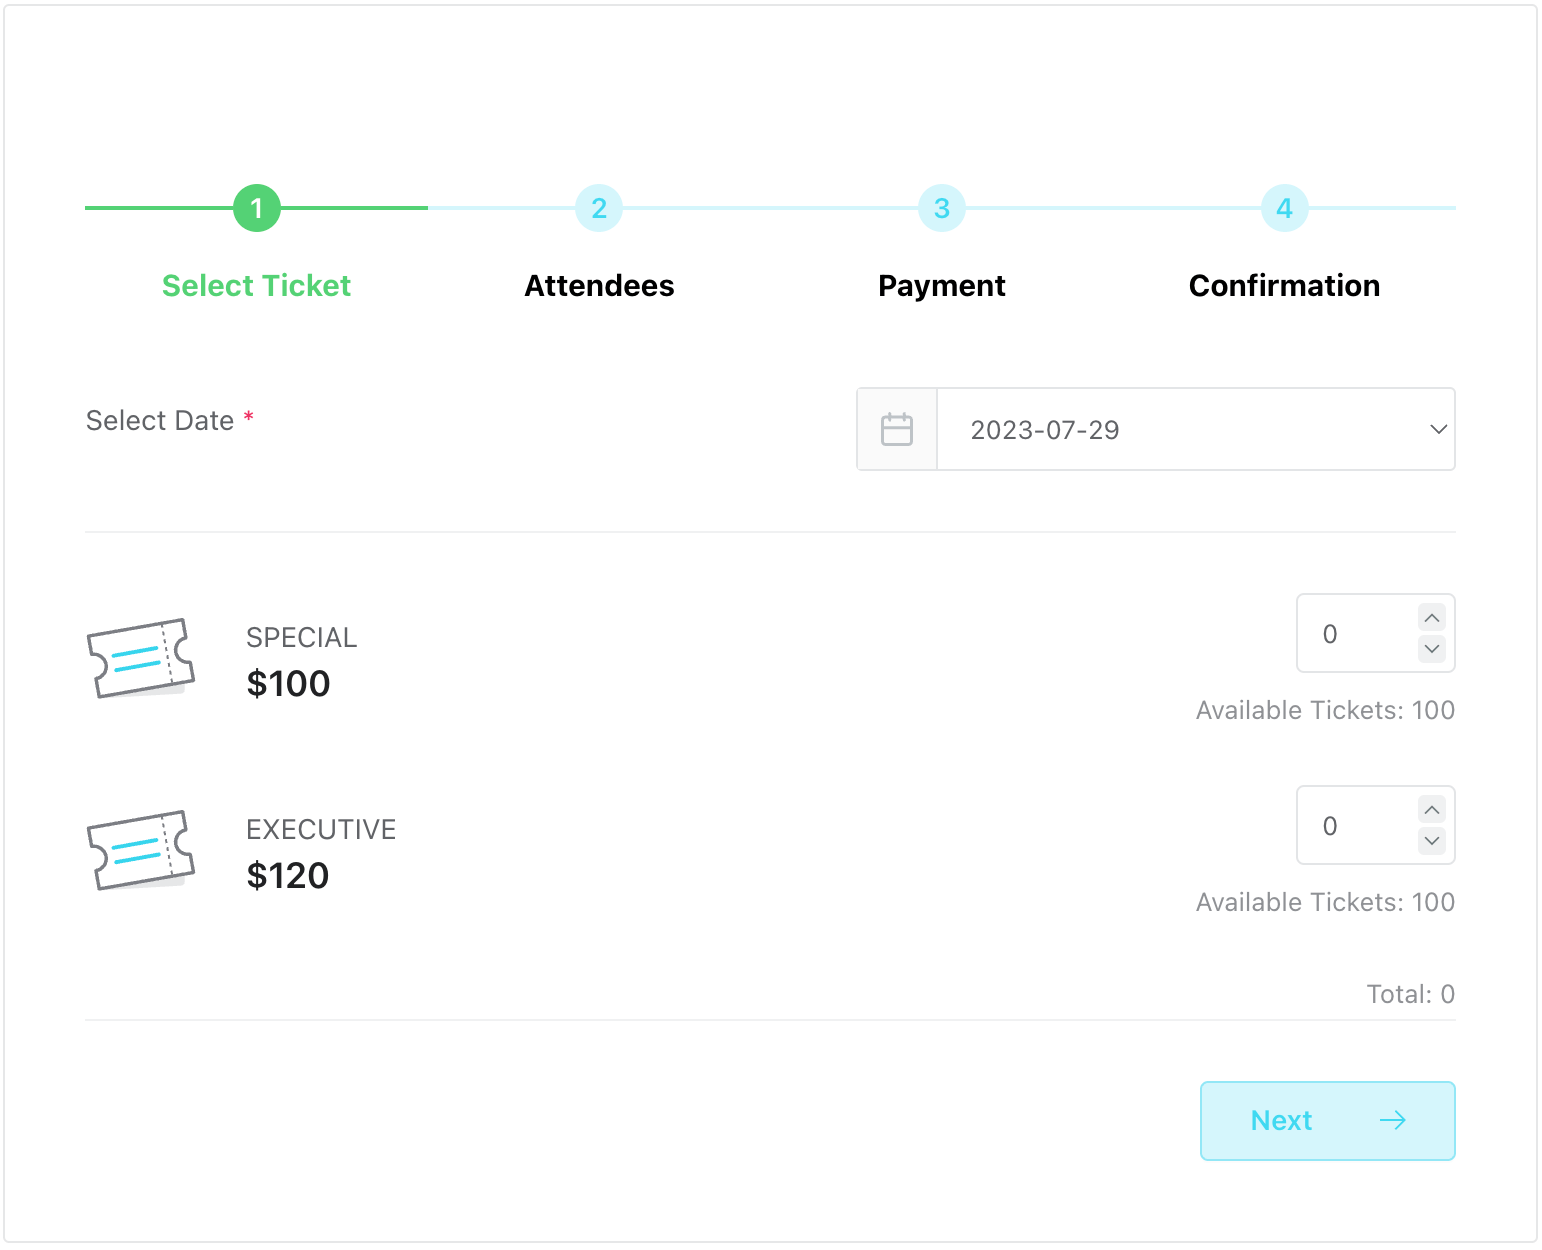
If enabled, a progress bar will be added to the booking module indicating the current step and the next steps. It won’t be displayed if there is only 1 step.
Event Gallery
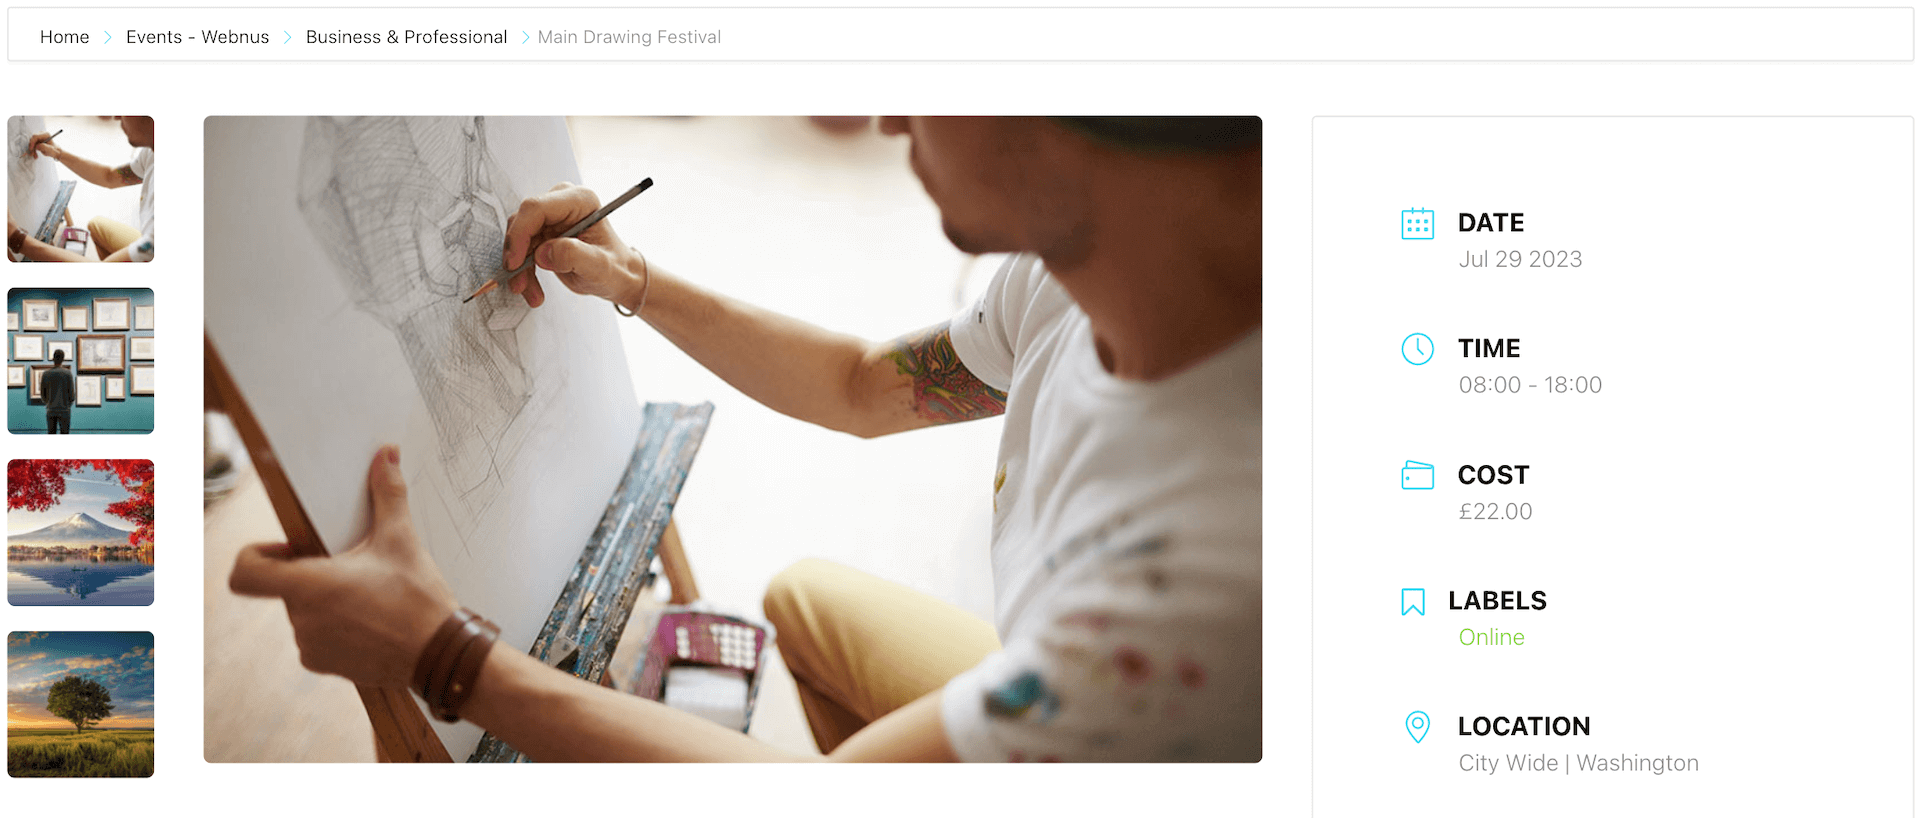
If you enable this option, you can add multiple images to be shown on your single event page as a gallery.
After enabling this option from MEC Settings > Event Modules > Event Gallery, a new box will appear underneath the feature image of your single event edit page.
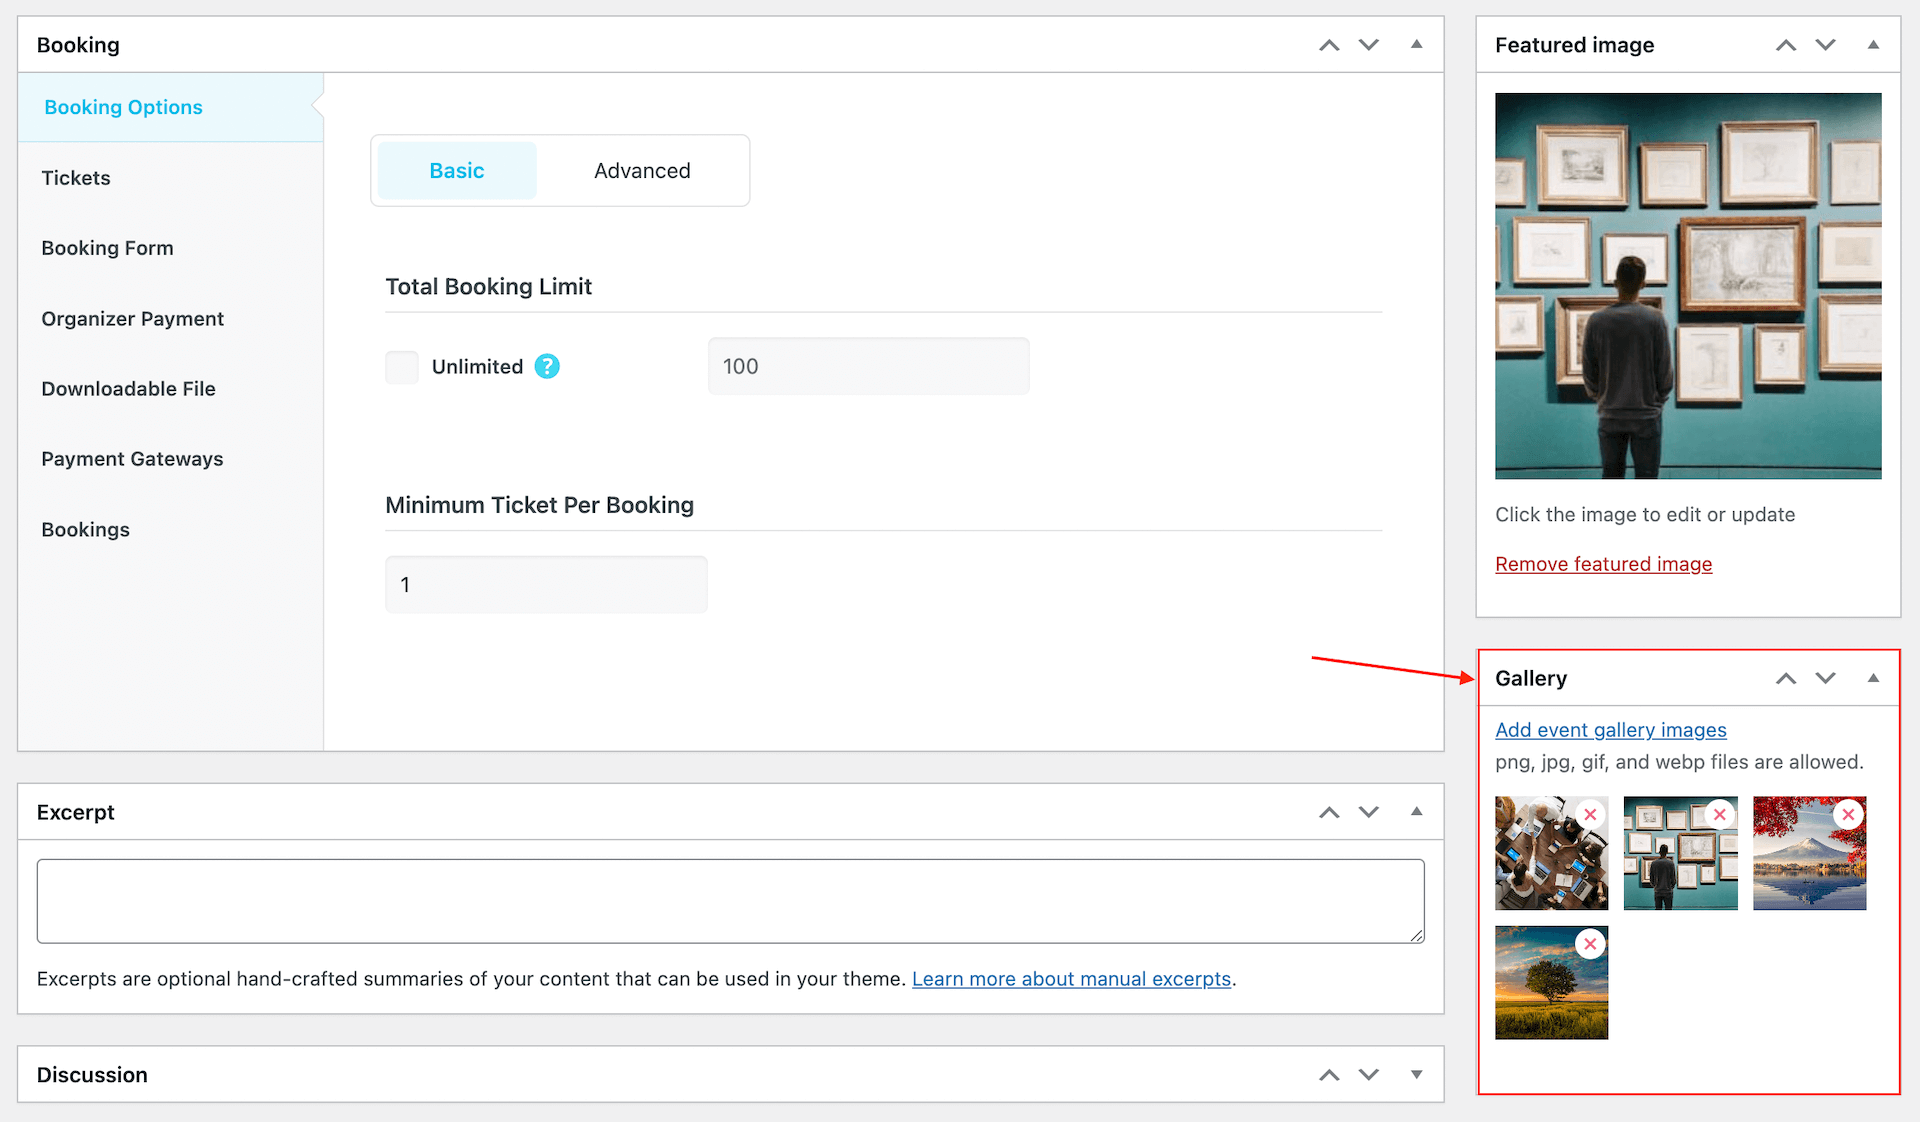
You can add as many images as you want and they will be shown on the front end.
QR Code
QR Code Module is a very practical option in the Modern Events Calendar. By using this module, you won’t need a third-party plugin to set up QR codes for your events.

This Module can have GIF, PNG, and JPEG output so that it maximizes the convenience of the users. Additionally, it can have a separate URL address.
By default, MEC puts the QR code in the sidebar. However, you can adjust this accordingly (refer to this documentation).
By reading the QR code using your phone or any other device, you will be redirected to the single event page of the current event on your device browser.
To enable this module, you need to go to MEC Settings > Event Modules > QR Code and check the Show QR code of event in details page and booking invoice option.
After that, you need to go to MEC Settings > Single Event > Sidebar and enable the QR Code module in the MEC single sidebar.
Weather
By using the Weather Module in Modern Events Calendar, you can display the current weather situation of the location of your event to your visitors.
Note: The weather module is only available in the MEC Pro.
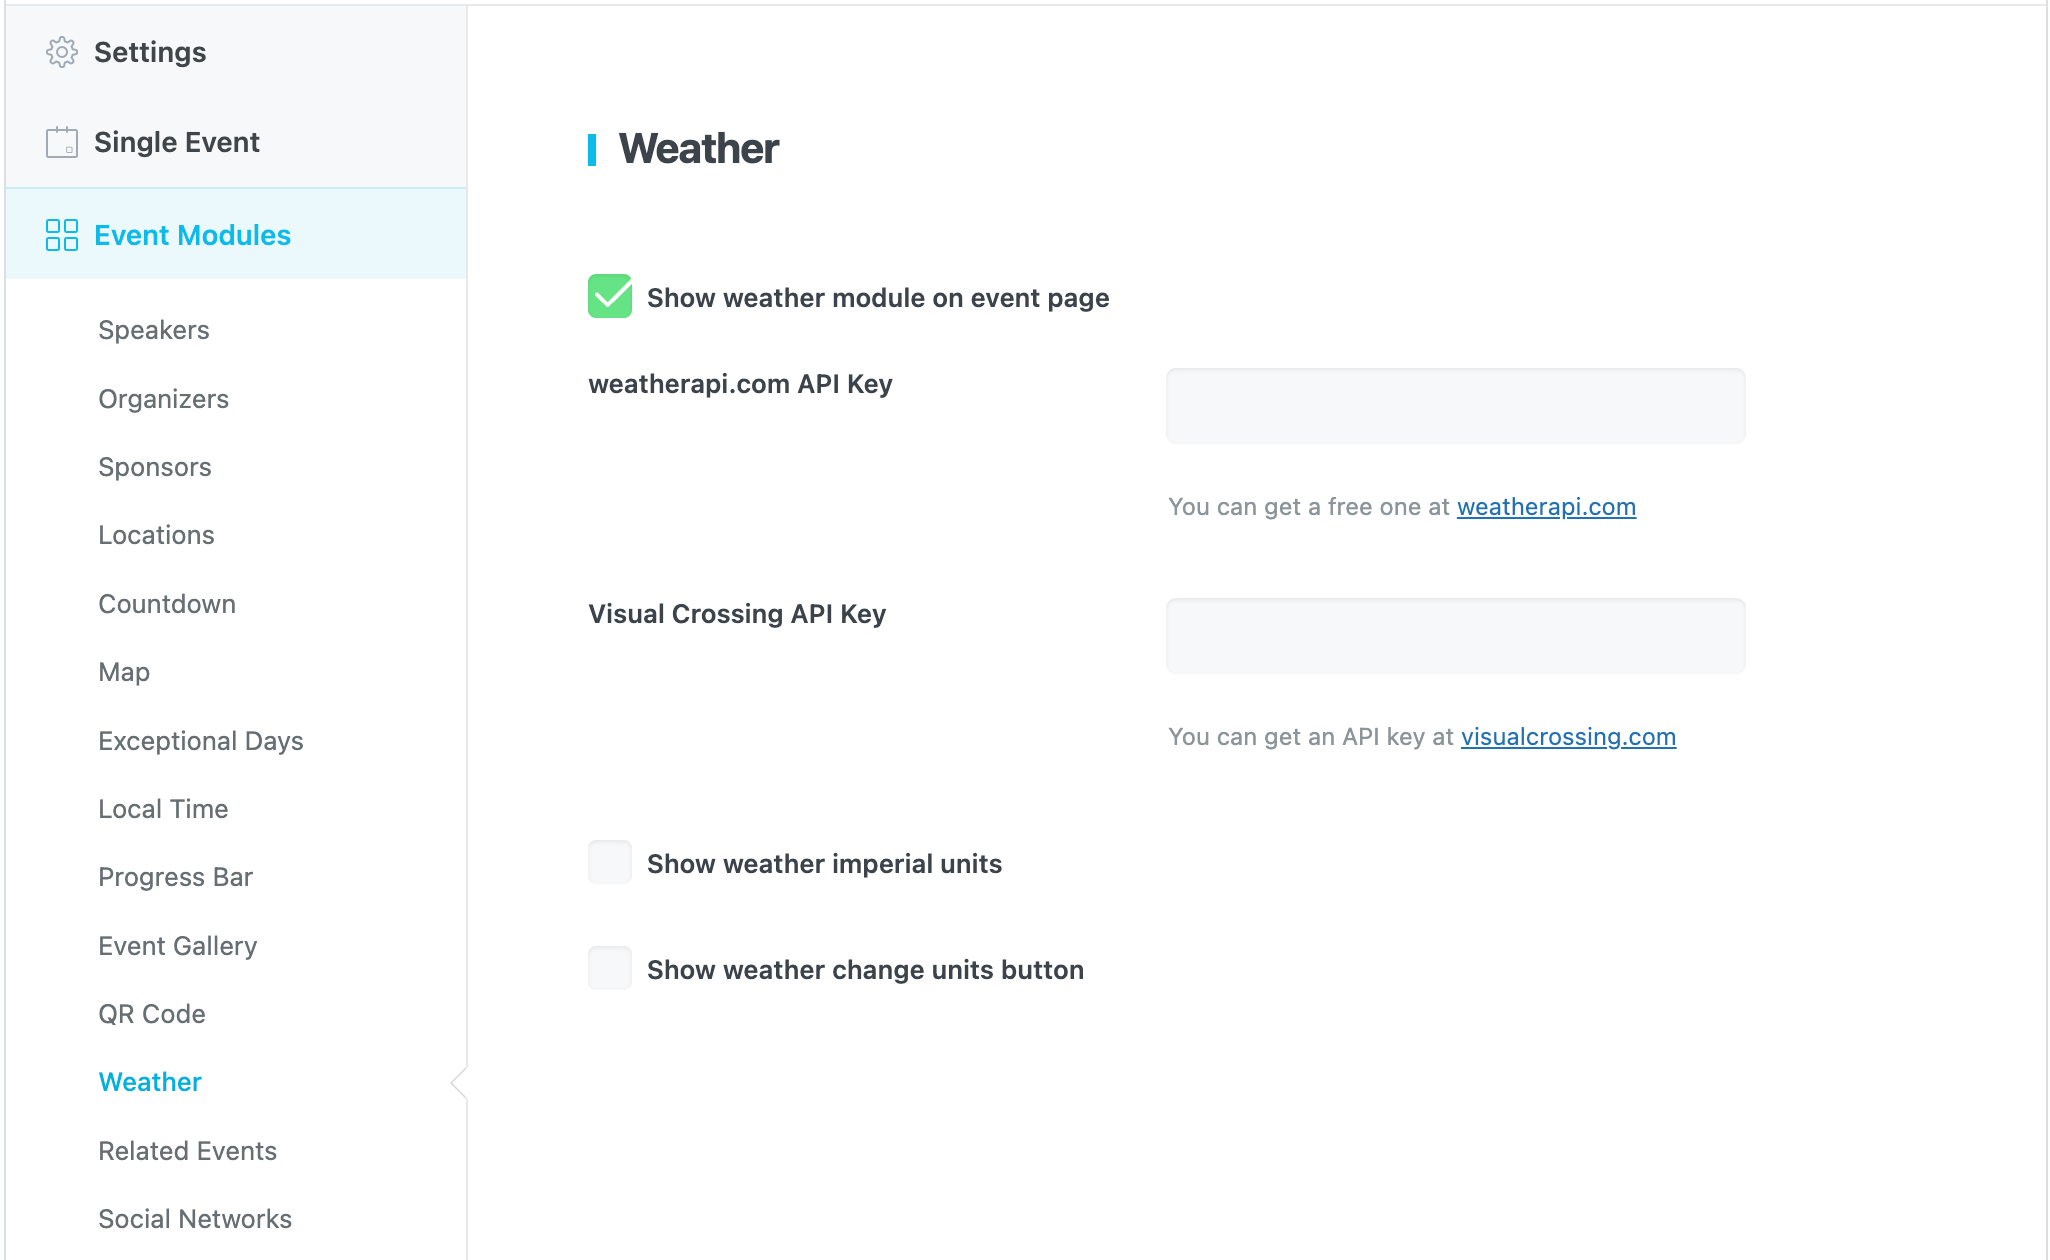
To enable this module, you need to go to MEC Settings > Event Modules > Weather and check the Show weather module on event page option.
After that, you need to get an API key from one of the following two providers:
weatherapi.com API Key
This website is totally free to use, and you can get your API at this link.
darksky.net API Key
There is another website where you can use their API key to show the weather situation to your users. The only problem is that they’re not accepting any new users right now.
For the old users of this website that have already received their API keys:
- You need to set up a location for your event that has latitude and longitude.
Show weather imperial units
By enabling this option, weather units will be displayed in the Imperial system.
Show weather change units button
If you want your users to be able to change the units of the weather module, enable this option.
Troubleshooting
If you confront, the issue of Weather Widget in MEC Plugin Is Not Displaying, first of all, you need to set the Darksky API Key accurately. And along with it, it is essential to set the geographical location currently. For precise information on how to do this, follow along the conversation between Webus support staff and a Modern Events Calendar user.
The weather widget is not displaying
After adding Darksky API Key, you should add a location in WordPress Admin > MEC Location for the events in which you want to show the weather widget in their single event. This location must have Latitude and Longitude; you can get help from this site to set them up: https://www.latlong.net. After doing this, go to your preferred back-end event(s) and set the Event Location, and save settings. In Front-End of the single event in which you have selected this location, the weather widget will appear. Also, please double-check Darksky API.
Related Events
The Related Events option in Modern Events Calendar helps your users easily find all the best and the most relevant events.
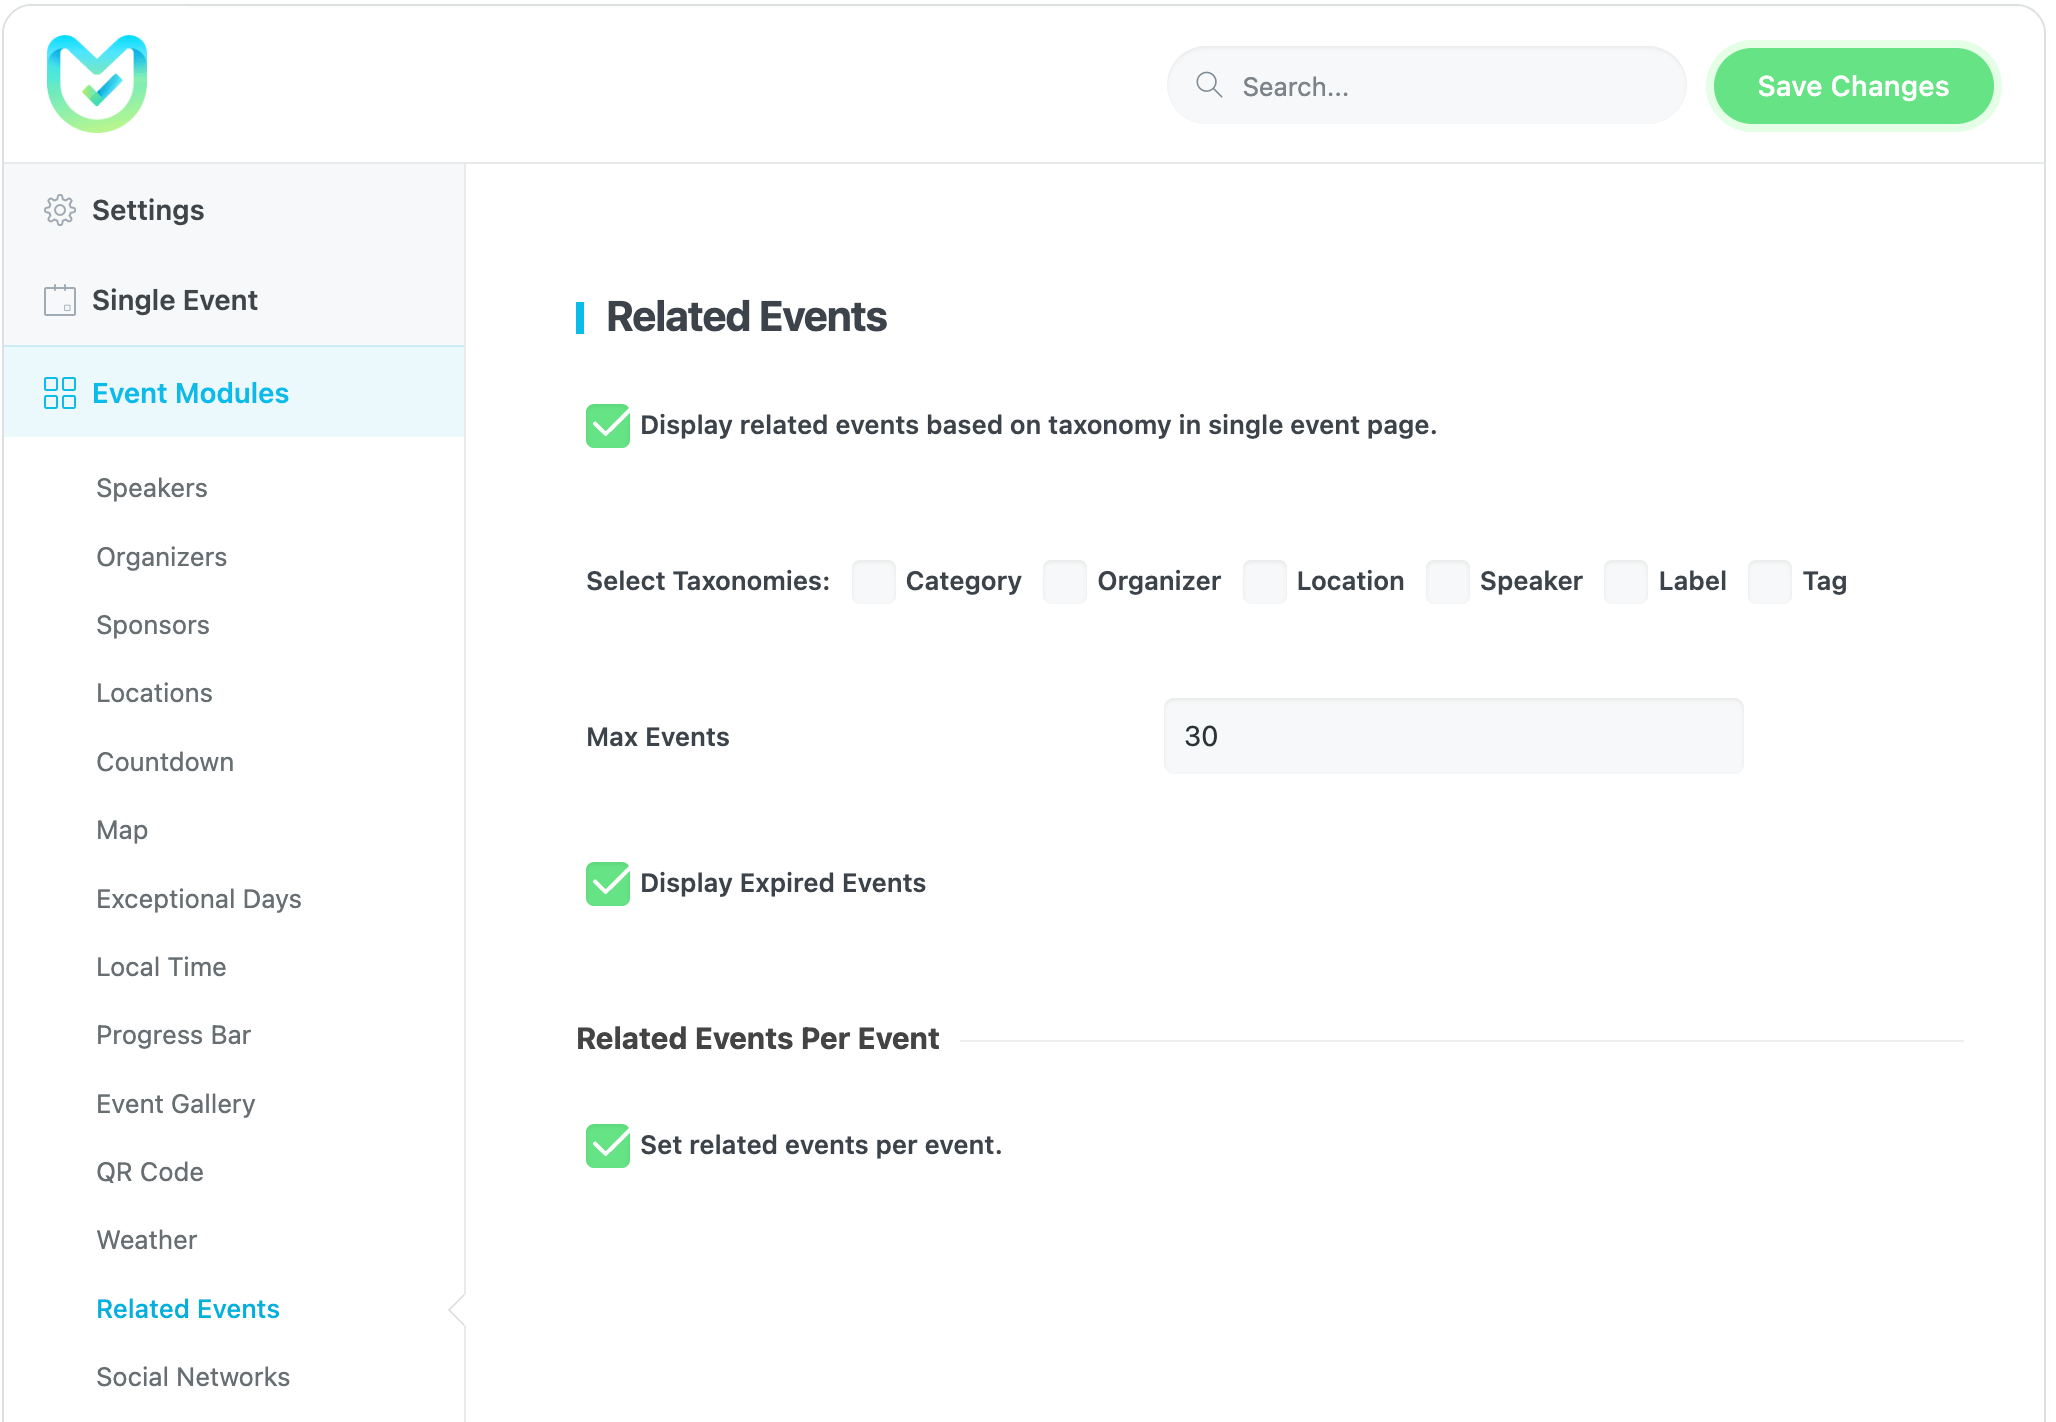
If you want to show related events in your single event pages, you should enable the Display related events based on taxonomy in single event page option in MEC Settings > Event Modules > Related Events.
Select Taxonomies
You can filter your related events to be shown based on the following taxonomies: Category, Organizer, Location, Label, and Tag.
Max Events
You can set the number of events you want to be displayed. If you have a lot of old events, you need to set this to a large number, like 1000 or 2000.
If not, you should set this to a smaller number, like 50 or 60.
Display Expired Events
By enabling this option, your expired events will be shown among the related events.
Set related events per event
This option allows users to enable the Related Event feature directly from the event edit page.
Social Networks
Modern Events Calendar allows integration with all the social networks, and you can broaden your events’ audience by activating any of these social networks.
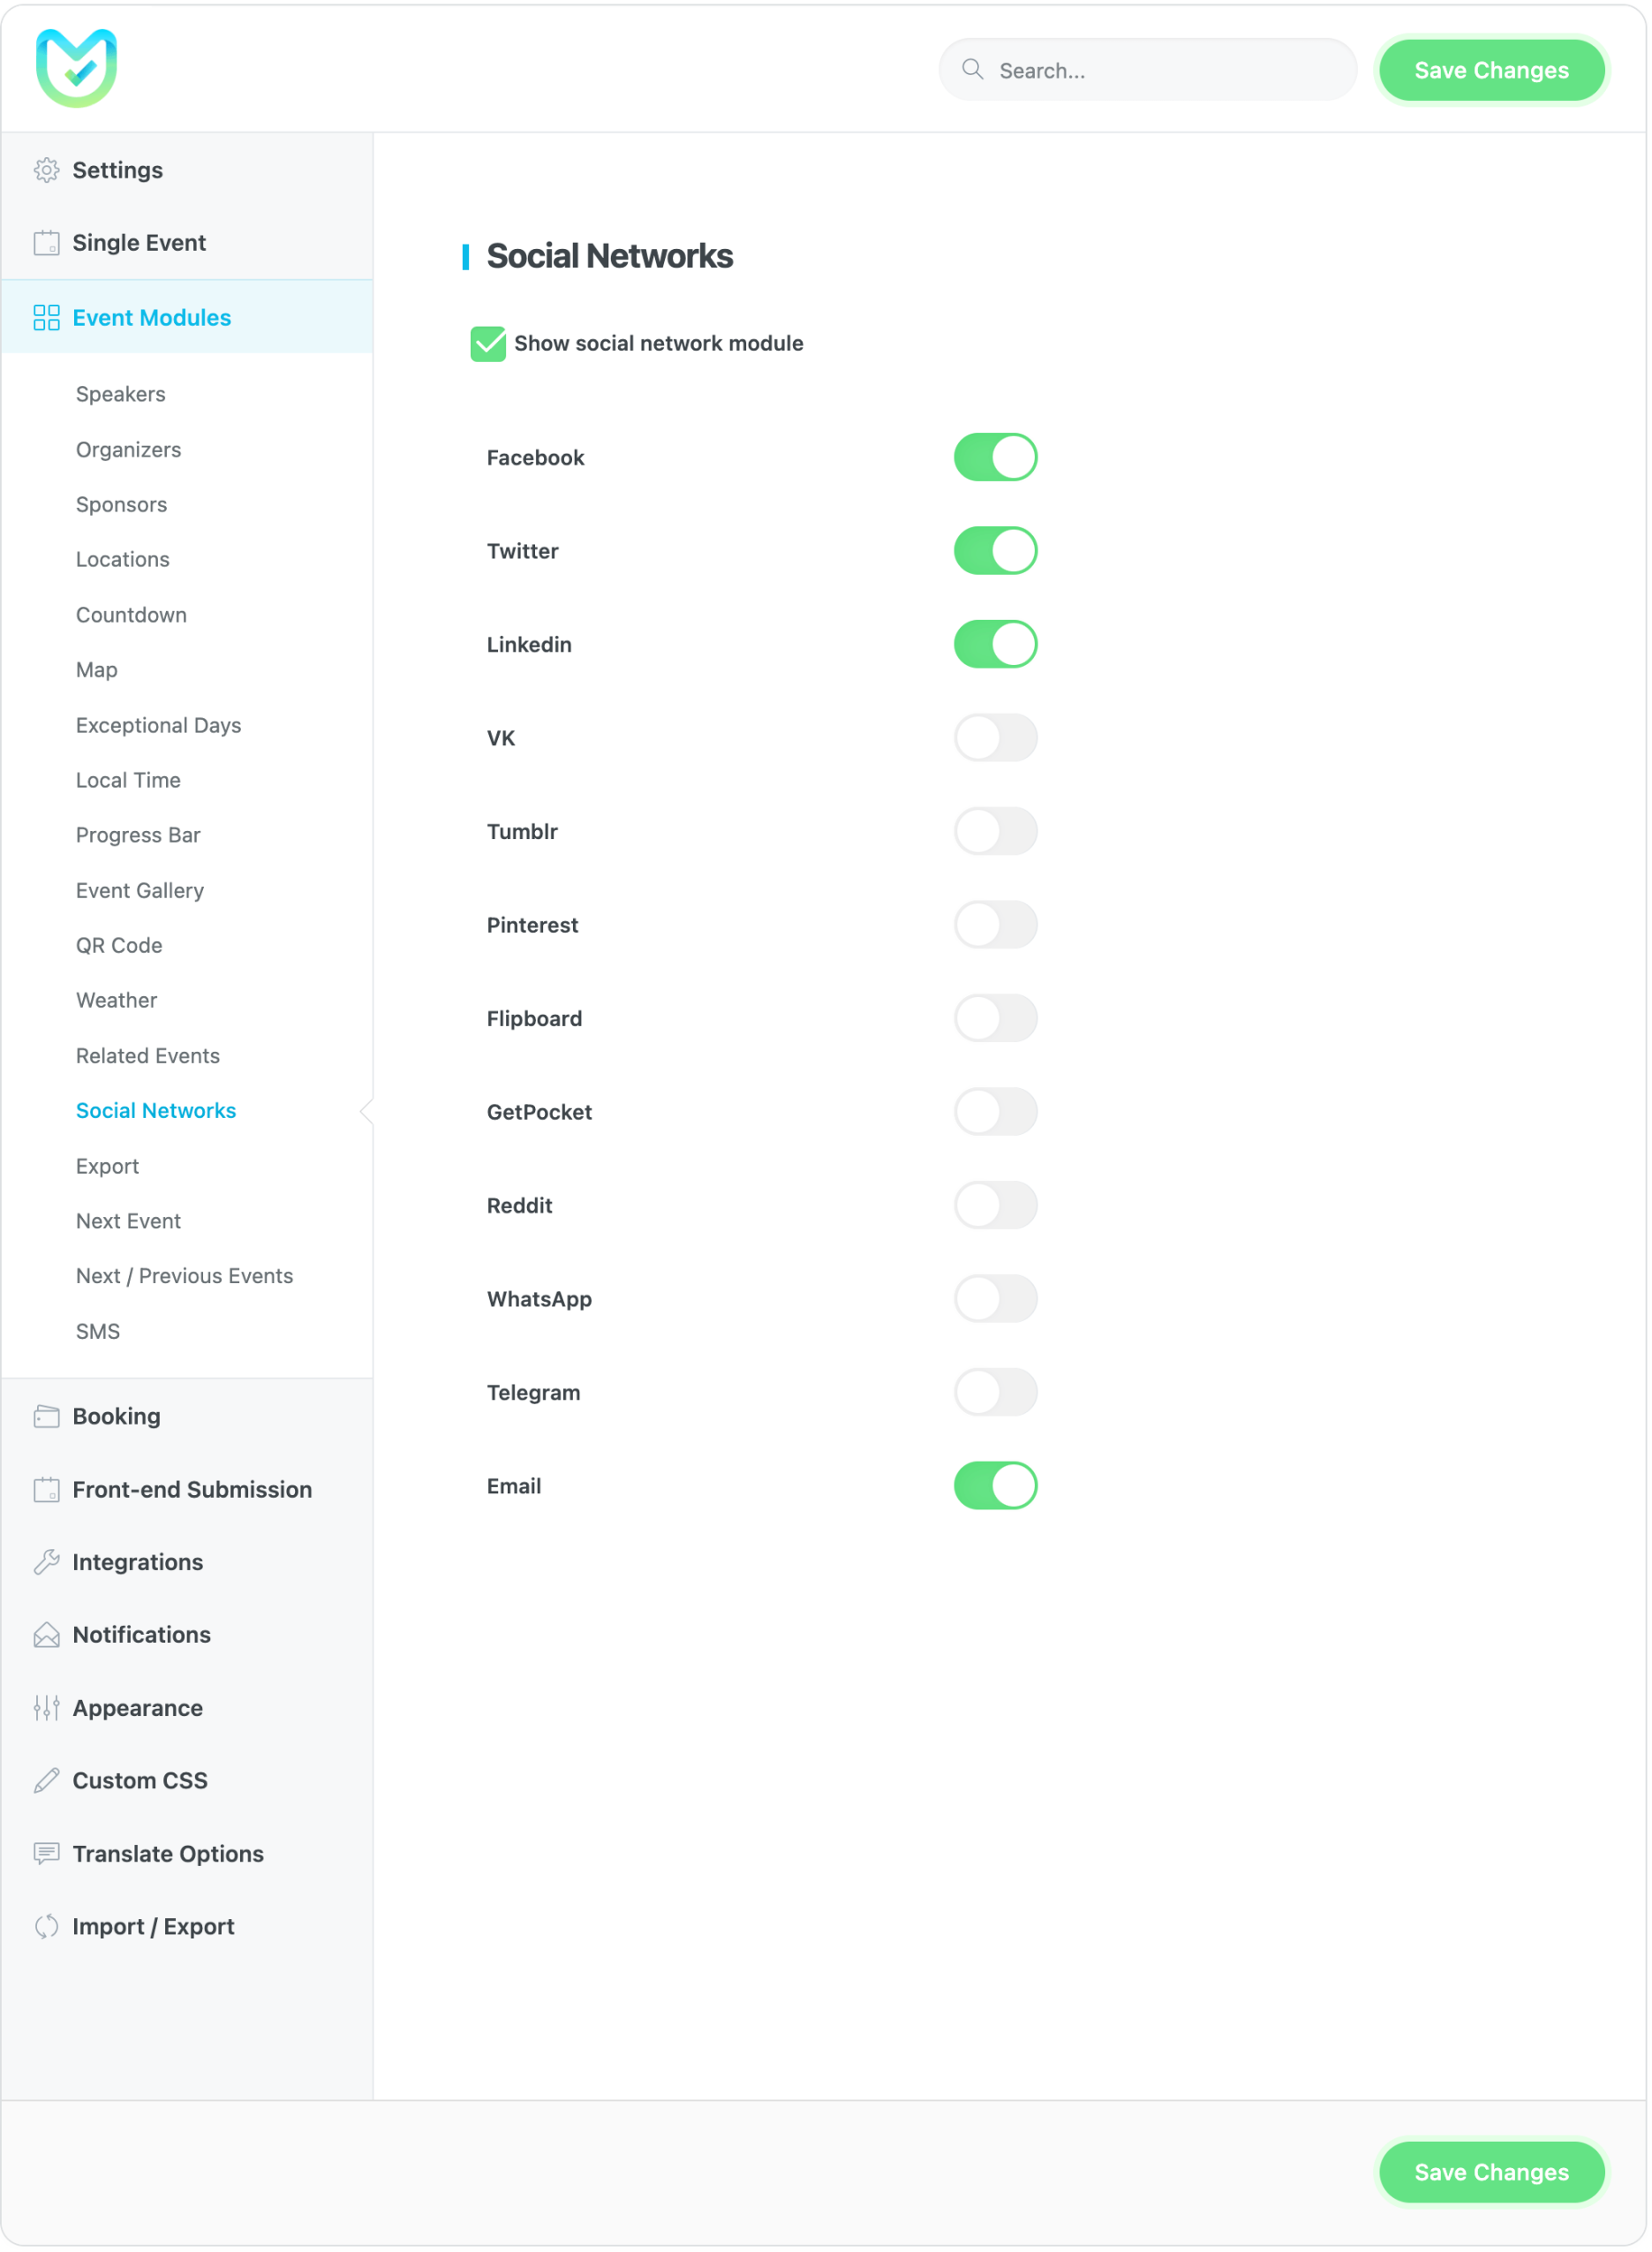
To enable this module, you need to go to MEC Settings > Event Modules > Social Networks and check the Show social network module option.
You can choose any of the following icons to be displayed on your single event page. Using these icons, your users can share your events anywhere they want.
Note: To display it better in the grid view, you should just select up to 3 of them.
Export
The export module in Modern Events Calendar has been designed to give your attendees the possibility to add the date and information of an event to their own preferred calendar (such as Google Calendar) and keep themselves up-to-date about the events and all the ongoing programs that you might offer.
You can use the two most popular calendar applications for exporting events:
Using this option, your users can easily add your events to their personal calendars.
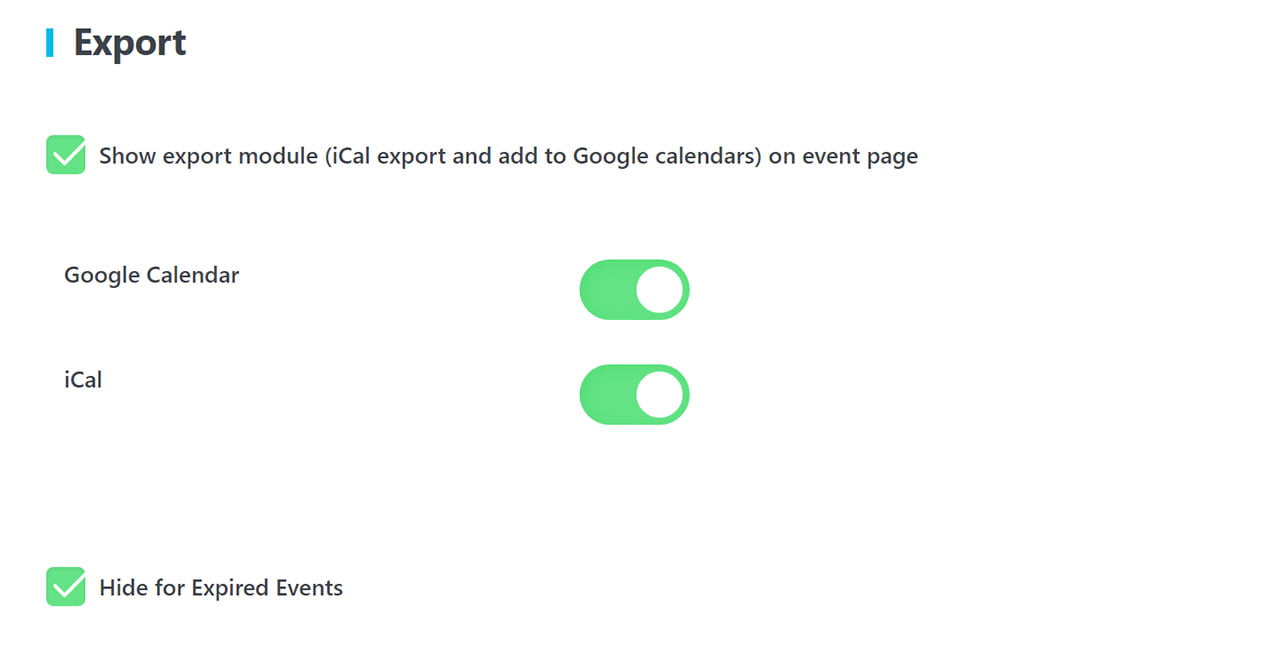
After enabling this feature, the related buttons will be added to your single event page:

For example, if a user clicks on the Add to Google Calendar button, they will be redirected to their Google Calendar page, and the related fields will be filled in for them.
Next Event
The Next Event module in Modern Events Calendar is an effective feature that helps you grow your website audience engagement. You can also inform them about the following events for a specific program.
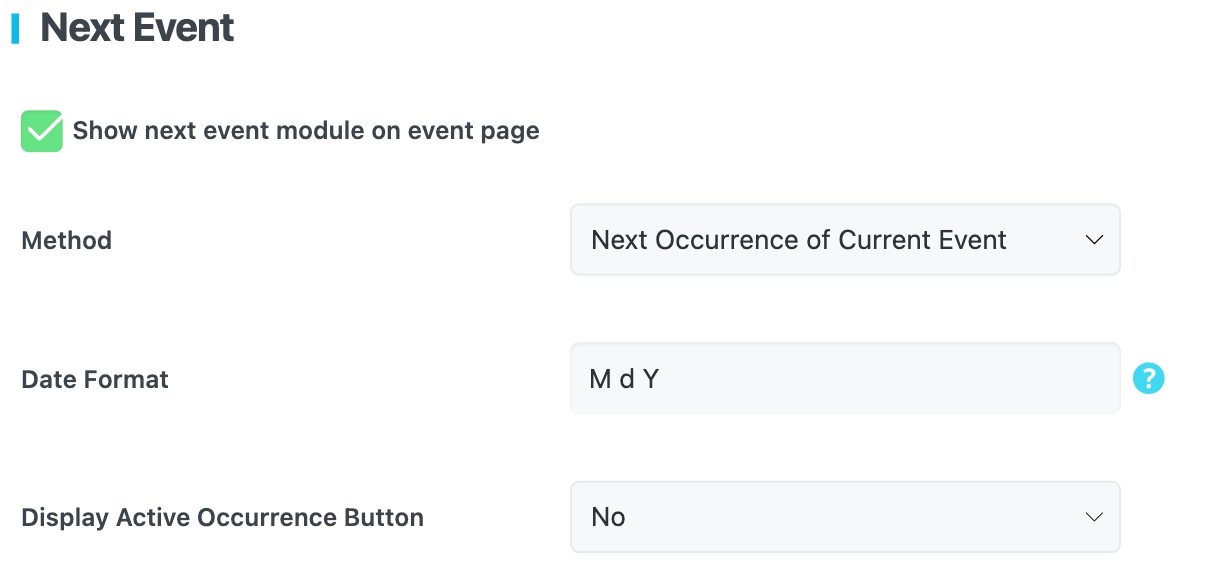
To enable this module, you need to go to MEC Settings > Event Modules > Next Event and check the Show next event module on event page option.
When the Event Repeat option is enabled for an event, you want your users to see when exactly is the next time for this particular event. You can simply provide your users with this by enabling Next Event Module.
The next Event module will be displayed in the right widget sidebar of the Modern Events Calendar, as shown in the following image:
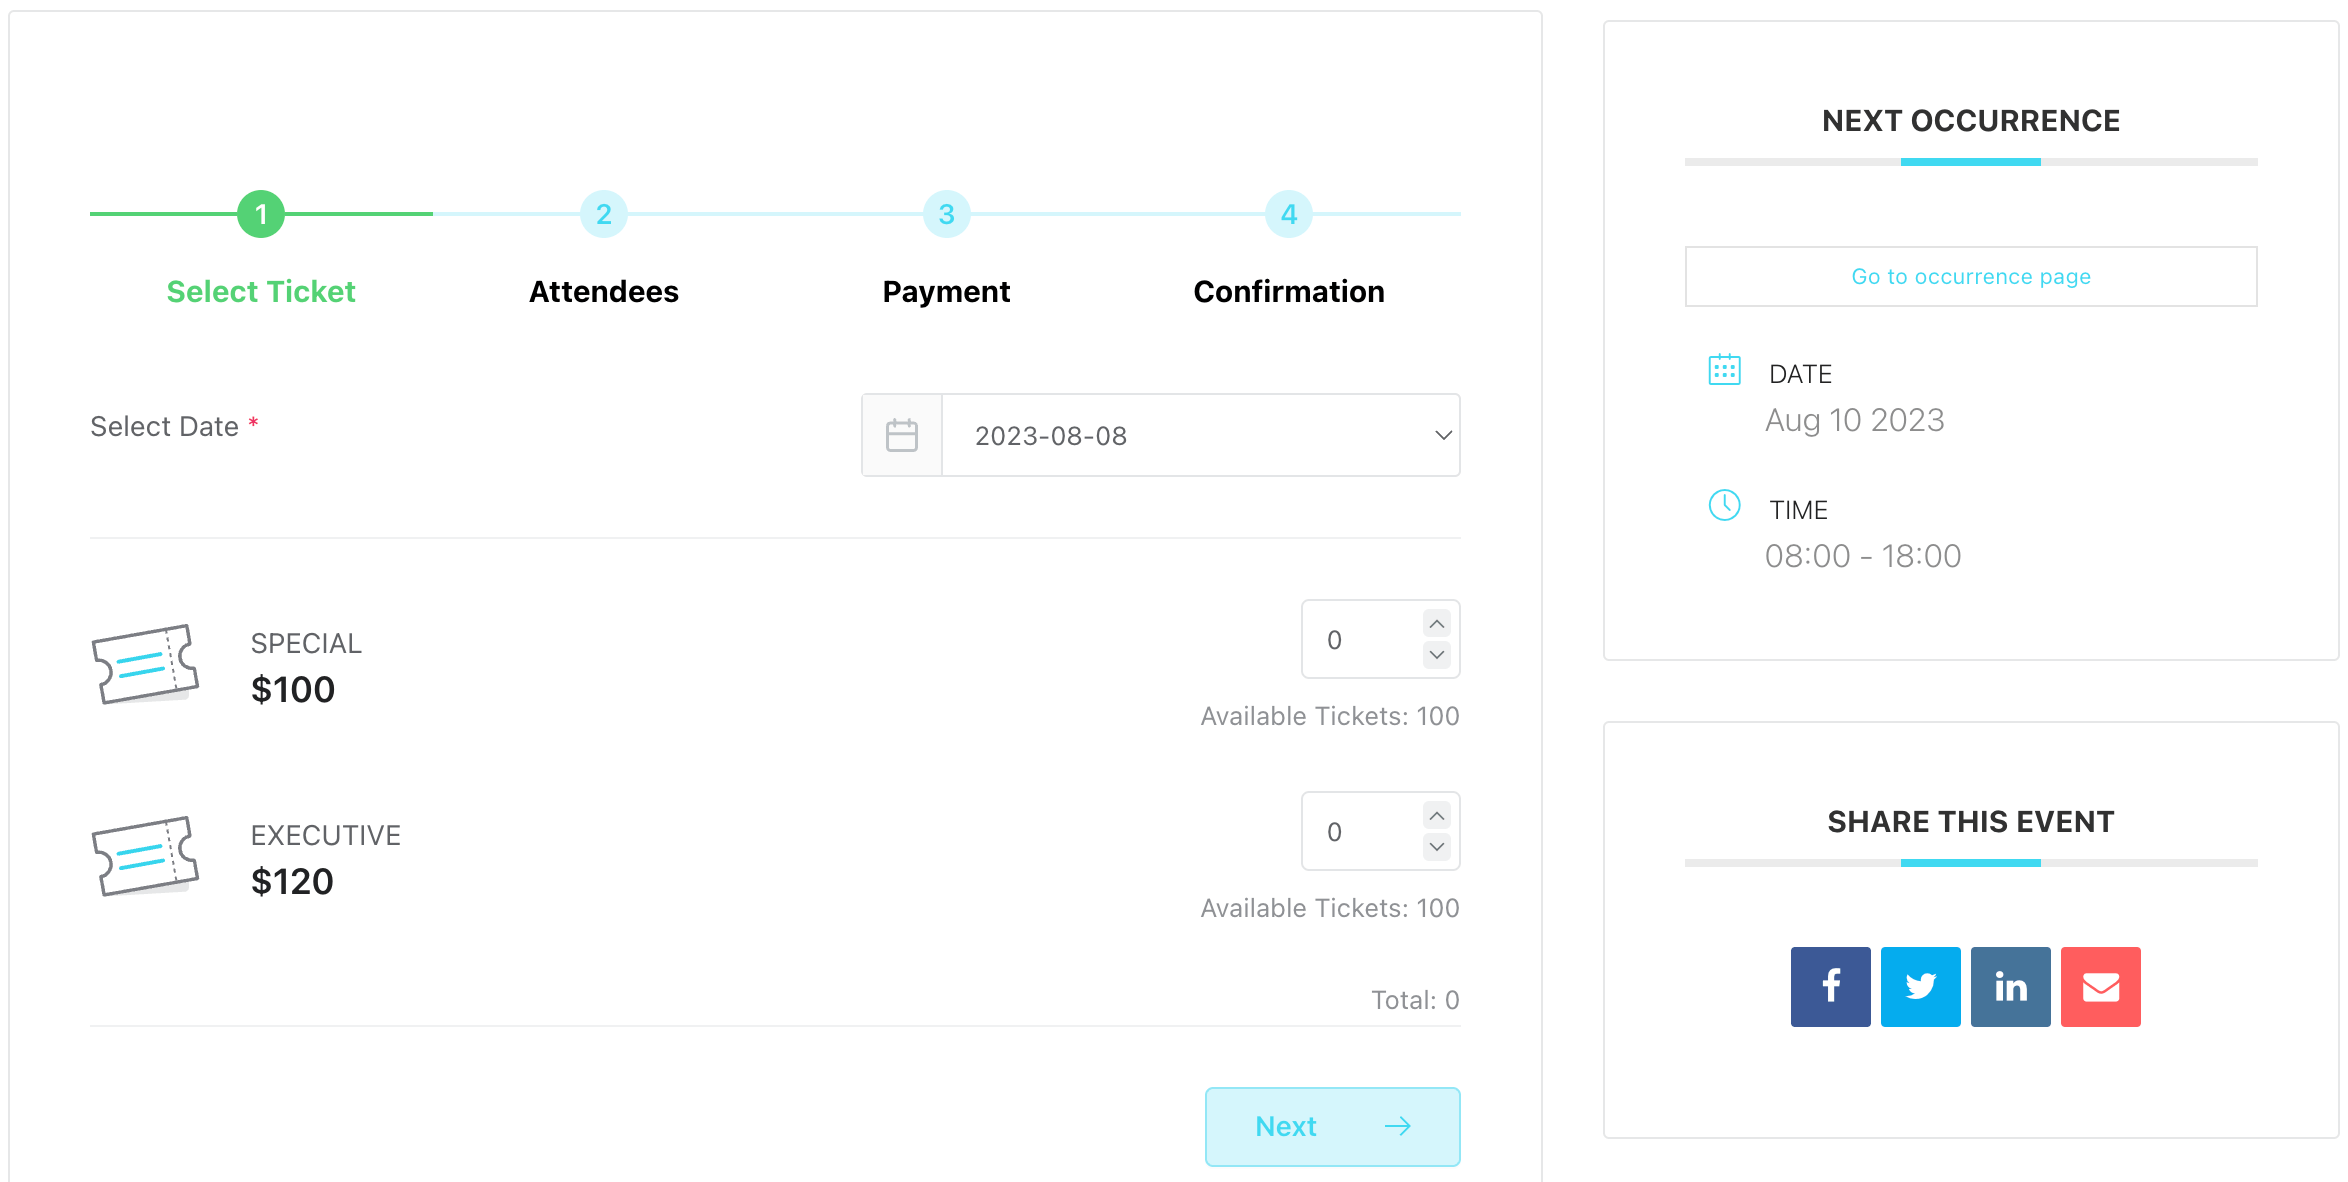
Now, if the Next Event Module option is enabled in your Single Event Sidebar, then it will be displayed on your single event page.
Note: It will be displayed only when the Event Repeat option is enabled for the event.
Method
Here you can set your Next Event Module to redirect the users to the next occurrence of the current event, the occurrence of other events, or multiple occurrences of the current event.
- If the Next Occurrence of Current Event option is set, then the date of the next occurrence of the same event is displayed.
- If the Multiple Occurrences of Current Event option is set, then the date of the multiple occurrences of the same event is displayed.
- If the Next Occurrence of Other Events option is set, then the date of the next occurrence of another event is displayed.
Date Format
You can change the date format of the Next Event Module using this field.
You can also do the same by going to WordPress Settings > General, from the Date Format section.
Next/Previous Events
The Next / Previous Events feature in Modern Events Calendar helps your users easily find the next and previous events and opt for the best and the most relevant ones.
If you want to show the Next / Previous links in your single event pages, you should enable the Display next/previous events based on taxonomy in the single event page option in MEC Settings > Event Modules > Next / Previous Events.

Select Taxonomies
You can filter your next and previous events to be shown based on the following taxonomies: Category, Organizer, Location, Label, and Tag.
SMS
MEC has introduced a new feature called SMS Notification, which enables the administrator to receive text messages when a new booking is made. In this documentation, we will provide a step-by-step guide on how to utilize this feature.
To send text messages, MEC integrates with the Twilio communication management system, and you need to have an active number or account on the Twilio website to get started.
Creating Twilio Account
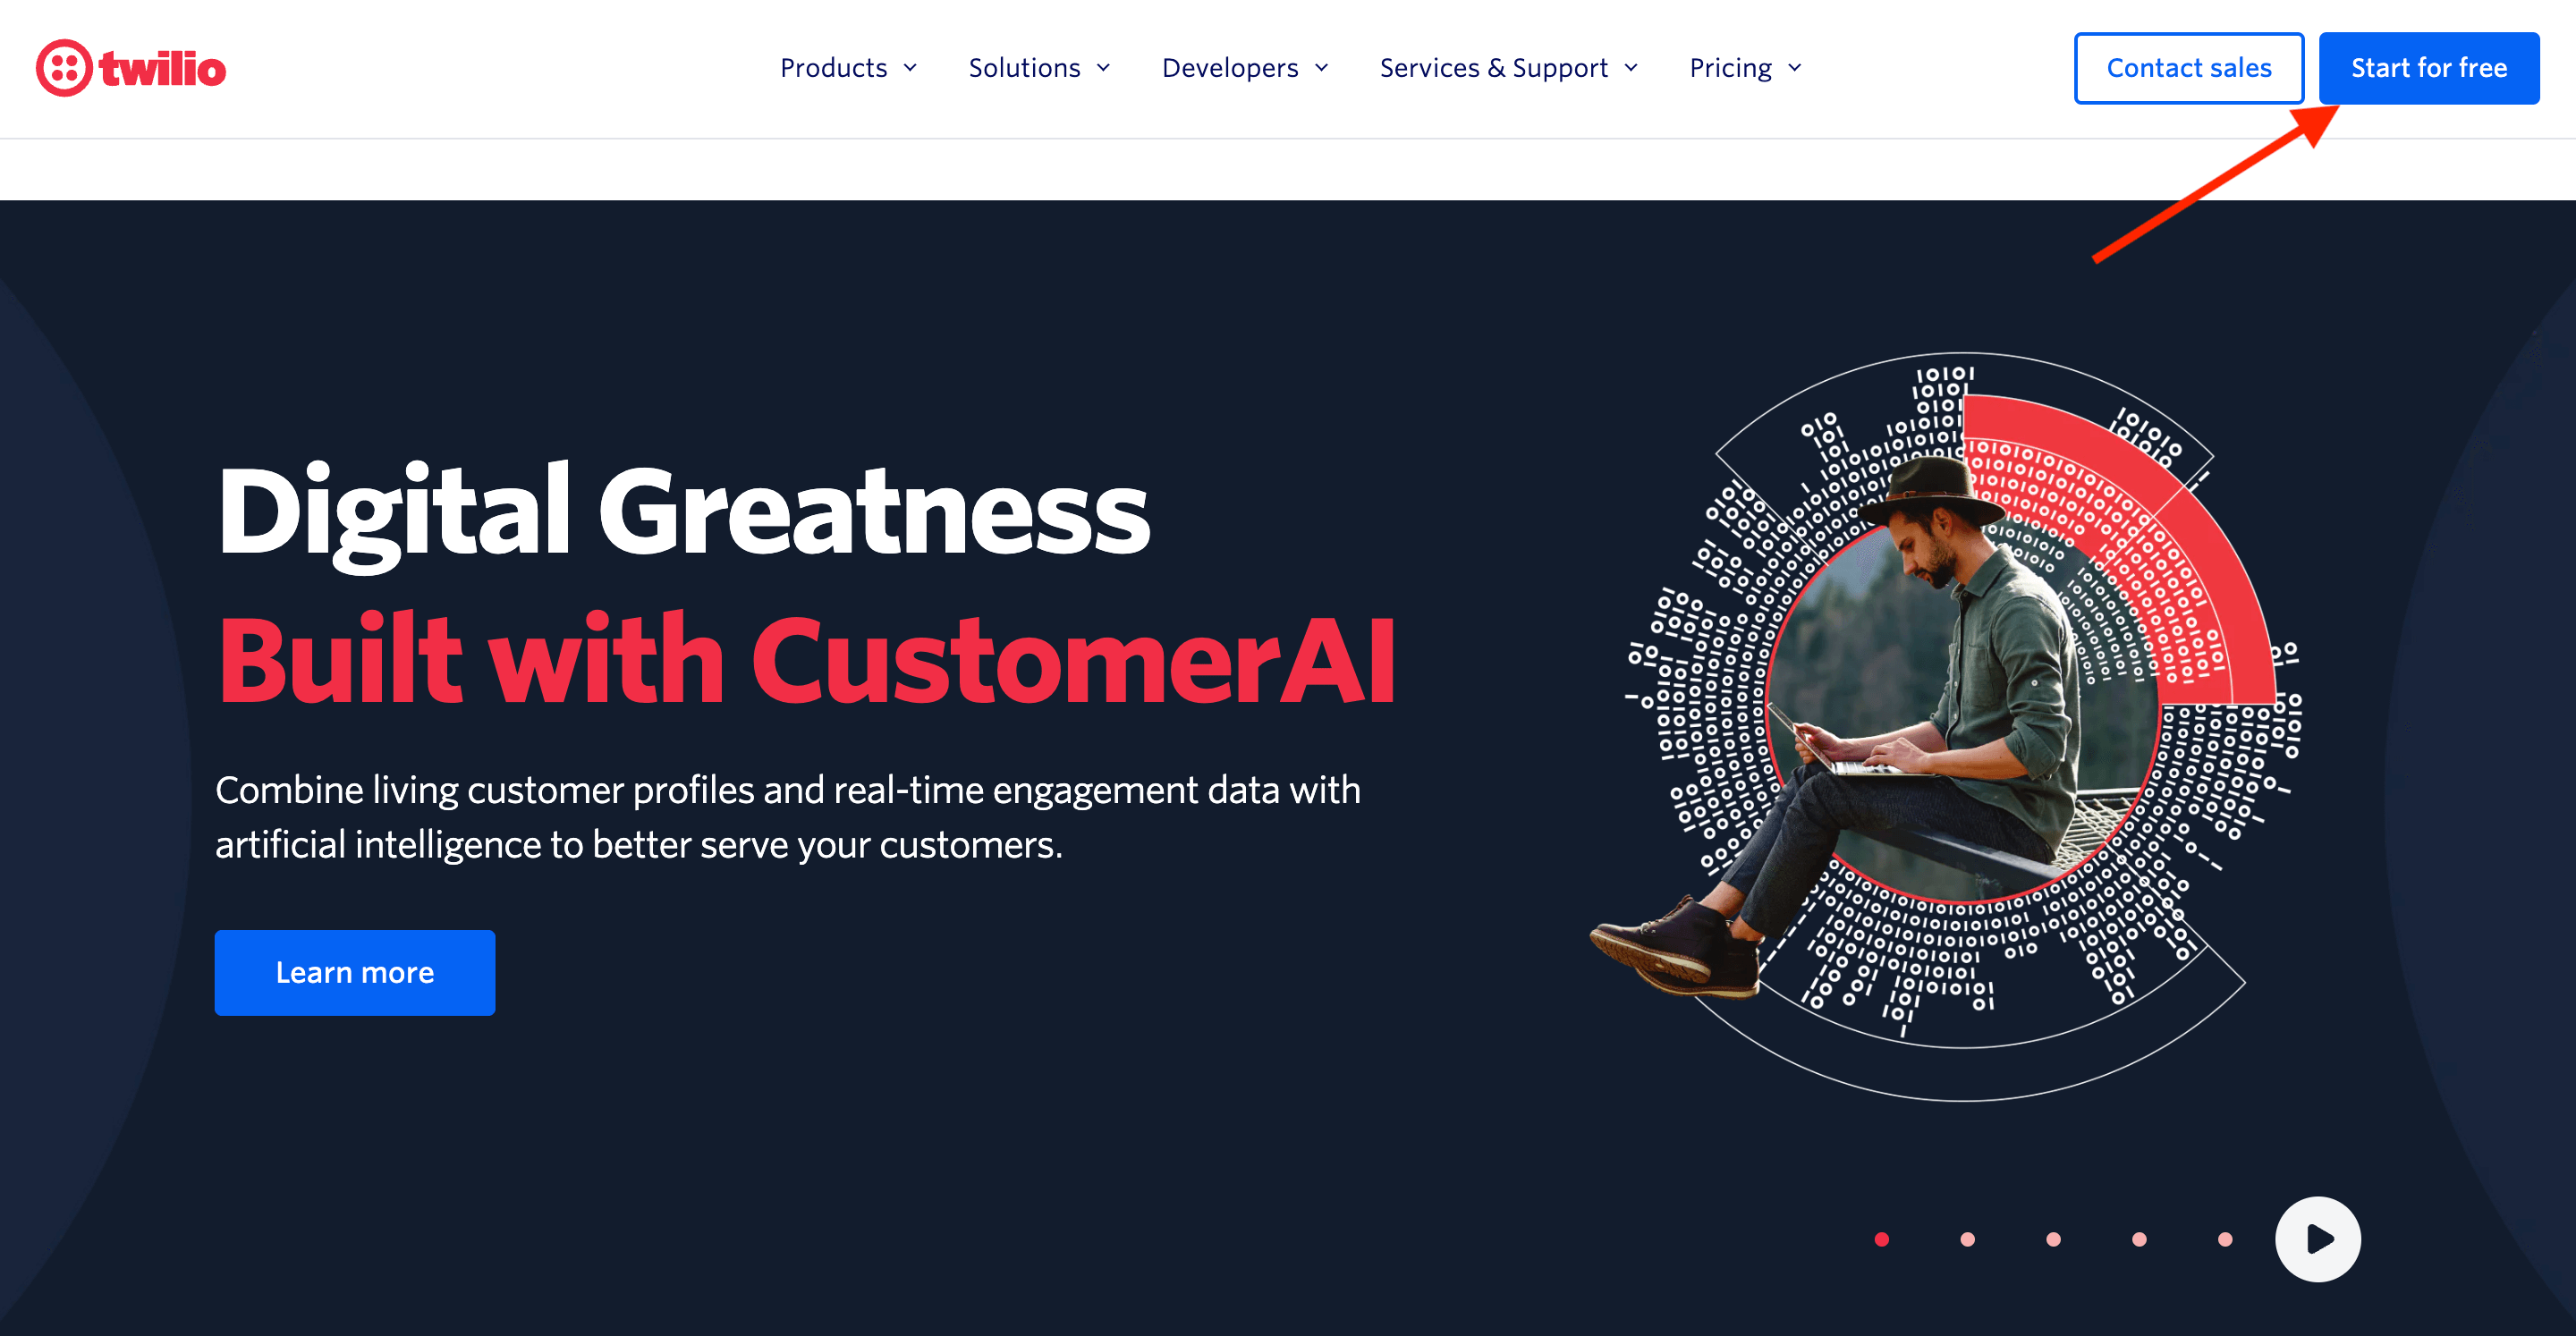
First, navigate to the Twilio website and click on the Start For Free button at the top right of the page.
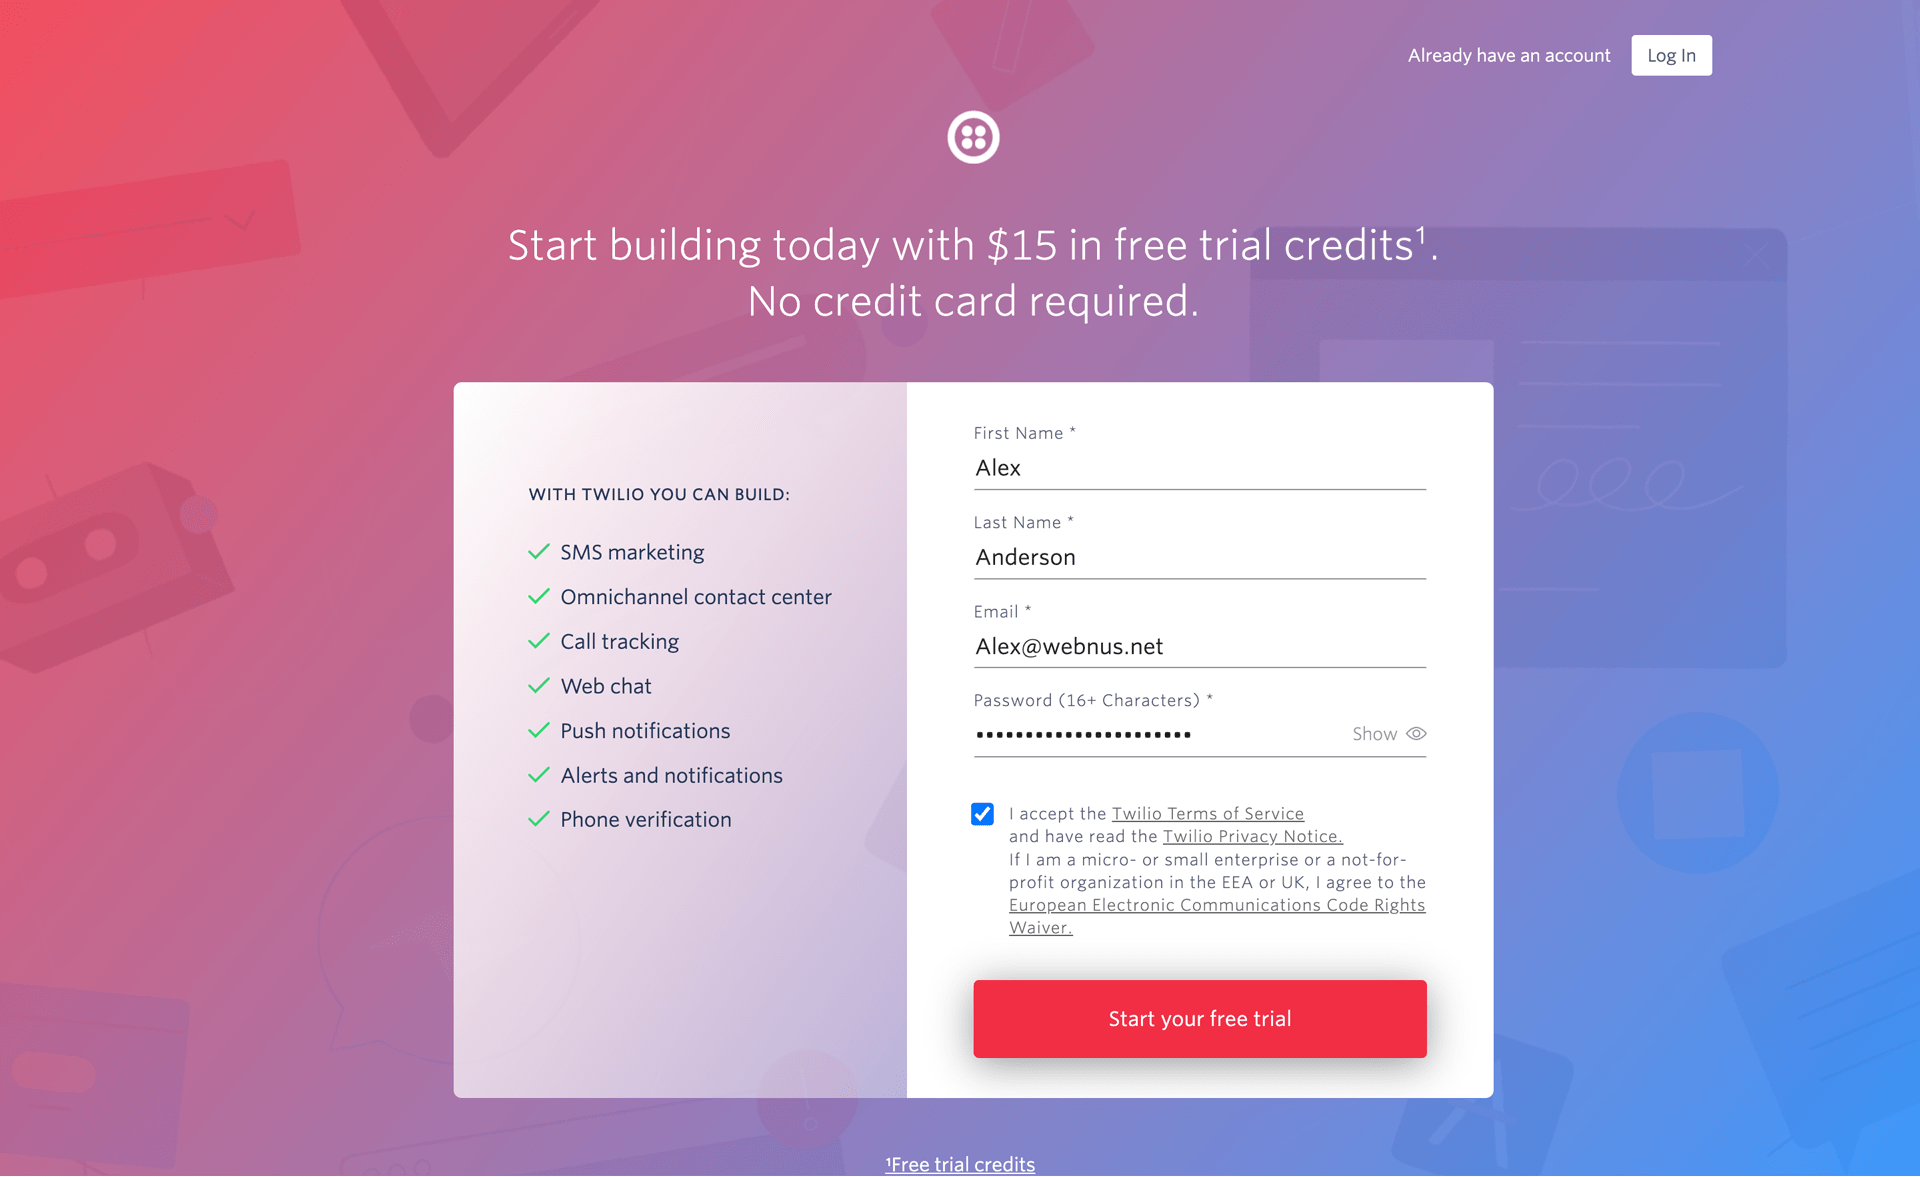
Please complete the required fields with your information and click on the Start My Free Trial button to proceed.
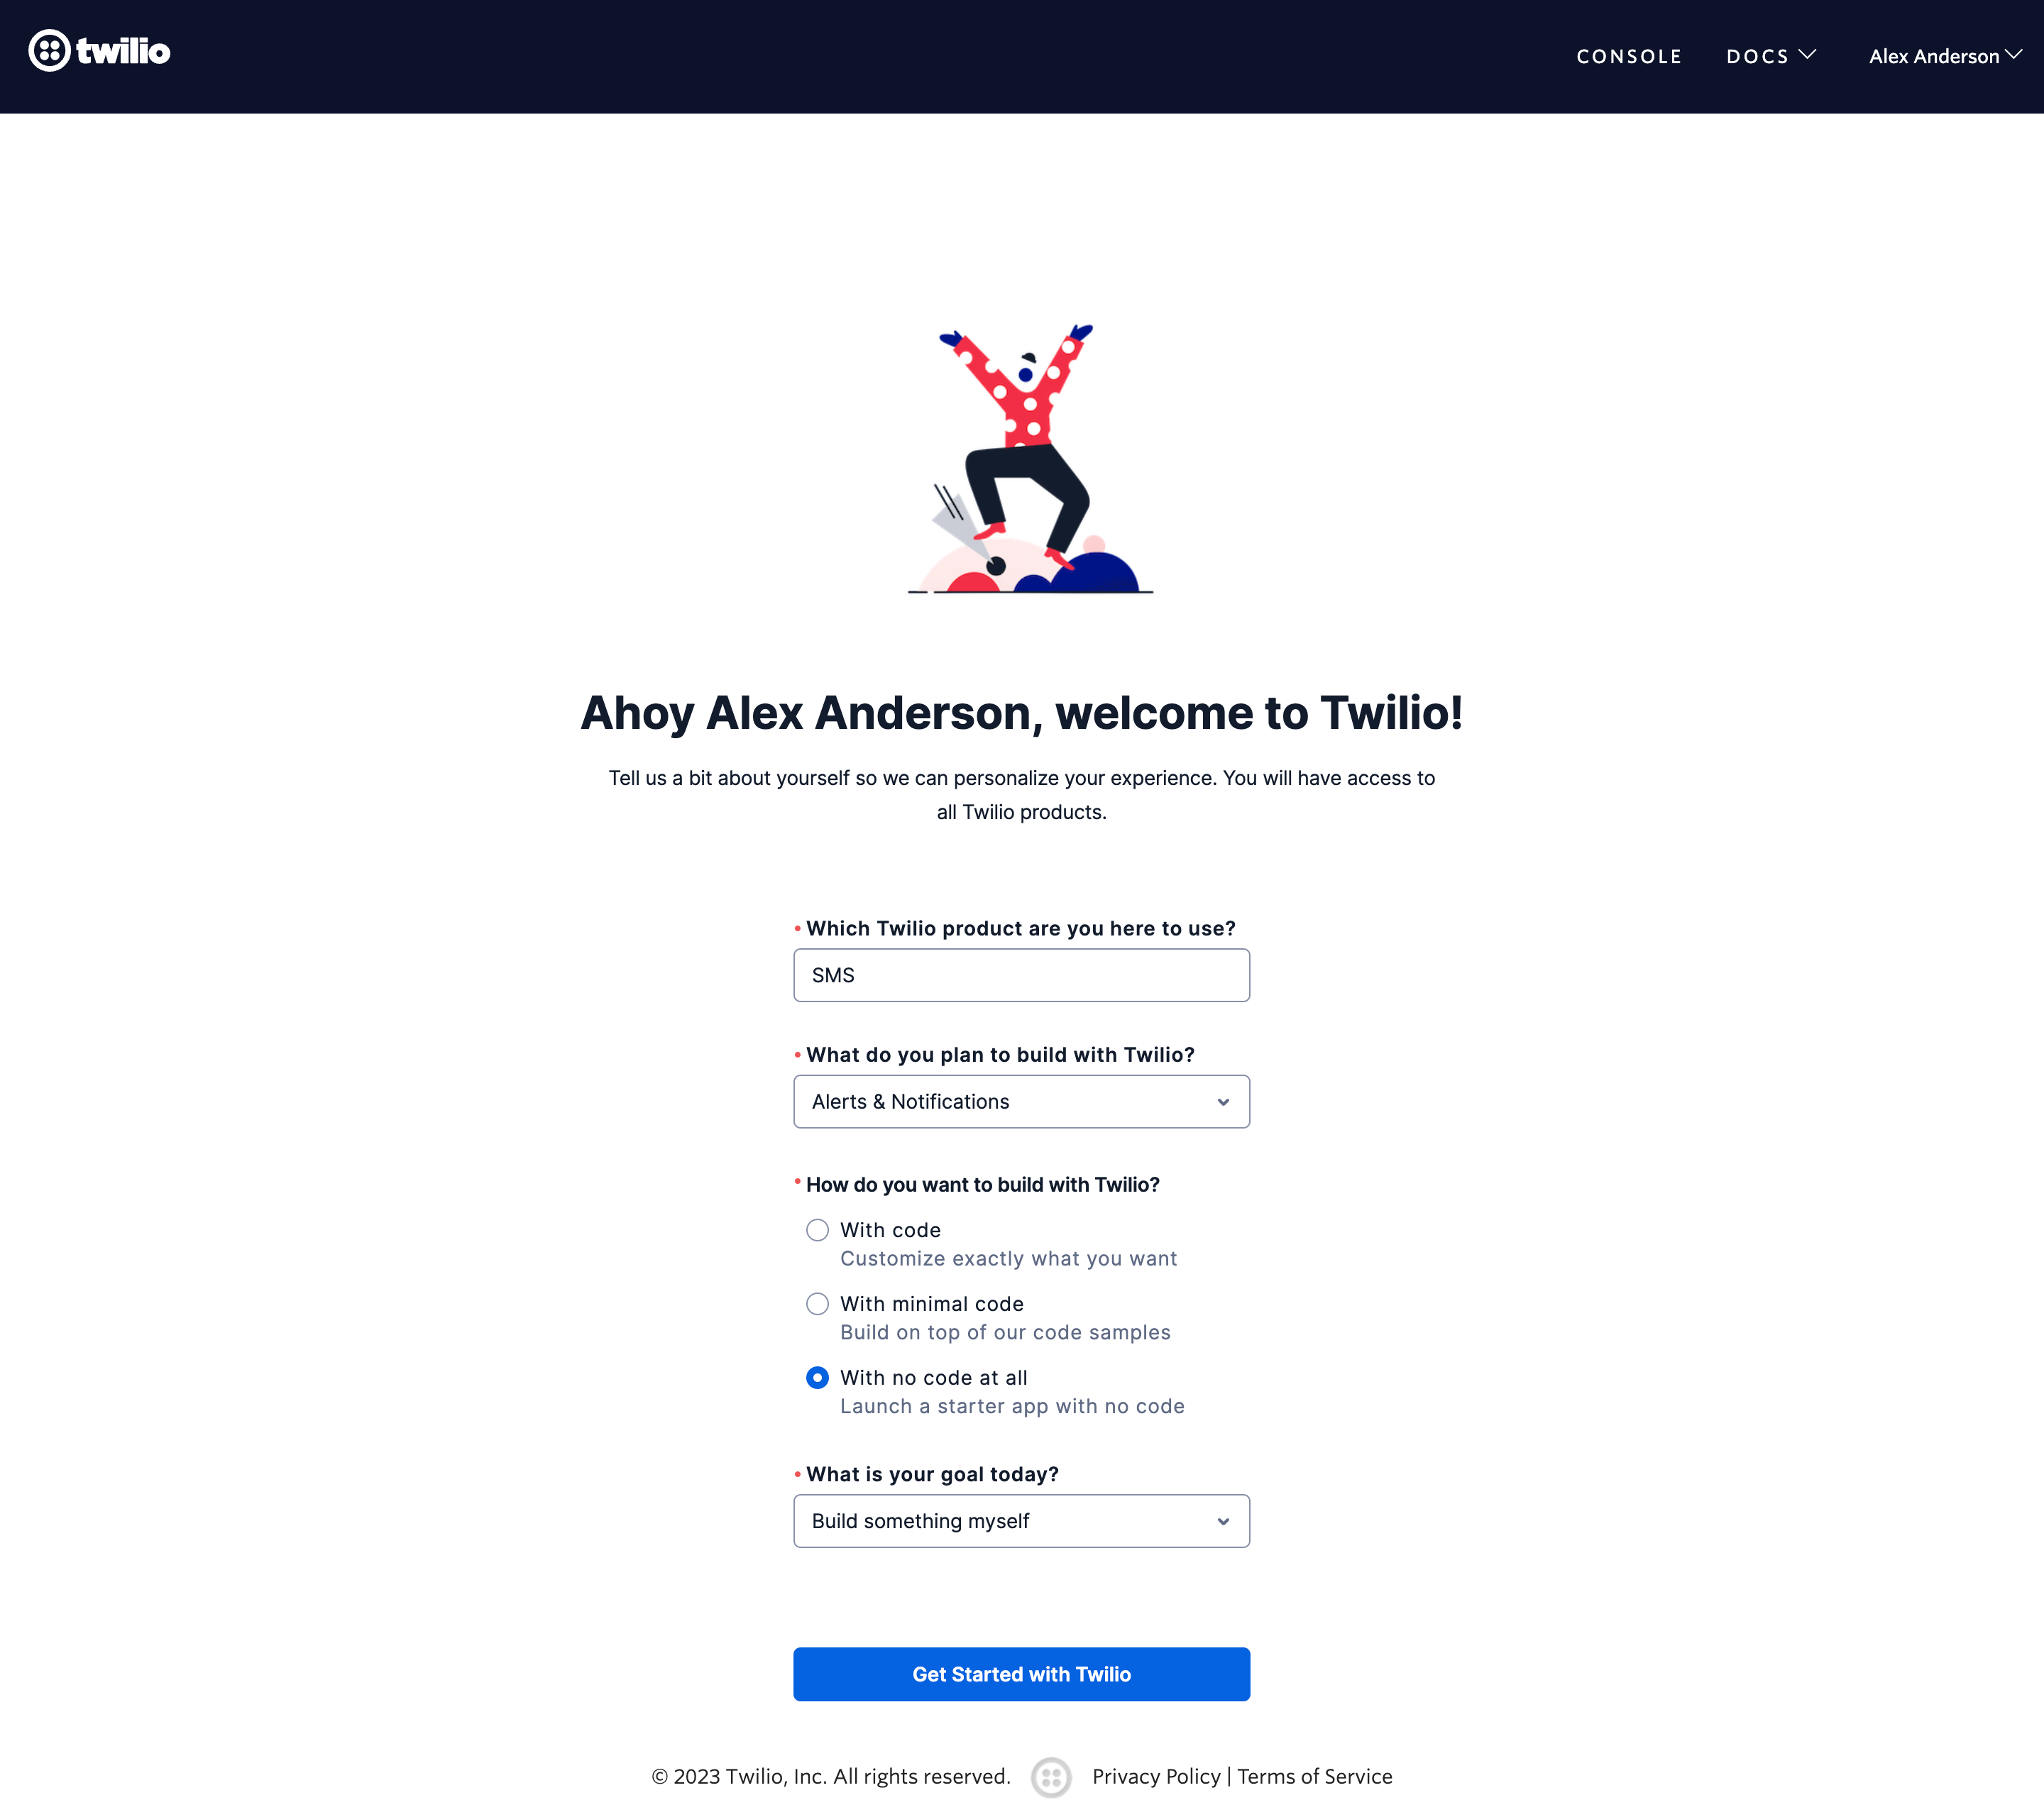
Please check your email to verify your Twilio account. Once verified, finalize your profile by following the instructions provided in the screenshot below.
After finishing the registration process, you will be directed to your personal Twilio Console. From there, you can easily manage and personalize your account as per your preferences.
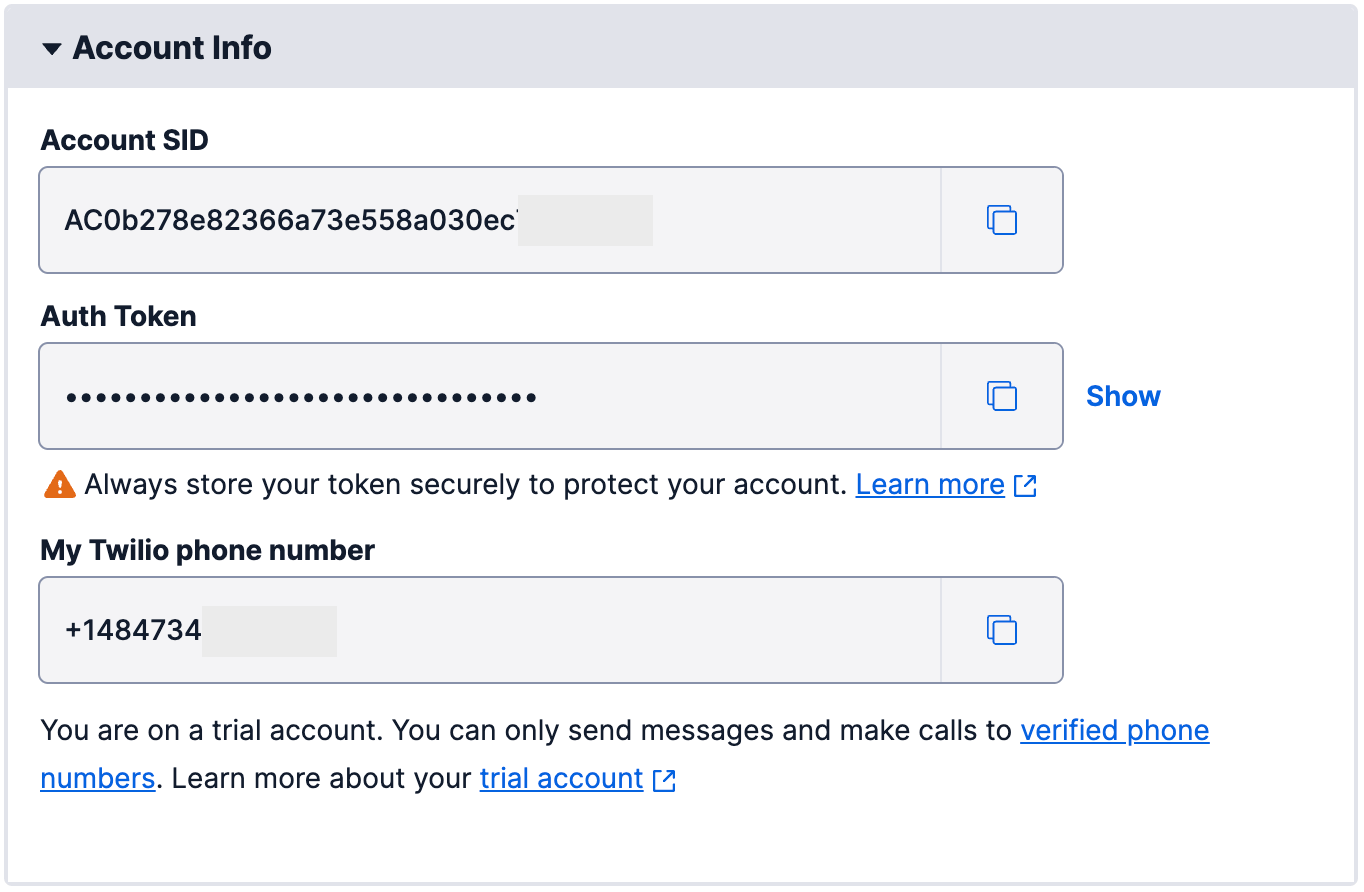
To integrate Twilio with MEC, you will need to access the Account Info box located at the bottom of the page.
Enabling the SMS feature on MEC
Once you’re prepared to utilize the Twilio System, navigate to MEC Settings > Modules > SMS.
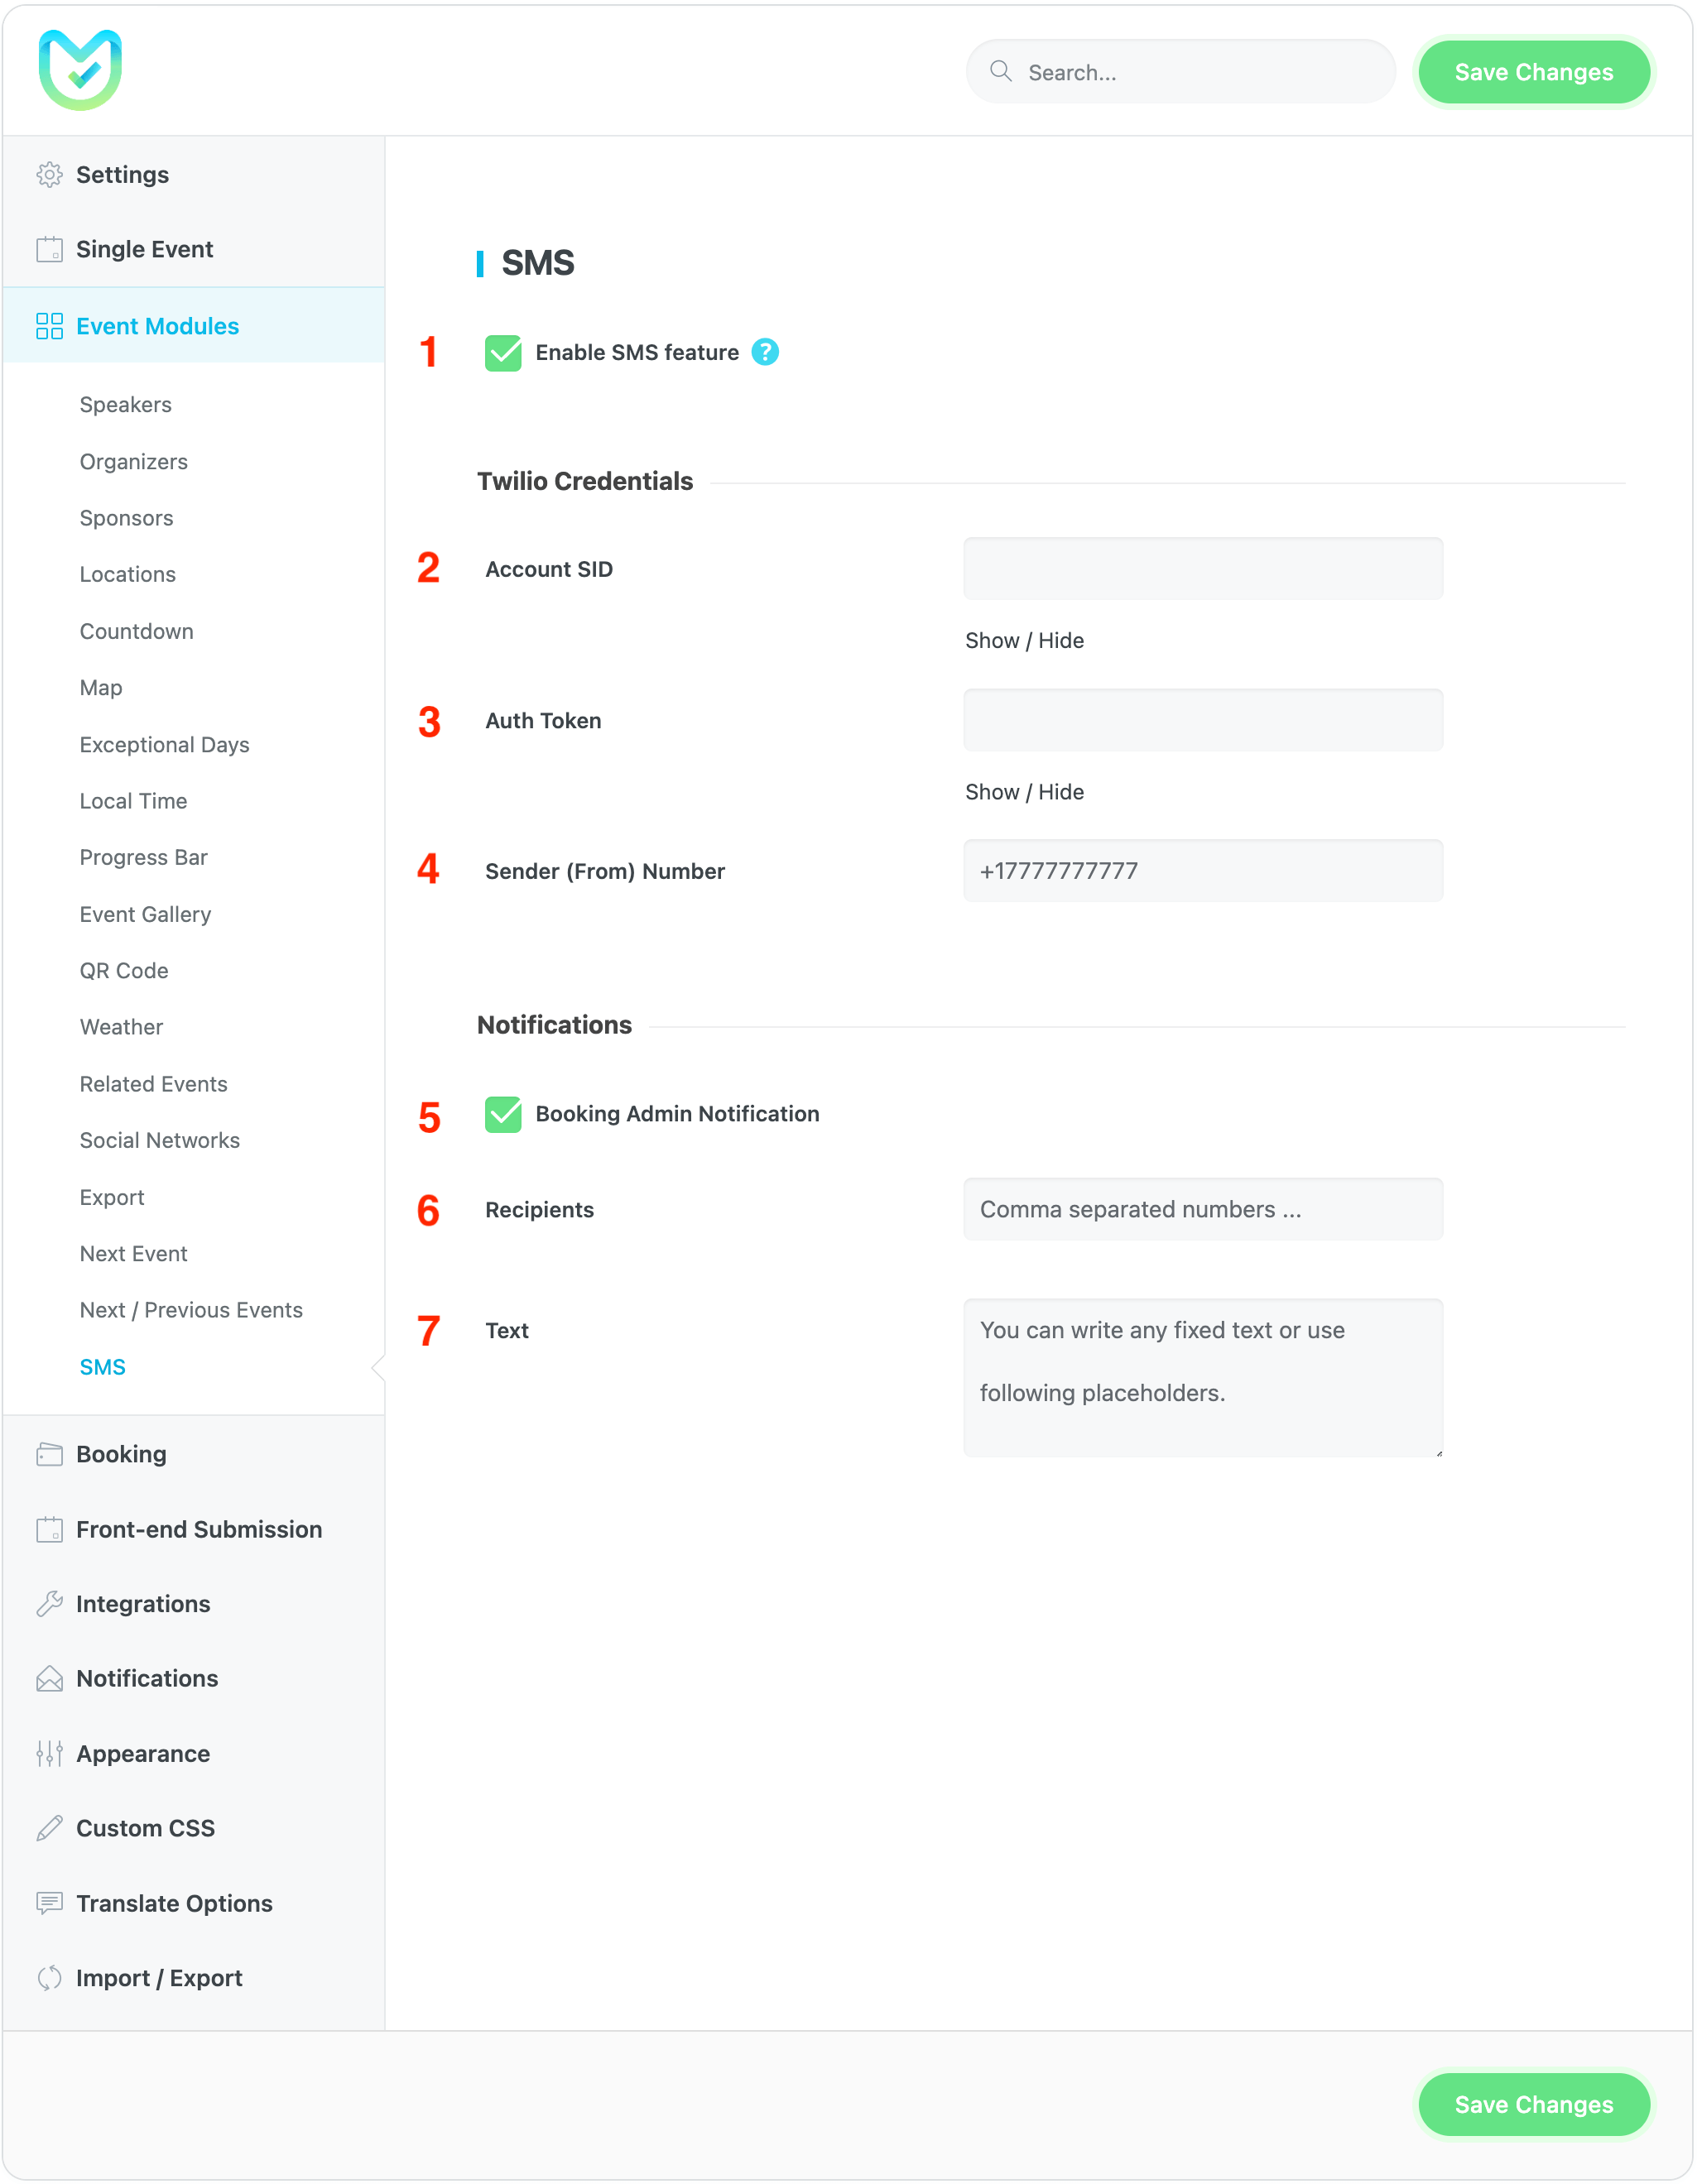
- To activate the SMS feature, select the checkbox provided.
- Account SID: Enter the account SID from your Twilio Console account info box here.
- Auth Token: Enter the Auth Token from your Twilio Console account info box here.
- Sender (From) Number: Enter the Twilio phone number from your Twilio Console account info box here.
- Booking Admin Notification: This option enables the booking admin notification.
- Recipients: You can enter the SMS Recipients here.
- Text: Set a text for your SMS or use the placeholders below.

Great! You’re all set up to receive SMS notifications whenever a user books an event.
Report Out Dated Content
If you think the content of this page does not reflect updated information, please let us know.
Nice post. I learn something totally new and challenging on websites


Nice post. I learn something totally new and challenging on websites