Zoom Integration Addon
With the Zoom Integration Addon, you can show users the information for your meetings and webinars in Zoom, providing the users with an event link’s embedded code, a username, and a password. You can choose whether they should be able to see this information after the reservation or be shown to everyone. You can also send this information via email after the reservation is made. Put a badge on shortcodes and single events to make them stand out.
Zoom Integration Addon Preparation
Installation
First, ensure that both MEC (Modern Events Calendar) and the Zoom Integration Addon are installed and activated.
Read Also:
How to install MEC and Addons?After installation, you can see a sub-menu in MEC’s main menu, which allows you to access the addon data and its integration with Zoom. First, you need to get down to combining. For this, you should log in to your Zoom account and follow the procedures below.
Zoom Settings
Build an OAuth app
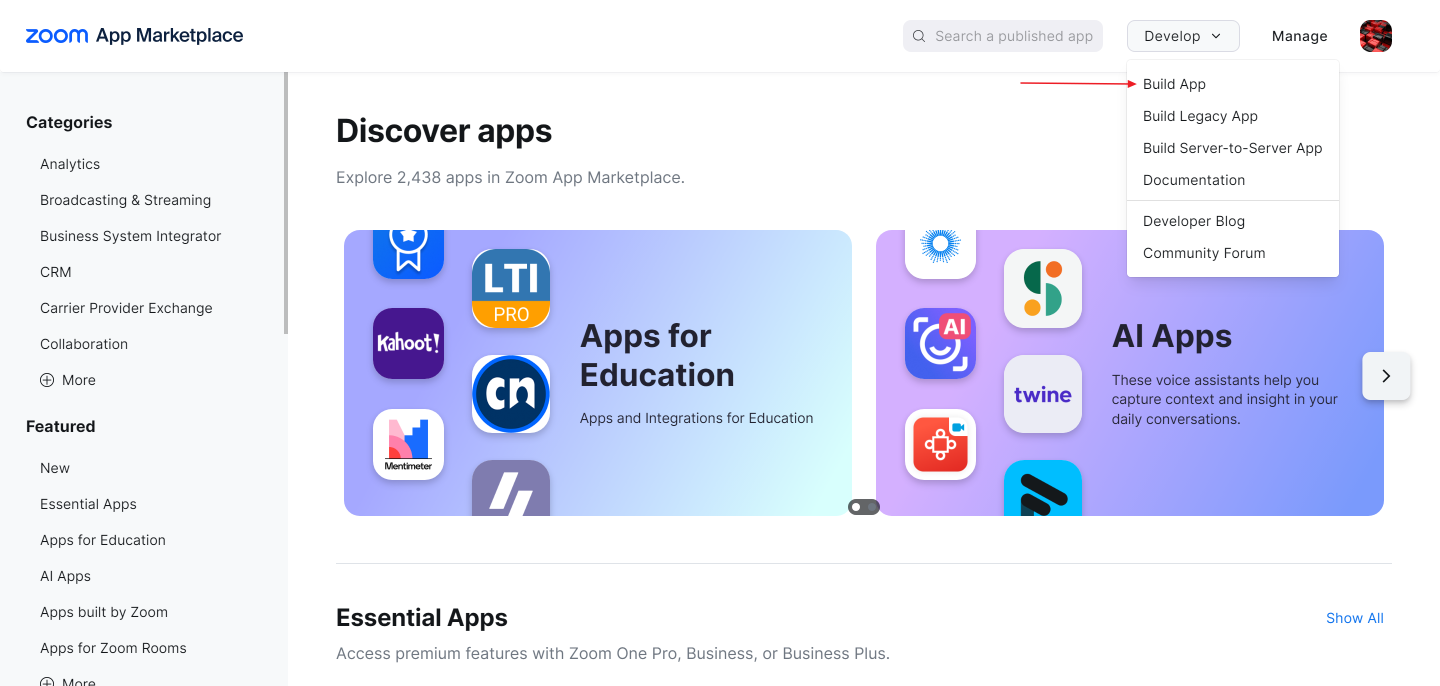
1. Log in to the Zoom App Marketplace through this link.
2. Click Develop > Build App.
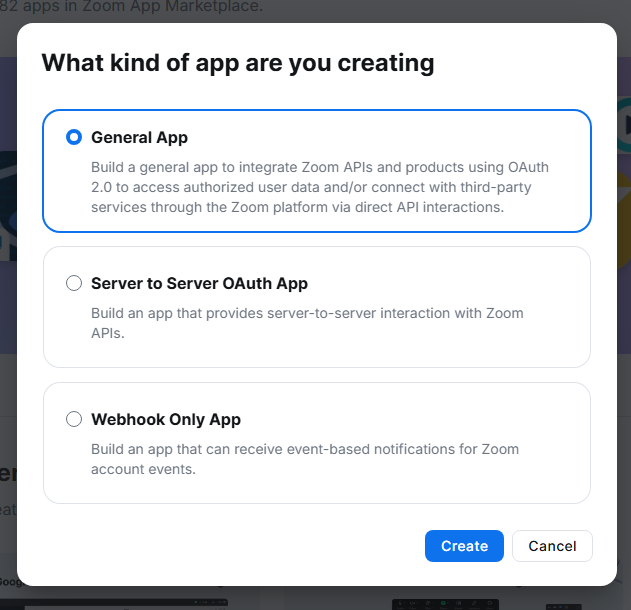
3. In the pop-up window that appears, choose General App.
Maintain basic information
On the Basic Info page, add or update information about the app such as the app’s name, how the app is managed, app credentials, and OAuth information.
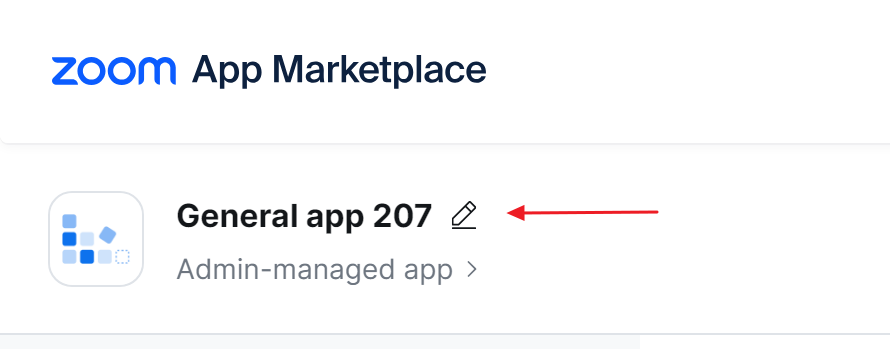
1. Update your app’s name. By default, the build flow generates a generic name for your app. To change your app’s name, select the edit icon (pencil) and update the name. To save your changes, click anywhere outside of the app name field.
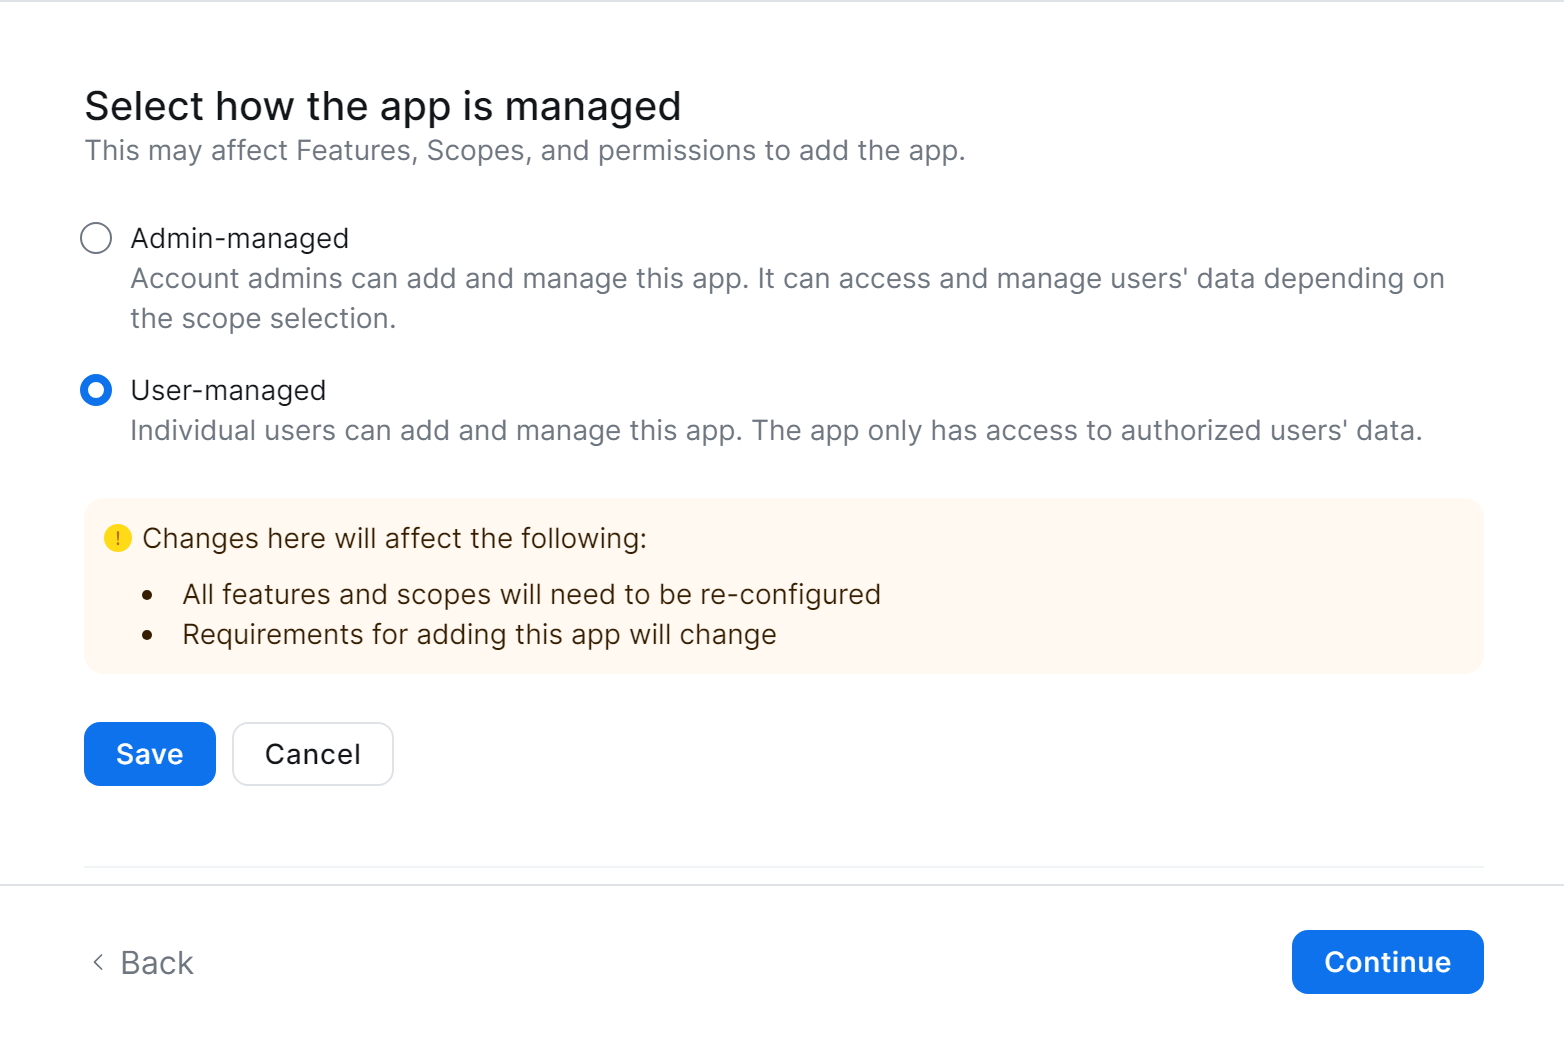
2. In the Select how the app is managed section, select the User-managed option and click the Save button.
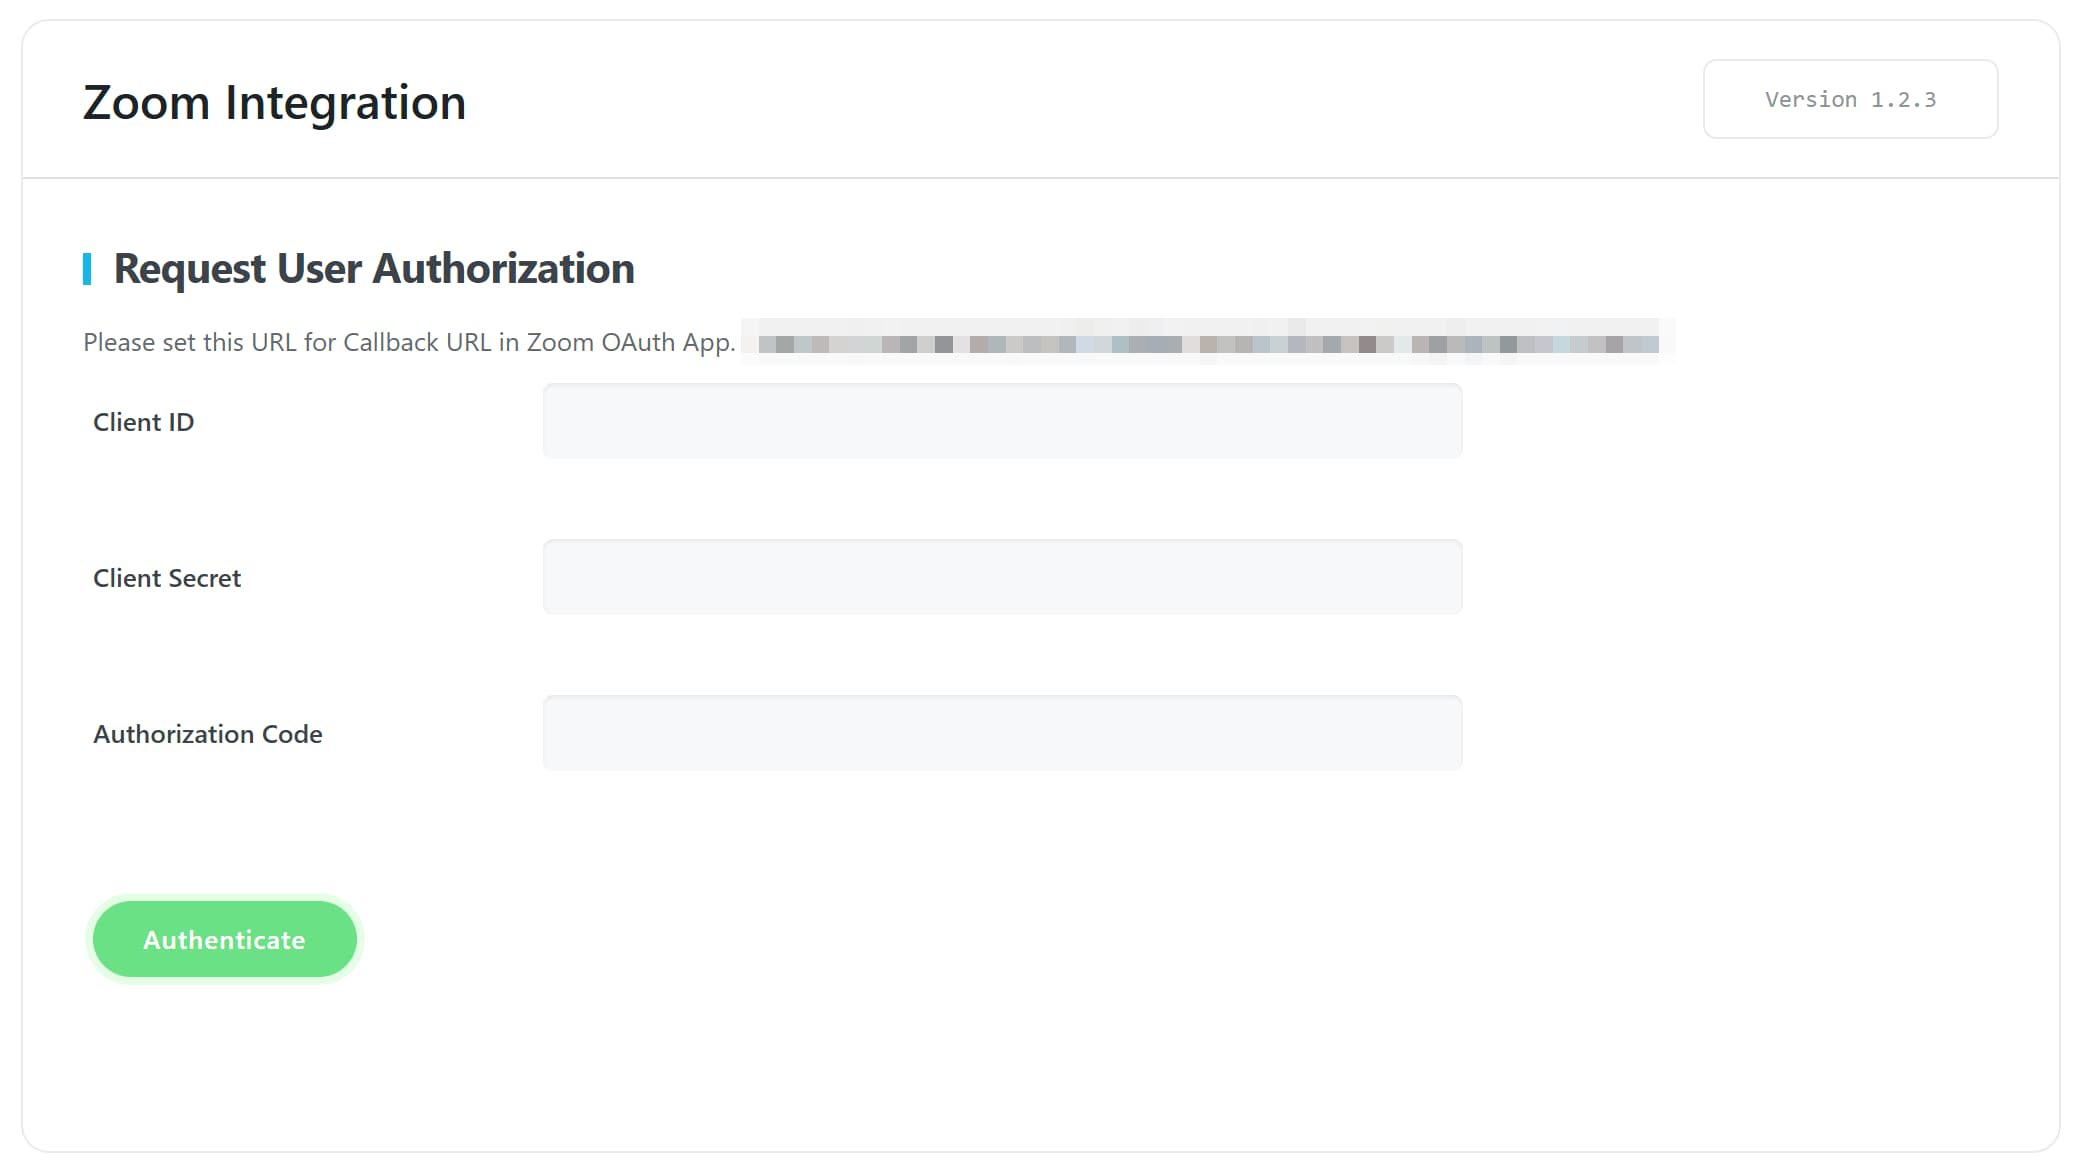
3. App Credentials – The build flow automatically generates app credentials (client ID & client secret) for your app. Copy and paste them into the API settings of the Zoom Integration addon in the WordPress dashboard: WordPress Dashboard > MEC Menu > Zoom Integration.
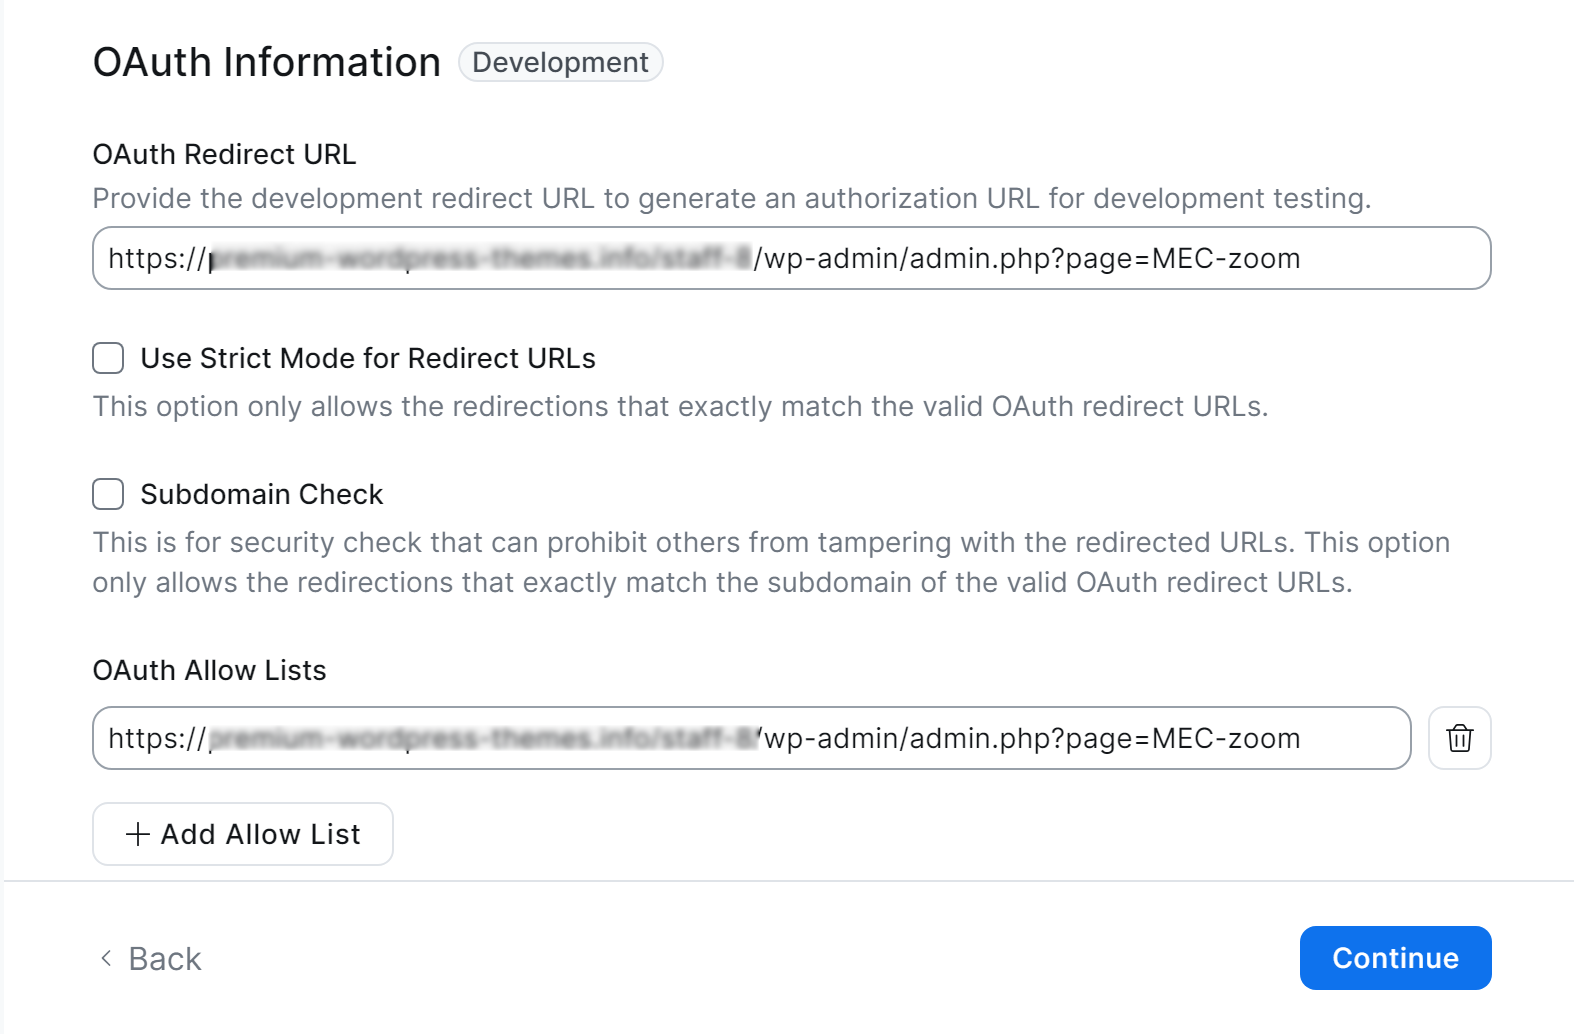
4. In the OAuth Information section, you will see an option called Redirect URL for OAuth, where you should put the provided link in the addon settings.
The above-referenced link will be automatically appended to the OAuth Allow List upon its inclusion in the OAuth Redirect URL field.
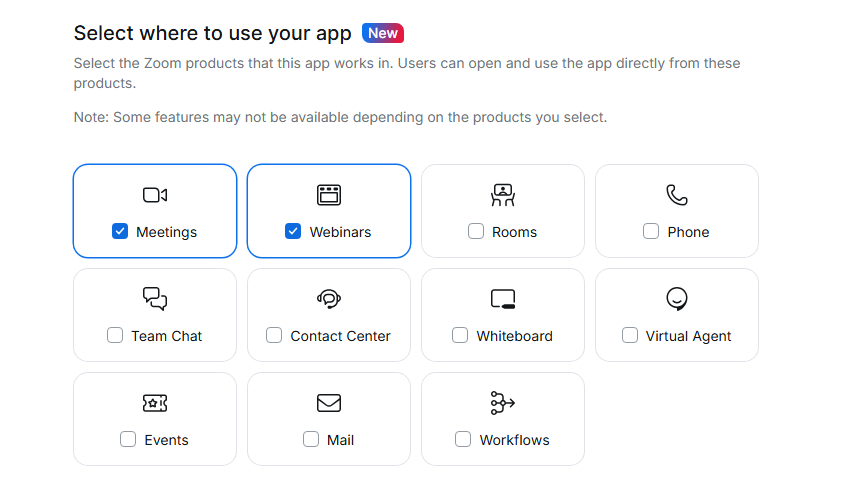
Select where to use your app
In the Features tab, under the Surface sub-menu, select Meetings and Webinars in the Select where to use your app section to improve app performance.
For now, we will skip the remaining submenus under the Features tab and the Custom Form tab.
Select the scopes
On the Scopes page, select the Zoom API methods your app is allowed to call. This defines which information and capabilities are available to your user.
1. By clicking on Add Scopes, a pop-up window appears.
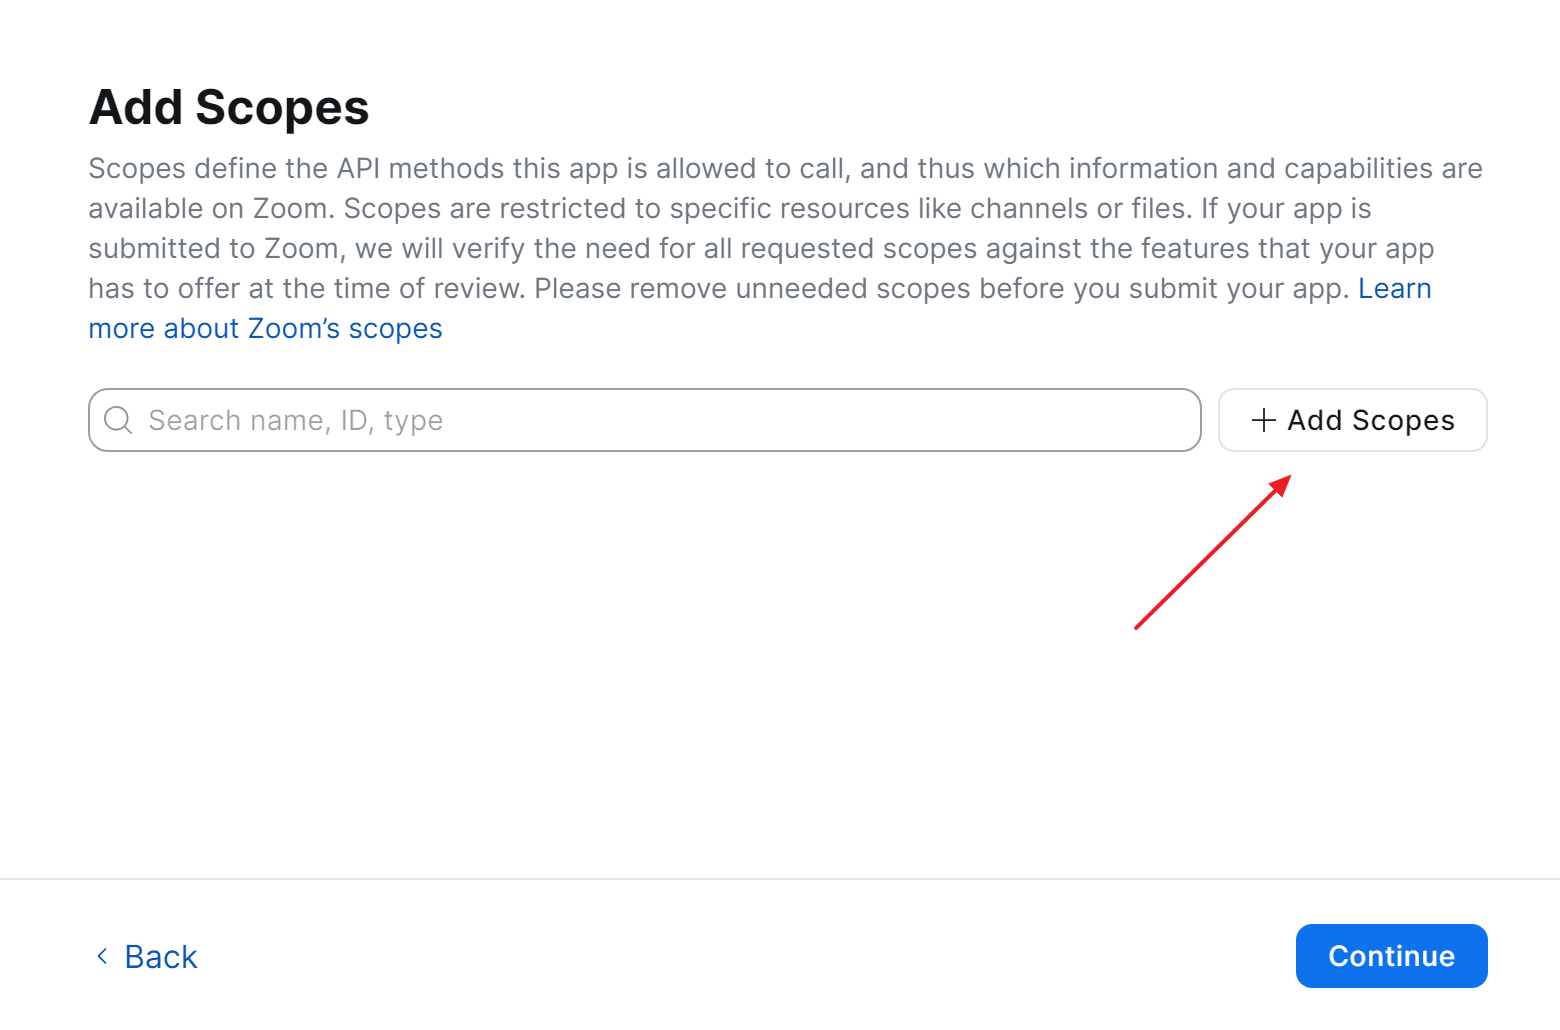
2. In the pop-up window, permit the meetings and webinars to be read and written.
To ensure seamless access to the list of webinars and meetings in your Zoom account, it is recommended to include the following scopes in the app:
From the Meetings menu, add:
- Scopes under the “View all user meetings” subcategory (26 scopes).
- Scopes under the “View all user Webinars” subcategory (19 scopes).
- Scopes under the “View and manage all user meetings” subcategory (3 scopes).
- Scopes under the “View and manage all user Webinars” subcategory (29 scopes).
- Scopes under the “View and manage your meetings” subcategory (22 scopes).
- Scopes under the “View your webinars” subcategory (5 scopes).
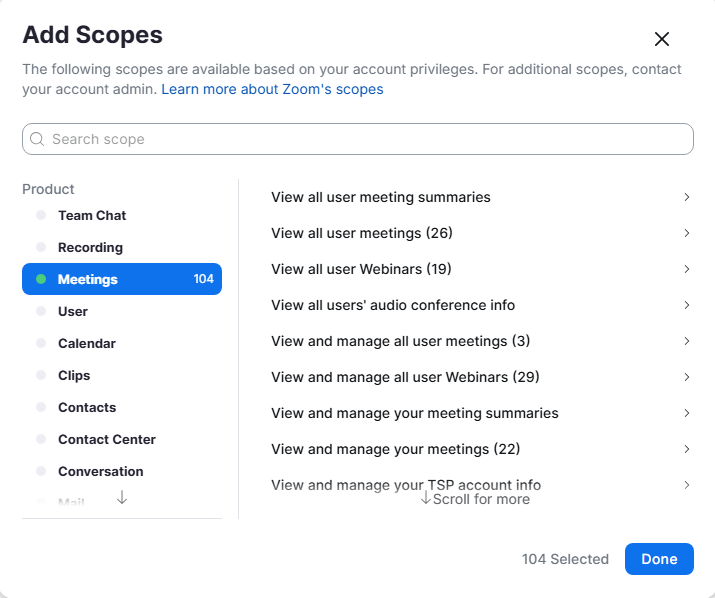
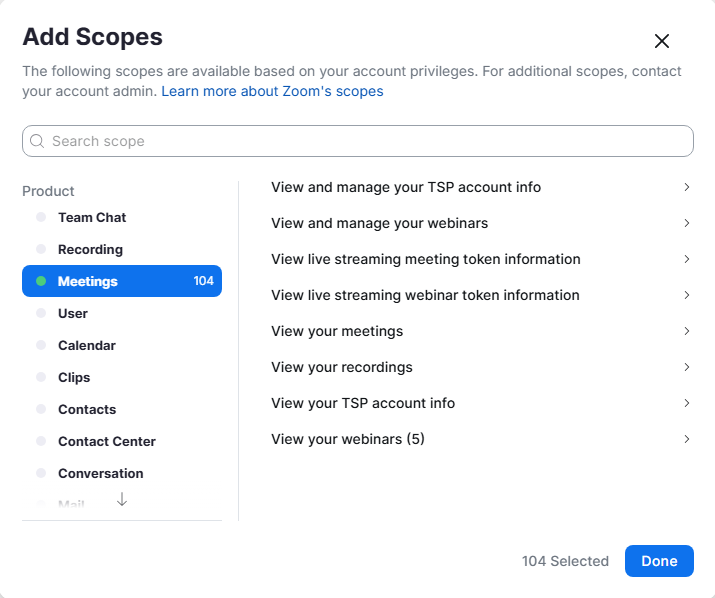
Adding these scopes ensures that you can access and manage meetings and webinars without issues. Once authentication is complete, the list of meetings and webinars will be displayed effortlessly.
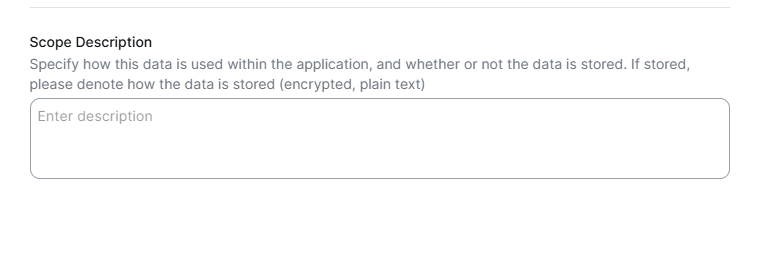
3. After completing this step, you can add a description for the data, specify how it will be used in the app, and indicate whether or not the data will be saved.
Test and preview your app
To see a summary of your app’s details and a preview of your app’s listing page on the Zoom App Marketplace, select Preview Your App Listing Page.

Connect Zoom Integration Addon
Your application is almost ready. Now you just need to add the Installation URL to the Zoom Integration.
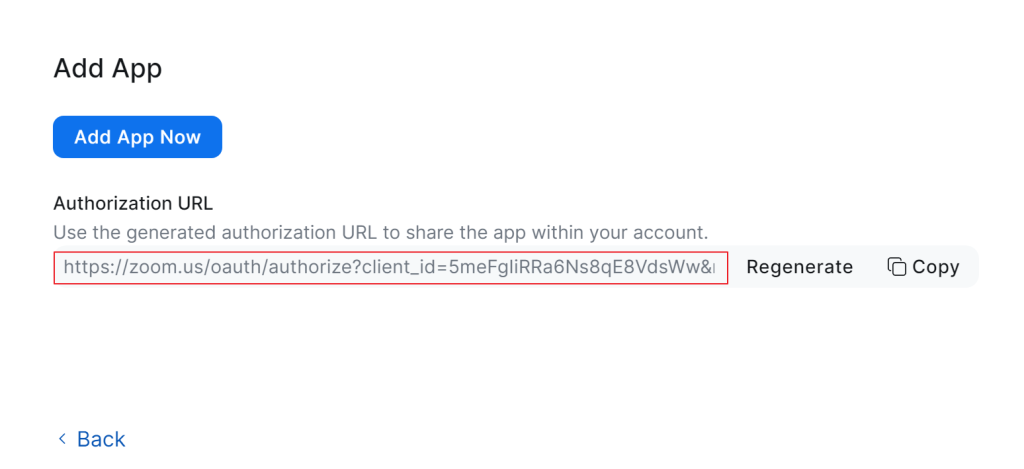
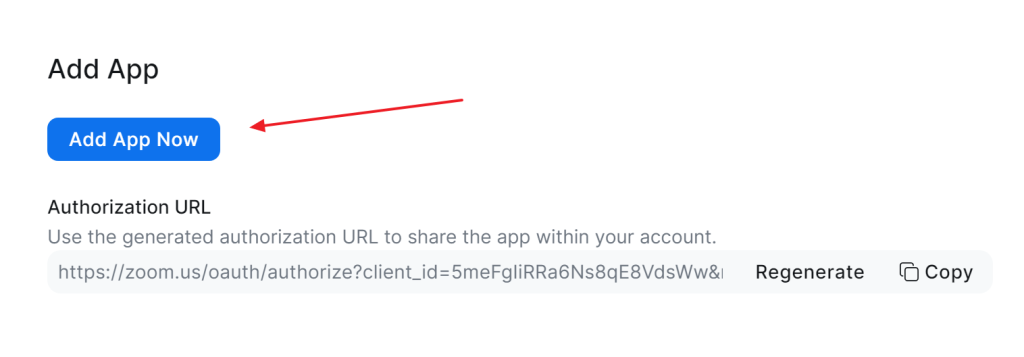
To share your app with other users on your account, go to the Authorization URL section, select Generate, and then copy.
Authorize Zoom Integration
To integrate the application with your account, it is required that you select Add App Now and subsequently click on Authenticate within the Zoom Integration interface.
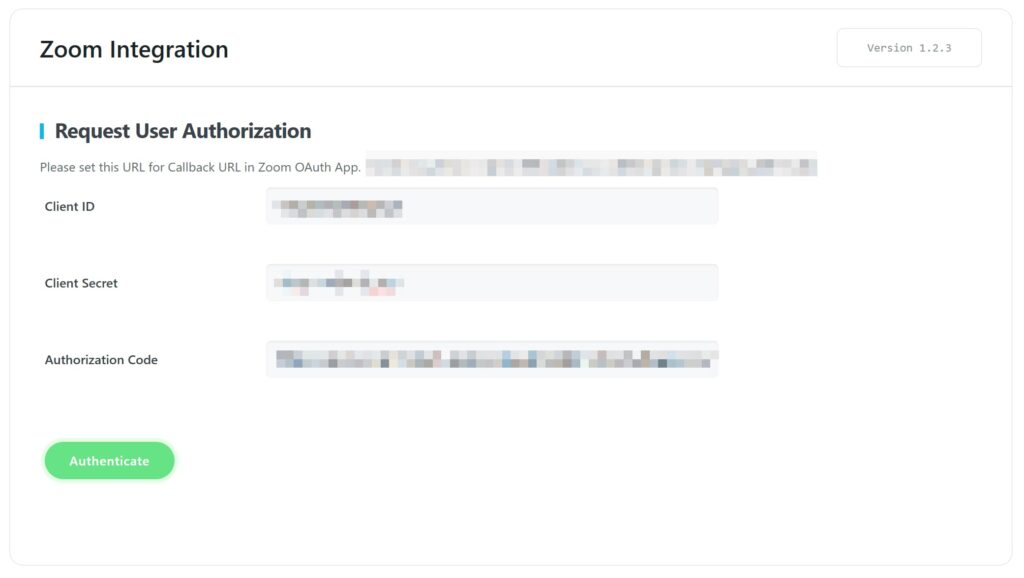
Now, click on Allow so it will be authorized.

Upon completion of these steps, an authorization code will be automatically generated. Subsequently, you return to the Zoom Integration page. Click Generate Access Token to obtain new access credentials.
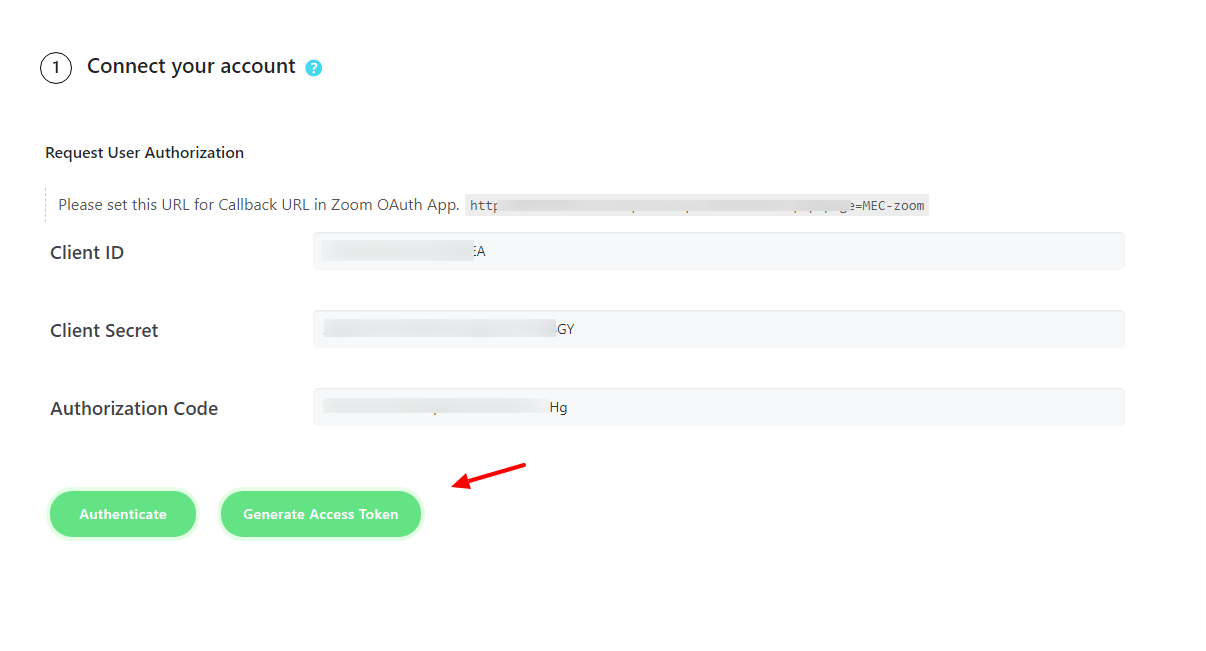
The system will start checking to give permissions. This might take a while. If you do not have a proper configuration for your host on the php.ini file, this might take more time or even give a timeout error. So make sure your server has a proper PHP execution time. After the generation of the access token, you will see a new box that points to the second stage.
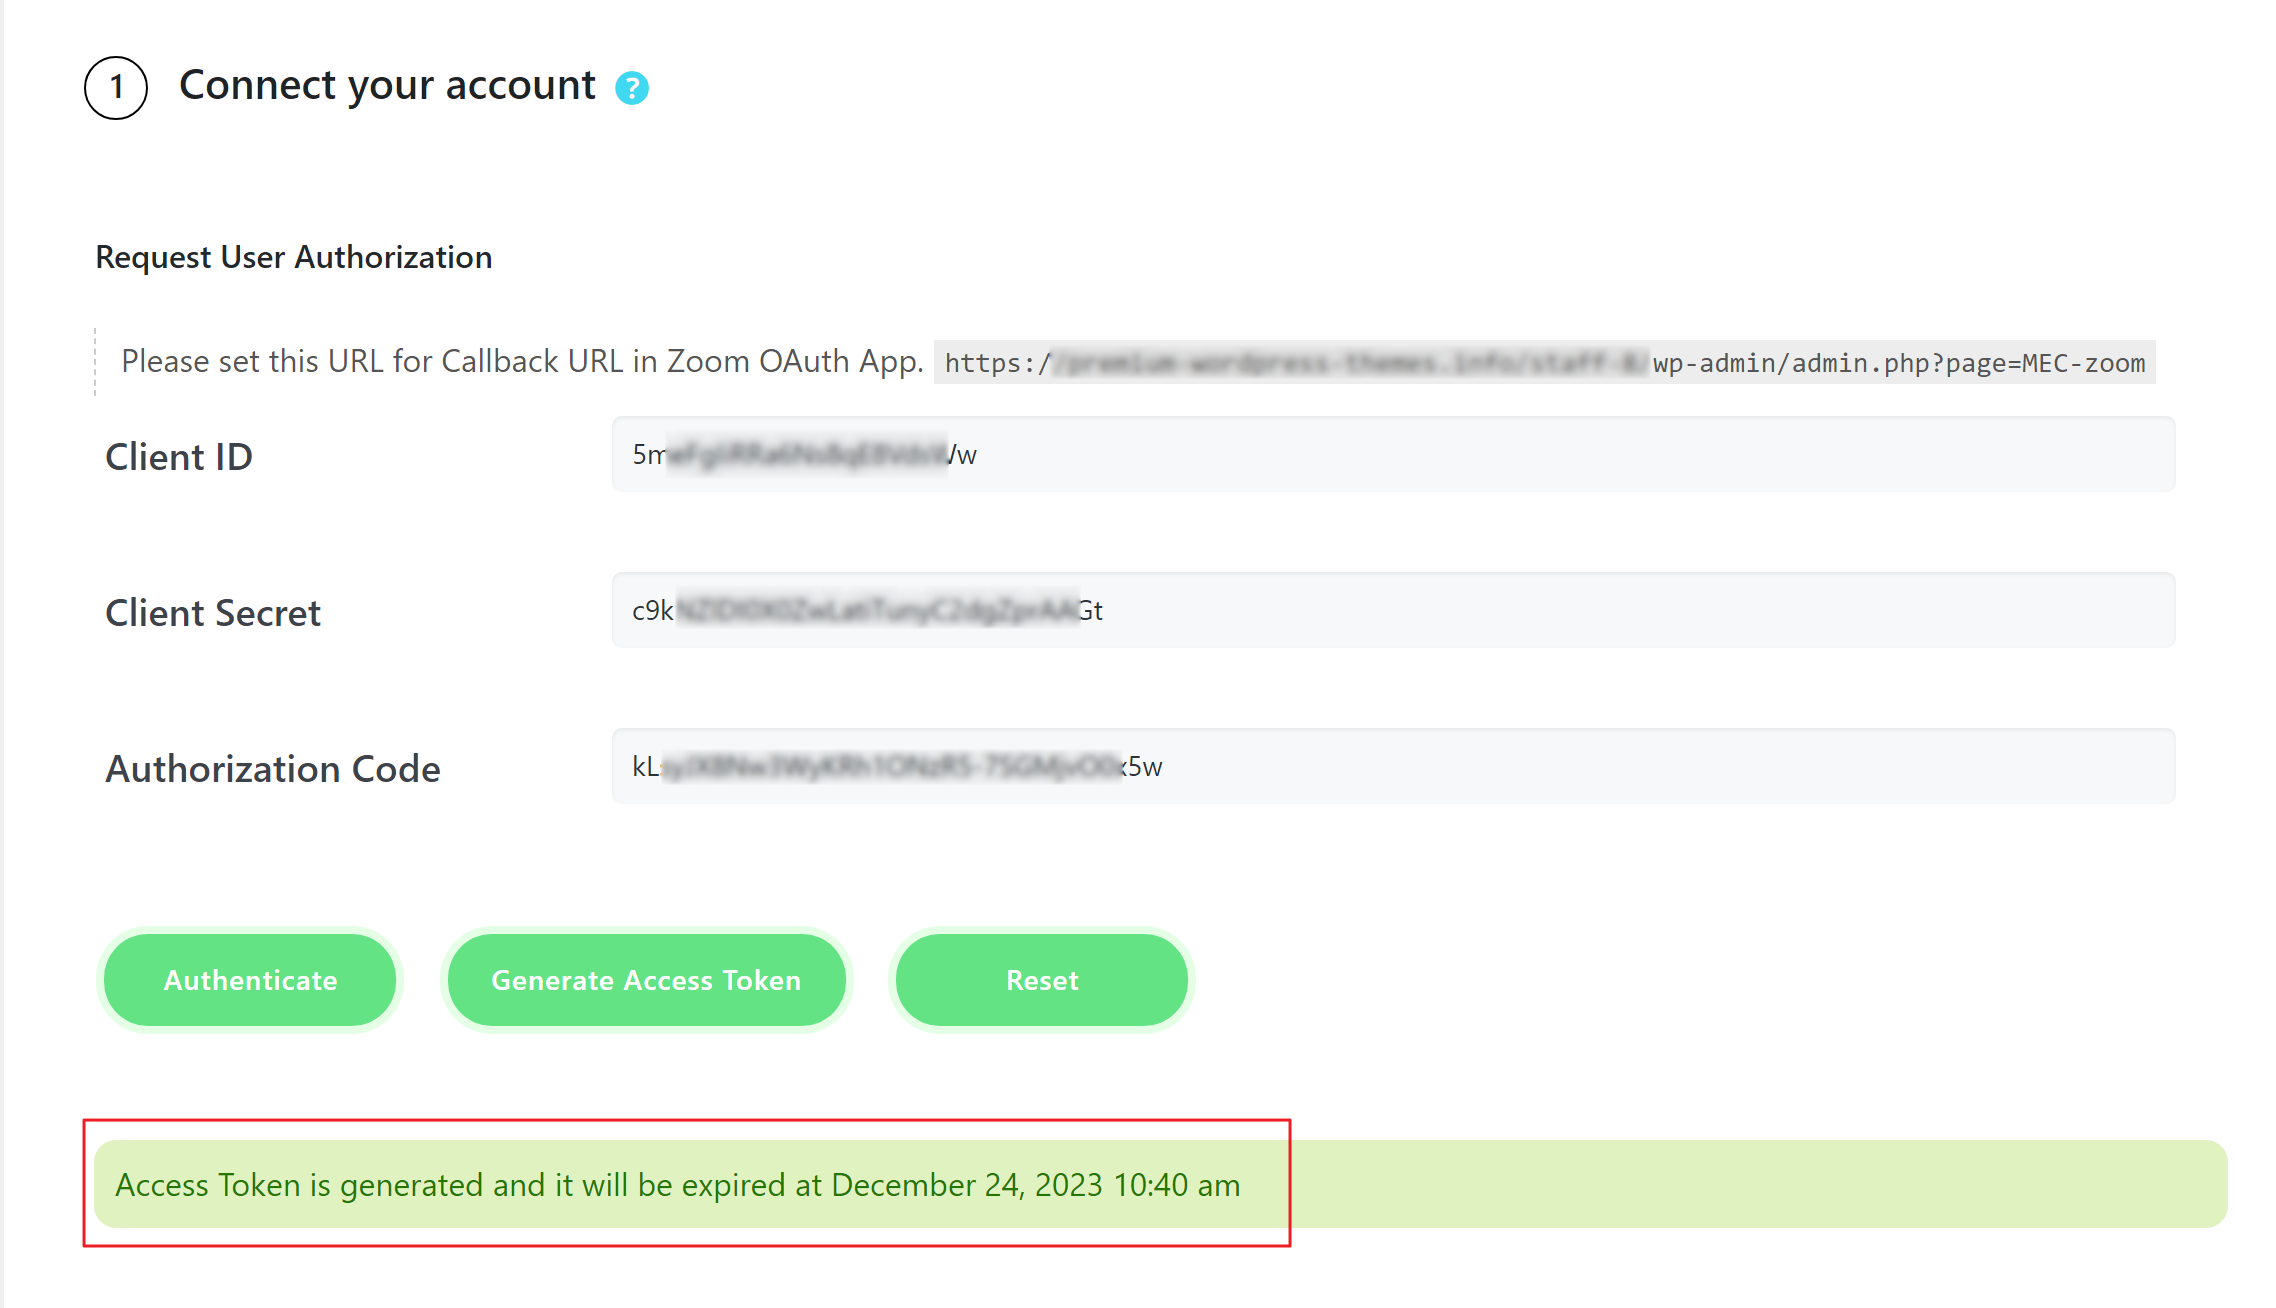
In this stage, you can transfer your meetings or webinars from Zoom to MEC as an event. To do so, click on Get Meetings or Get Webinars to see the list of meetings or webinars. Select one, some, or all of them to be imported, and at the end, click on Import.
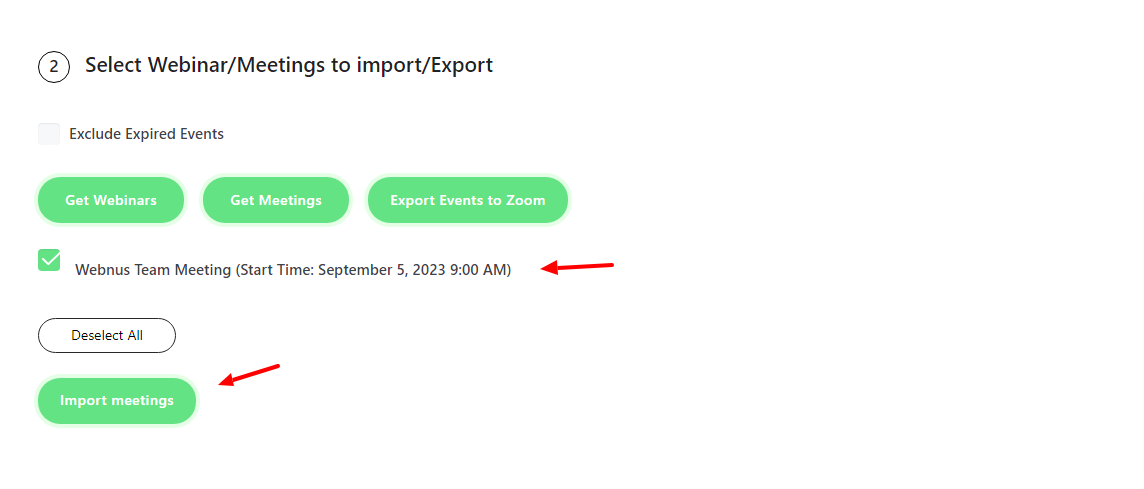
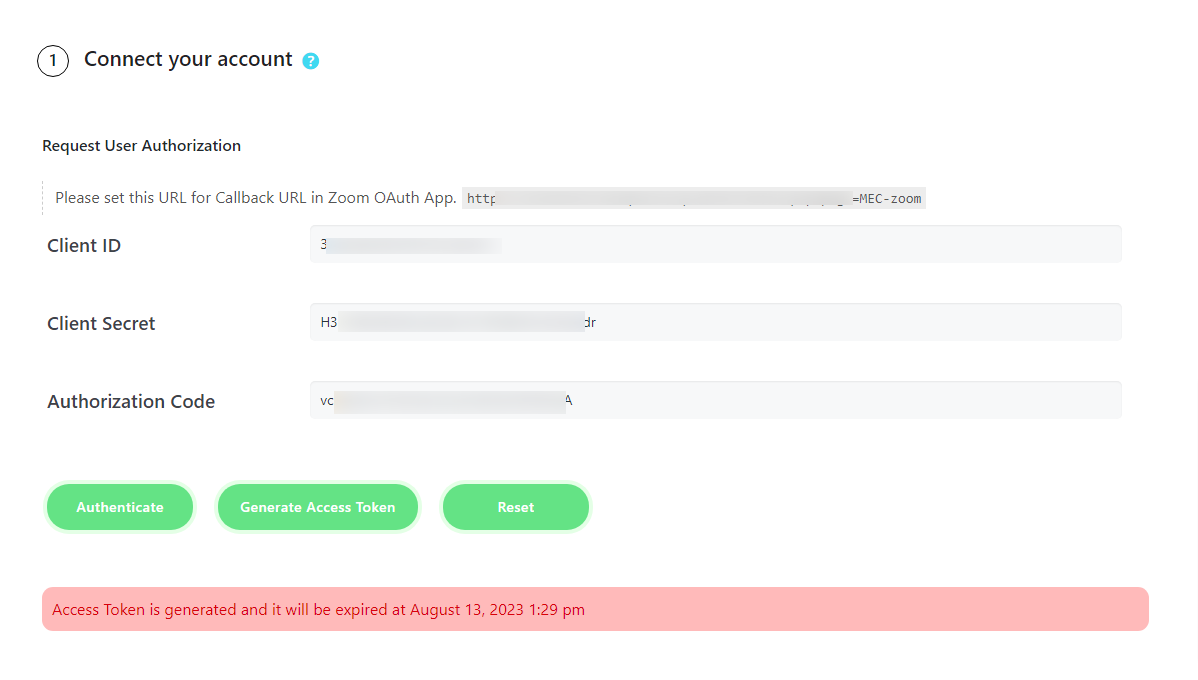
Note: During the import process, you may find that the access token has expired. In this case, you need to click again on Generate Access Token.
The access token in the Zoom integration expires every hour, and there is no automatic way to refresh it regularly to access the events exported to Zoom. This issue pertains to the Zoom platform, where MEC and the Zoom Integration have no control over access token policies. The Zoom platform provides access tokens with a fixed validity of one hour (60 minutes), and it is not possible to modify this duration through the integration.
To continue accessing the Zoom API after a token expires, it must be refreshed. However, the expiration of Zoom access tokens does not impact the functionality of events already sent to Zoom; only new events cannot be exported from MEC to Zoom until the token is refreshed.
This limitation does not disrupt the event process, as users will retain access to their previously booked events without any issues. Additionally, the expiration of these tokens does not affect the display of past events, as the tokens are primarily used for syncing new events between MEC and Zoom.
Go to the list of all events in the backend. The imported events contain essential information for entering the webinar of the meeting. You just need to complete your event and create the main characteristics of it, such as the speaker, organizer, description, featured image, etc.
Zoom Integration Settings
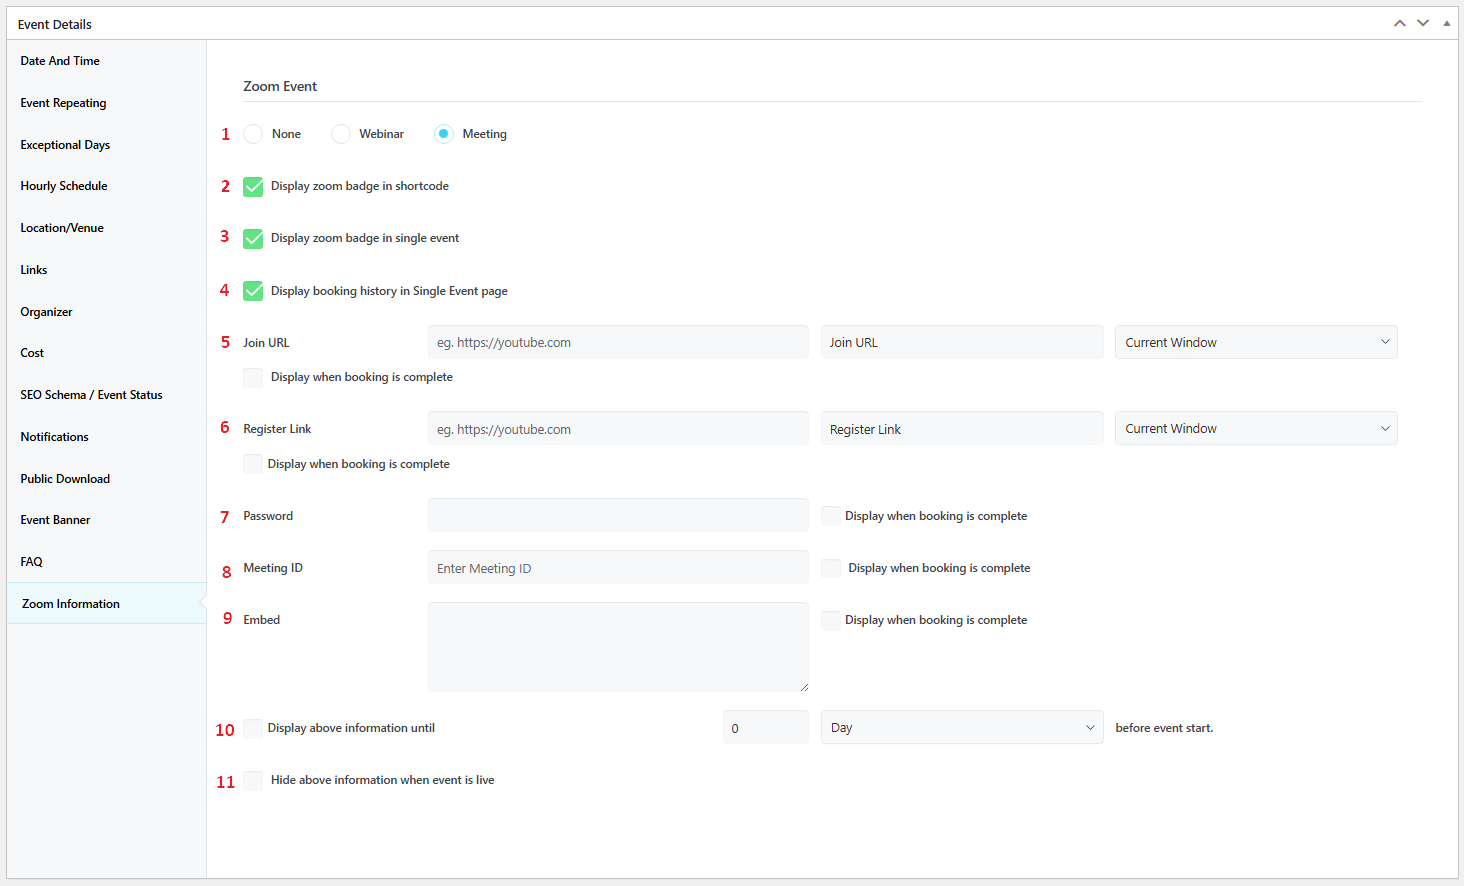
Regarding the new tab after installing Zoom Integration, some complementary information is provided here:
1. Type of the event.
2. View the zoom icon in all shortcodes as a badge:
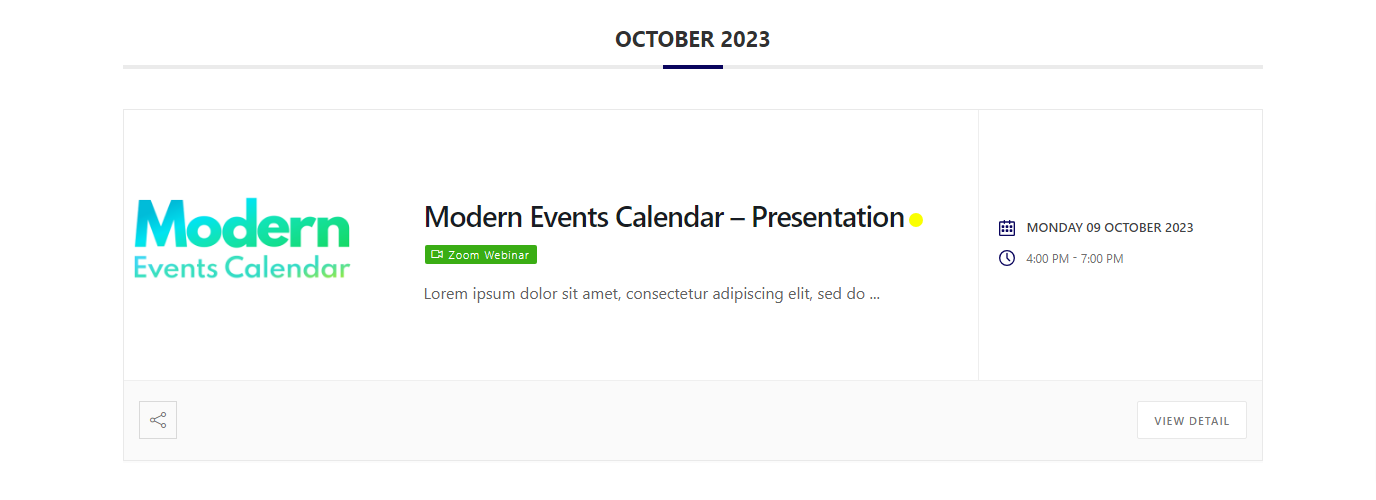
3. View the badge on the Single Event page in the sidebar:
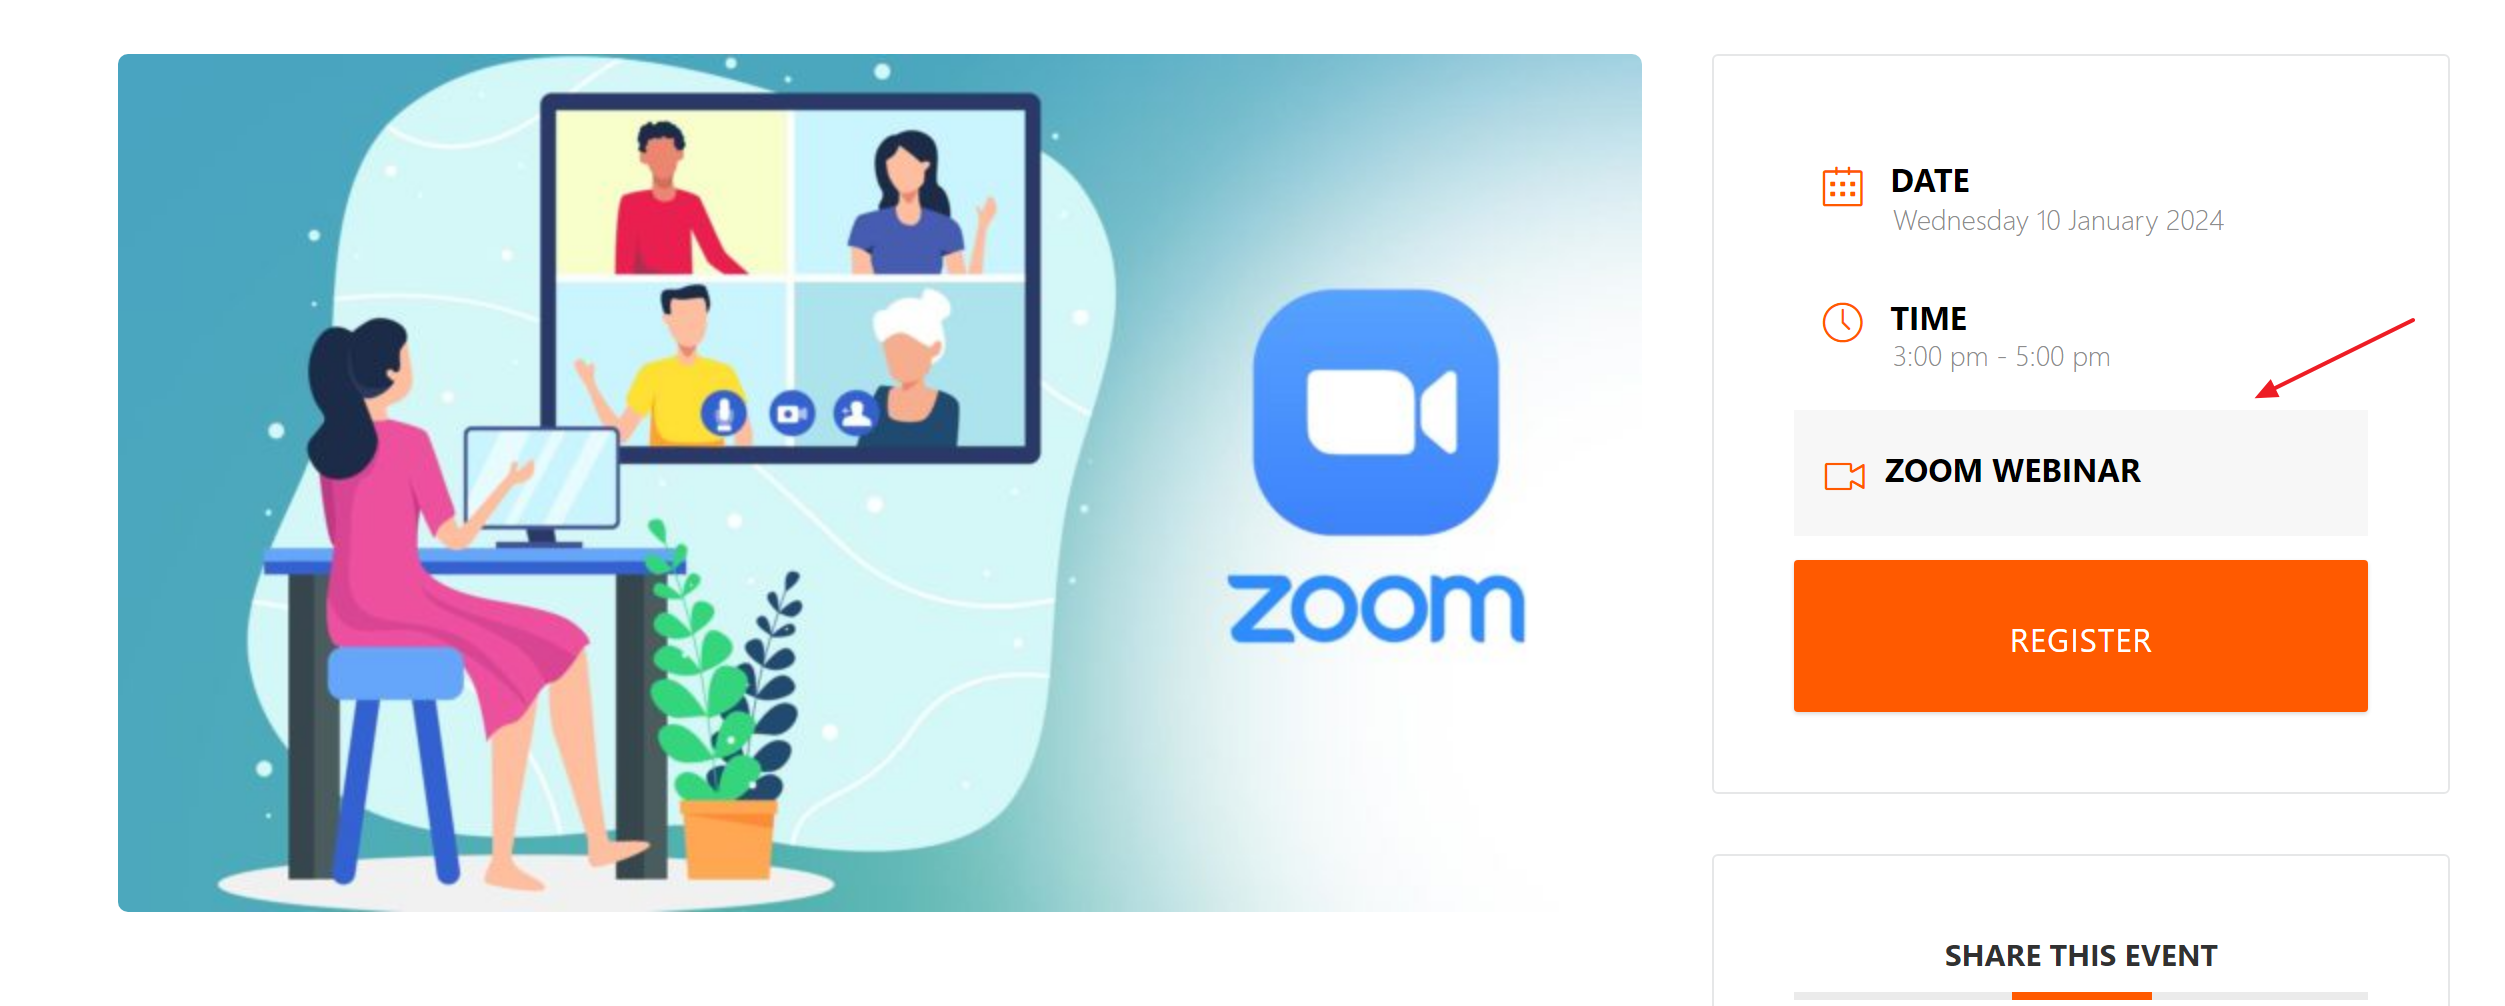
4. By enabling this option, you can display booking history on the Single Event page

5. Join URL with title and link target
6. Register link
7. The password to join the Zoom event.
8. The Meeting ID of the Zoom meeting linked to the event.
9. Embed code (for instance, a YouTube video or…)
10. View the above info at a certain interval before the event starts.
11. Hide the details once the event is live.
You can manage this using the Display above info at a certain interval before the event starts option, which allows you to specify a time frame before the event begins for the Zoom details to become visible.
Additionally, enabling the Hide above information when the event is live option will automatically conceal the Zoom event details as soon as the event starts. A checkbox is located next to the Join URL, Link, Password, Meeting ID and Embed fields. By selecting these options, the corresponding information will only be displayed to users after they complete a booking. This ensures that the details are not visible upfront and become accessible only upon reservation.

This addon utilizes email placeholders to send the relevant Zoom details to users.
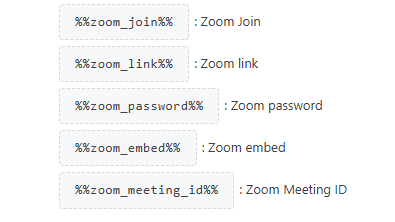
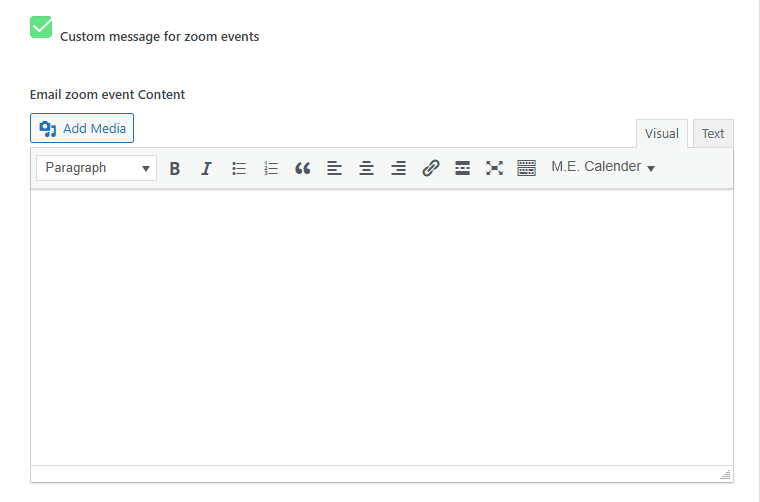
Additionally, after installing the addon, a new option called Custom message for Zoom events is added to the MEC notification settings. This feature allows you to create dedicated content for Zoom event emails without modifying the email content for other events.
Zoom Integration in Single Events
Making preparations for Exporting from MEC to Zoom:
You may need to transfer your events from MEC to Zoom. You must ensure you’ve defined what events need to be transferred. You can do this by going to Edit Event Page for each event you want to be transferred and then going to Event Details > Zoom Information and defining that your Zoom event is either a Meeting or Webinar.

Then go to Zoom Menu under MEC – you might need to generate the access code again – then in the new window, simply click on Export Events to Zoom.
Using Zoom Events in FES
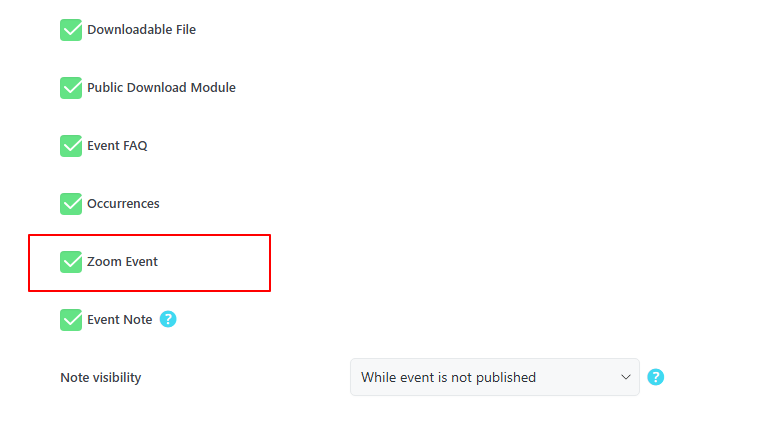
Also, you can enable the Zooml Event option on the FES Form.
FAQ
What are the prerequisites for using the Zoom Integration Addon?
You need to have MEC Pro and the Zoom Integration Addon installed and activated, along with a Zoom account to integrate the services.
What does the Zoom Integration Addon for MEC do?
The Zoom Integration addon connects Modern Events Calendar to Zoom, enabling you to display details about your Zoom meetings and webinars to users, such as links, usernames, and passwords.
How can I display Zoom meeting details to event participants?
You can provide meeting links, embedded codes, usernames, and passwords to participants. You can choose to display this information after booking or show it publicly on event pages
How do I integrate Zoom with the Modern Events Calendar (MEC)?
First, install both MEC and the Zoom Integration Addon. Then, follow the steps to create an OAuth app in the Zoom App Marketplace, configure API settings in your MEC dashboard, and enable the required Zoom API scopes for meetings and webinars.
What is an OAuth app, and why do I need to create one?
An OAuth app is necessary to enable the Zoom Integration Addon to securely access and manage your Zoom meetings and webinars. It provides the required credentials and permissions for proper functionality.
What information do I need to provide when creating the OAuth app?
You’ll need to provide a name for the app, select “User-managed” as the app management option, and copy the generated client ID and client secret. Additionally, make sure to add the Redirect URL for OAuth provided in the addon settings.
What are Scopes and why are they important?
Scopes define the Zoom API methods your app can access, determining the information and actions available to the user. For the integration to function correctly, you will need to add Meeting and Webinar scopes.
Which scopes should I add for the integration to work correctly?
You should add all the scopes from the subcategories “View all user meetings,” “View and manage all user meetings,” and “View and manage your meetings” under the “Meeting” menu. Similarly, from the “Webinar” menu, include scopes under “View all user Webinars,” “View and manage all user Webinars,” and “View your webinars“.
Can I integrate multiple Zoom accounts?
No, the Zoom Integration add-on only allows you to connect one Zoom account at a time. The addon uses OAuth credentials, which can only be linked to a single Zoom account. If you need to switch to a different Zoom account, you would have to disconnect the current account and then connect the new one by entering the new OAuth credentials (Client ID, Client Secret, and Authorization Code) in the MEC Zoom Integration settings.
How do I authorize the Zoom Integration add-on in WordPress?
After creating your Zoom OAuth app, copy the authorization URL from the Zoom App Marketplace and paste it into the Zoom Integration settings in your WordPress dashboard, then click “Add App Now” and then “Authenticate”. Click “Allow” and then “Generate Access Token”.
How do I import meetings or webinars into MEC?
Once you’ve generated the access token, you can import your meetings or webinars from Zoom to MEC as an event. Click on “Get Meetings” or “Get Webinars”, select the ones you want to import, and click “Import”.
How do I export meetings or webinars into ZOOM?
Once you’ve generated the access token, you can export your meetings or webinars from MEC to Zoom as an event. Click “Export Events to Zoom”, select the ones you want to export, and click “Export to Zoom”. You can allow expired events to be exported by selecting “Exclude Expired Events”.
How can I select whether my Zoom event should be a Meeting or a Webinar?
You can set the event type by going to the Edit Event Page for each event, navigating to “Event Details > Zoom Information“, and selecting if it is a Meeting or a Webinar.
How do I ensure Zoom meeting details are only visible after booking?
You can choose to show the Zoom details only after a booking is made, and you can also send this information via email after the booking.
Where can I access the settings to display the Zoom badge?
The settings to display the Zoom badge in shortcodes and single event pages can be accessed individually for each event on the Edit Event page, within the Zoom Information menu.
Can I control when users see the Zoom event details before the event starts?
Yes, you can control this through the “View the above info at a certain interval before the event starts” option on the Edit Event page, within the Zoom Information menu. This allows you to set a specific time interval before the event starts for the Zoom details to become visible.
Is it possible to hide Zoom event details after the event goes live?
Yes, you can enable this through the “Hide the details once the event is live” option on the Edit Event page, within the Zoom Information menu. This ensures that Zoom event details are automatically hidden as soon as the event starts.
What can cause a timeout error during the access token generation?
If your server does not have a proper PHP execution time configuration in the php.ini file, it might cause a timeout error during the access token generation.
Can I send Zoom meeting details via email?
Yes, the addon allows you to automatically send Zoom meeting information, including links and passwords, via email after a reservation is made.
What if I encounter issues during Zoom OAuth app creation?
Double-check that the Redirect URL from MEC is added to the Zoom OAuth Allow List and that all required app credentials are correctly configured in the MEC Zoom Integration settings.
Report Out Dated Content
If you think the content of this page does not reflect updated information, please let us know.