Quick answer: To create an event website with WordPress, you need to an event management plugin, then decide how visitors will discover an event, register, pay, receive confirmation, and check in. Then set up WordPress, choose a responsive theme, and install Modern Events Calendar (as your event management plugin). Use MEC to create event records, assign dates, venues, organizers, and recurring schedules, then display them through a calendar or list. MEC Lite is suitable for publishing and displaying events. MEC Pro is required for MEC’s native booking and ticketing workflow. Before launch, complete a real test booking on desktop and mobile, check the confirmation email, confirm capacity changes, and verify how canceled or rescheduled events appear.

Disclosure: Webnus develops Modern Events Calendar. This guide uses MEC as its WordPress event-management example and identifies where the free edition, Pro edition, or an add-on is required.
A calendar full of dates is only one part of an event website. The harder part happens after someone clicks an event: Can they understand the offer, choose the right ticket, finish payment, find the confirmation, and arrive with whatever they need?
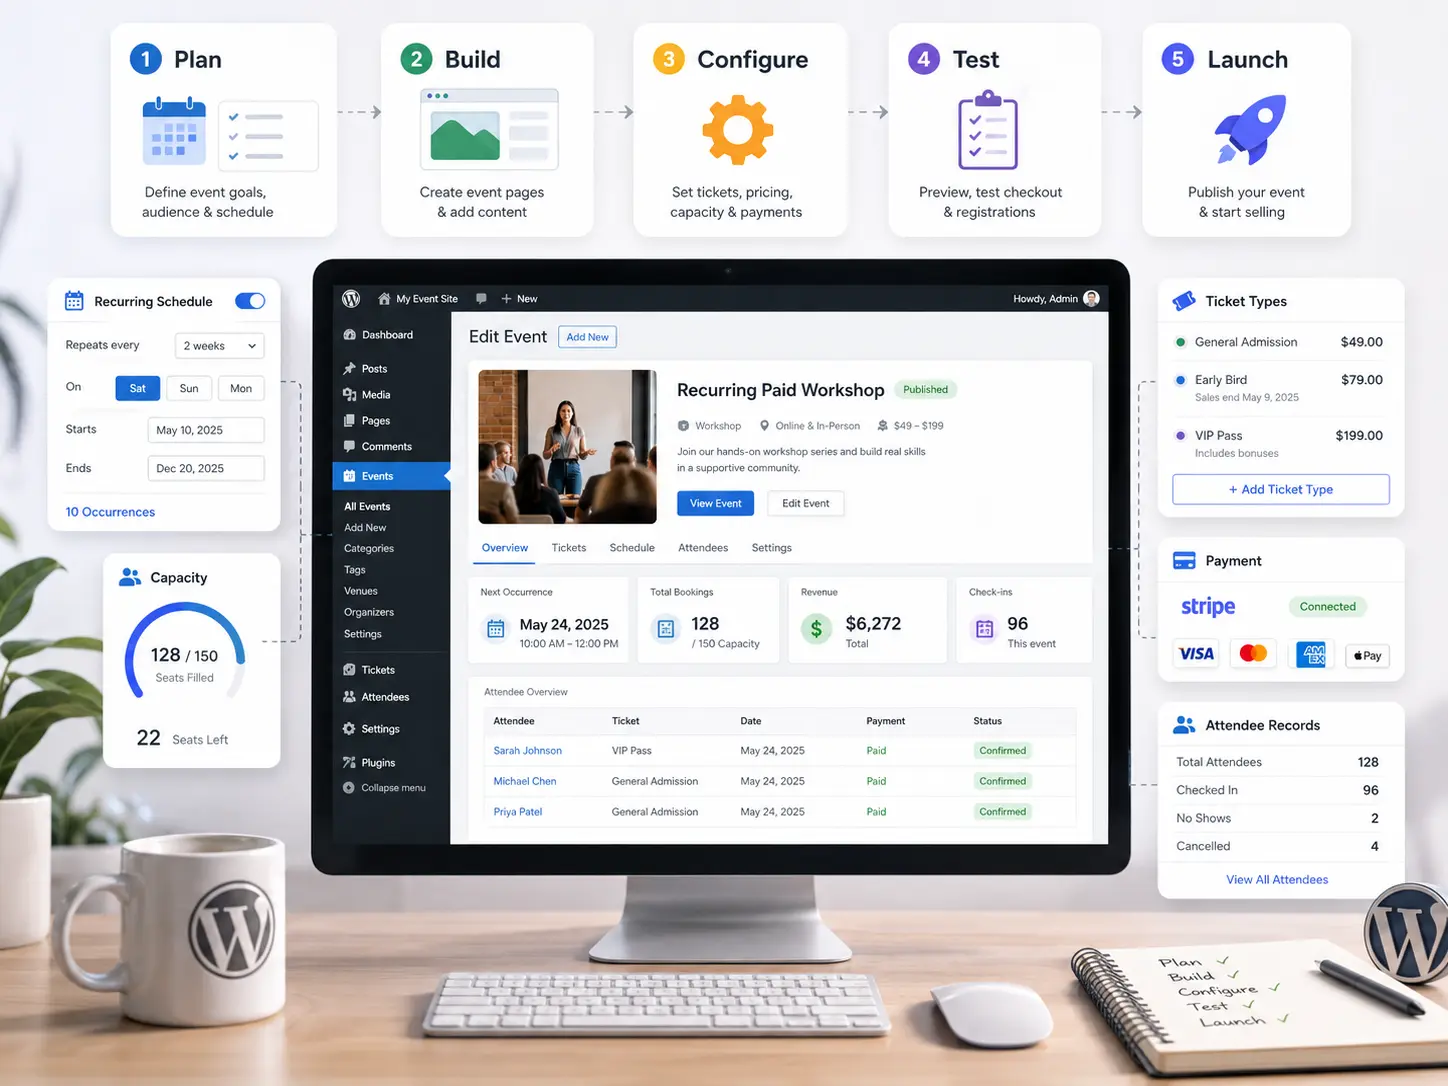
That is the thread running through this guide. We will build a WordPress event website in five stages: Plan, Build, Configure, Test, and Launch. A recurring paid workshop will be the working example because it exposes the details that simpler events can hide, including repeat dates, capacity, ticket types, payment, and attendee records.
What should you plan before you create an event website with WordPress?
Write the attendee journey before choosing plugins or layouts. This is the first useful step when you create an event website with WordPress. It keeps a simple community calendar simple, while preventing a paid workshop or conference from reaching launch with half a booking system.
Start with these six questions:
1. How will visitors find the right event?
2. What information must they see before registering?
3. Is registration free, paid, or handled on another website like Eventbrite?
4. Do you need ticket types, capacity limits, sale windows, coupons, or taxes?
5. What should happen after registration, including emails and attendee records?
6. How will staff check people in, handle cancellations, or move a booking?
Those answers determine whether your WordPress event website needs a display calendar, a booking system, a WooCommerce checkout, or a submission workflow for outside organizers. They also tell you which MEC edition fits.
| Requirement | Likely setup | What to confirm |
|---|---|---|
| Publish one-off, multi-day, or recurring events | MEC Lite can cover the basic publishing and display path | Required calendar view and design controls |
| Send visitors to an external registration page | MEC Lite with an event linking to external page | Whether the visitor returns to your site after registering |
| Take registrations and sell tickets inside MEC | MEC Pro booking module | Ticket rules, gateways, emails, and attendee data |
| Sell tickets and store products in one cart | MEC Pro plus the WooCommerce Integration add-on | Cart behavior, order-status syncing, and registration fields |
| Let organizers submit their own events | MEC frontend event submission (both Lite and Pro), with roles and moderation configured | Who may submit, edit, publish, and upload files |
| Issue tickets or scan QR codes at the door | MEC Pro and the appropriate ticketing or check-in setup | Current add-on requirements and staff workflow |
If you only publish a handful of dates and send people elsewhere to register, compare the lighter options in our guide to building a custom WordPress event calendar. However, if your schedule already lives in Google Calendar, compare the ways to embed Google Calendar in WordPress before rebuilding it. If you need bookings and attendee records on your own site, continue with the full setup below.
Which pages should a WordPress event website include?
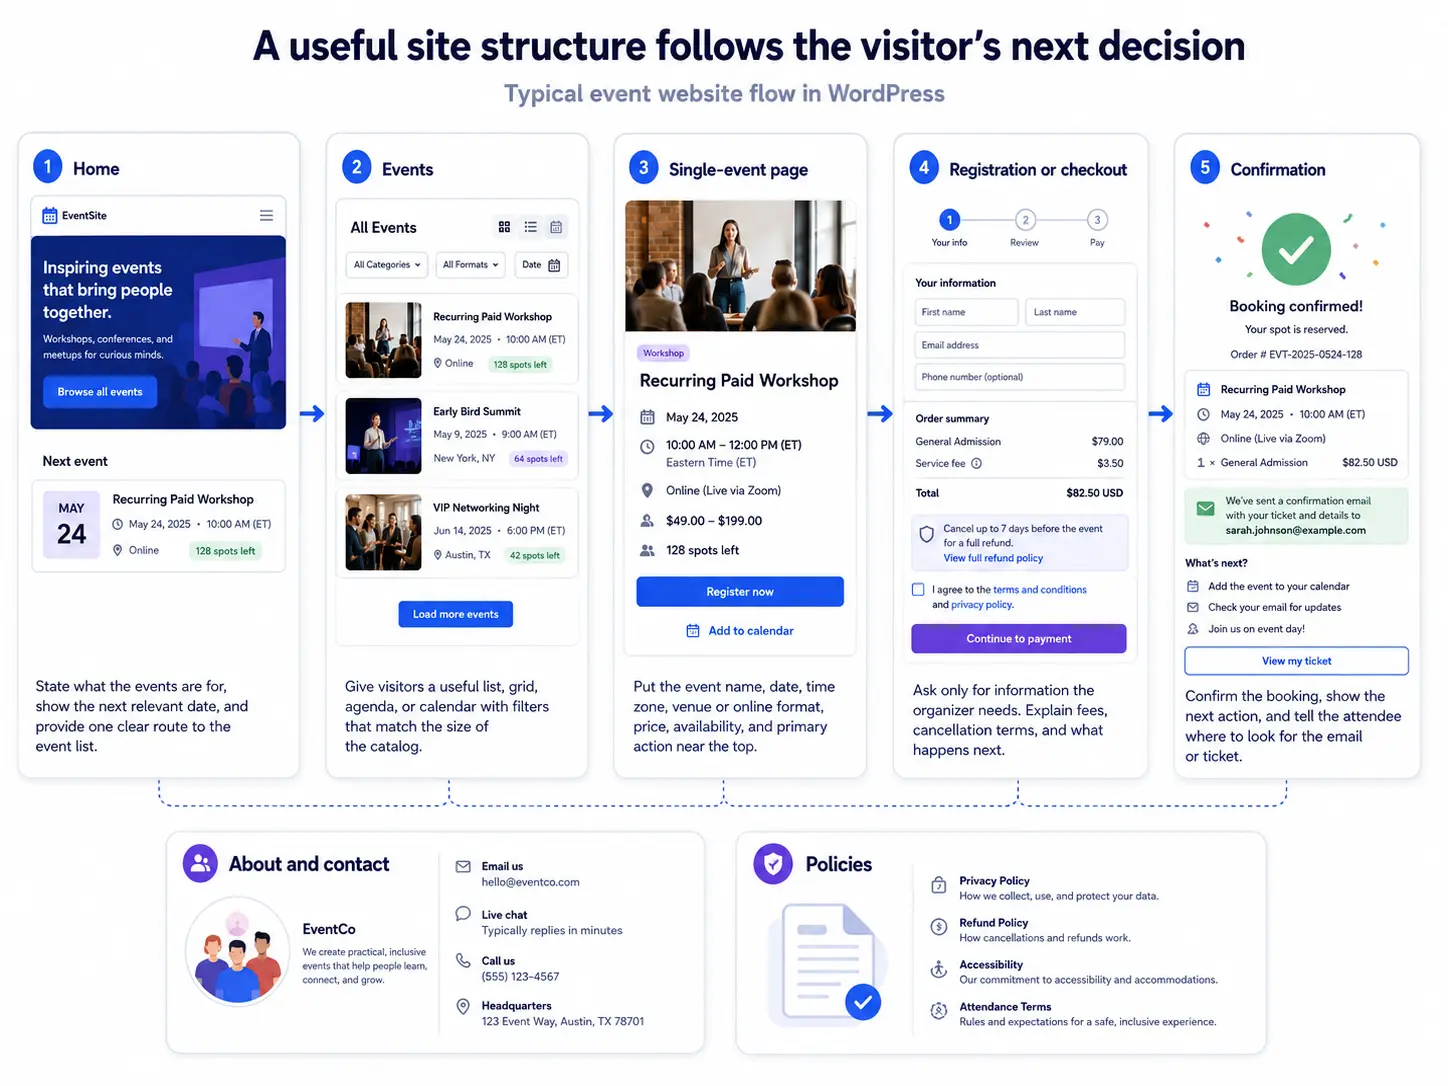
A useful site structure follows the visitor’s next decision. When you create an event website with WordPress, that usually means a home page, an events listing, a page for each event, registration or checkout, and a confirmation page. About, contact, and policy pages support trust and answer questions that do not belong in the booking form.
– Home: State what the events are for, show the next relevant date, and provide one clear route to the event list.
– Events: Give visitors a useful list, grid, agenda, or calendar with filters that match the size of the catalog.
– Single-event page: Put the event name, date, time zone, venue or online format, price, availability, and primary action near the top.
– Registration or checkout: Ask only for information the organizer needs. Explain fees, cancellation terms, and what happens next.
– Confirmation: Confirm the booking, show the next action, and tell the attendee where to look for the email or ticket.
– About and contact: Identify the organizer and provide a real way to get help.
– Policies: Publish applicable privacy, refund, accessibility, and attendance terms.
Before settling on a layout, review these event website examples to see how other sites organize schedules, venues, speakers, and registration.
For a single conference, the home page may also be the main event landing page to reduce registeration time. A venue, training company, or community group with frequent dates usually needs a separate event archive. Review these event website examples before settling on a layout, but choose the structure according to the booking path rather than the look of a competitor’s homepage. That distinction matters when you build an event website with WordPress for a continuing program instead of one date.
How do you install WordPress, a theme, and MEC?
To create an event website with WordPress, you need a domain, WordPress hosting, an SSL certificate, a theme, and an event plugin. If hosting is still undecided, use the Webnus WordPress hosting guide as a separate buying comparison. This tutorial starts from the premise that you’ve already set up your WordPress.
1. Sign in to the WordPress dashboard.
2. Open Settings > General. Check the site title, administration email, time zone, date format, and time format.
3. Open Settings > Permalinks and choose a readable structure before publishing event URLs. Changing established URLs later can create redirects and broken links.
4. Install a responsive theme. A block theme uses the WordPress Site Editor, while other themes may use the Customizer or their own settings.
5. Download MEC Lite or Pro through Webnus and install it. Activate the plugin.
6. Use a staging site or current backup before adding payment gateways, page builders, or several add-ons.
The official WordPress guide explains how to install and manage plugins. Webnus also maintains separate MEC installation instructions.
At this point, the WordPress event website has its foundation, but it is not ready for event data yet. Global dates, URLs, layouts, and booking behavior need one consistent setup.
How should you configure an event website with MEC?
When you create an event site with MEC, set the global rules first. Otherwise, each event becomes a small repair job and repeated events drift apart.
Open the MEC settings area and review:
– Slugs and archive behavior: Decide how event URLs and the event archive should work with the site’s existing permalink structure.
– Date, time, and time zone: Make sure WordPress and the event display agree. For online events, state the time zone on the page rather than assuming the visitor will infer it.
– Currency and cost display: Set the default currency and decide how free events or minimum ticket prices should appear.
– Single-event layout: Select the elements visitors need and remove modules that add no value to this site.
– Booking: If the project uses MEC Pro booking, enable the booking module before building tickets or forms.
– Notifications: Decide which attendee and administrator messages the workflow requires, then test them later with real inboxes.
This configuration is easy to rush when you create an event website with WordPress. Spending a few minutes on shared configurations saves far more time once the event catalog contains dozens of dates.
How do you create your first event in MEC?
Create one complete test event before importing or entering the full catalog. On a WordPress event website, that record becomes the model for titles, descriptions, locations, organizers, schedules, tickets, and images which you can easily duplicate.
In the WordPress dashboard, open the MEC event area and add a new event. For the worked example, imagine a two-hour bread-making workshop that runs every Saturday, has 18 spots, and offers a standard ticket plus a lower-priced student ticket.
1. Name the event clearly: “Saturday Sourdough Workshop” says more than “Weekly Class.”
2. Write a useful description: Explain what attendees will do, who the session suits, what is included, and what they should bring.
3. Set dates and recurrence: Check the first occurrence, end date, excluded dates, and time zone. Recurring events deserve an extra front-end check because a single incorrect rule can affect many pages.
4. Add the schedule: A short hourly schedule helps people understand arrival time, instruction, breaks, and finish time.
5. Create the venue and organizer: Reuse consistent records rather than typing a slightly different venue address or organizer name for every event.
6. Add cost and status information: Keep displayed pricing consistent with the tickets configured later. Update the event status when an occurrence is canceled, postponed, or rescheduled.
7. Choose a useful featured image: Show the event, instructor, venue, or outcome. Decorative text-heavy banners are harder to reuse and read on mobile.
Anyone who wants to build a WordPress event website with recurring dates should inspect at least two occurrences on the front end. Check the first date, a later date, and any exception before cloning the setup.
The official MEC event editor documentation covers dates, repeats, schedules, locations, organizers, cost, status, tickets, and booking fields.
How do you display events on a WordPress event website?
MEC stores the event records on your site. On an event website with MEC, a shortcode determines which records appear, how they are filtered, and which calendar skin visitors see. Per our current design structure, custom calendars are created under M.E. Calendar > Shortcodes > Add New Shortcode.
Pick a view that matches how people search:
| Visitor need | Useful starting view | What to test |
|---|---|---|
| Scan the next few events quickly | List or agenda | Date clarity, price, venue, and call to action |
| Browse a busy monthly program | Monthly calendar | Mobile navigation and crowded days |
| Compare visual event cards | Grid or Tile | Image crops, equal card height, and readable metadata |
| Follow a class or venue timetable | Weekly, timetable, or agenda view | Time zones, recurring dates, and filters |
Create the shortcode, set its filters and date behavior, save it, then place the resulting shortcode on your calendar page. Do the same for smaller blocks such as “Next workshop” on the home page. This is where the work to create an event website with WordPress becomes visible to visitors. Avoid placing several full calendars on one page unless people genuinely need to compare a featured calendar with an all-purpose one.
See the current MEC shortcode guide for the available settings.
How do you design event pages that help people register?
When you create an event website with WordPress, help the visitor understand the event before reaching the first full screen on a phone. Put the name, date, start time, time zone, venue or online format, price, availability, and main action near the top. Then answer the questions that delay registration.
For the workshop example above, the page should explain skill level, duration, ingredients, equipment, accessibility, cancellation terms, and what the ticket includes. A conference page may need speakers, tracks, sponsors, accommodation, and a longer schedule. A free neighborhood event can be much shorter.
Keep one main action. If registration happens in MEC, label the button “Register” or “Choose tickets.” If another service handles it, say that the visitor will continue to an external registration page. Avoid giving equal visual weight to registration, newsletter signup, social sharing, and unrelated promotions. You can change the text on most crucial buttons straight from the MEC settings.
You can build supporting pages with the WordPress editor. The Site Editor is available when the site uses a block theme. Elementor users can follow this guide to use Elementor with Modern Events Calendar.
How do you add registration to a WordPress event website?
To create an event site with MEC that accepts registrations, first choose the booking path. MEC’s native booking section is exclusive to MEC Pro. Enable it under the current booking settings, then configure the global or individual booking form, payment gateways, notifications, and booking rules before overriding anything for a single event.
For each paid event:
1. Create the ticket types and prices.
2. Set ticket availability dates and any per-ticket limits.
3. Set the total booking limit to the actual venue or session capacity.
4. Build the booking form with only the fields staff will use.
5. Configure taxes or fees only after the site owner has confirmed the applicable rules.
6. Choose the permitted payment gateway or gateways.
7. Define what counts as verified and confirmed for that payment path.
8. Run a free test and a paid test before opening sales.
A capacity of 18 does not necessarily mean 18 bookings. One booking may contain several tickets. Decide whether the operational limit applies to bookings, tickets, seats, or a combination, then test the setting with more than one ticket type. This is a common source of mistakes on a WordPress event website. MEC documents both per-ticket settings and a total booking limit in its booking setup guide.
If your event only needs a simple form and no MEC ticket inventory, the focused guide to creating an event registration form in WordPress may be the shorter route.
Should you use MEC checkout or WooCommerce?
For an event website with MEC, use the native booking path when the transaction is centered on event tickets and the available gateways fit the project. Consider WooCommerce when customers need to put tickets from different events, or tickets and store products, into one cart.
The documented WooCommerce path requires MEC Pro and the WooCommerce Integration add-on. It also has workflow details that deserve testing, including registration fields, ticket quantity changes, and synchronization between WooCommerce order status and MEC booking status. Follow the full WooCommerce and MEC guide rather than trying to configure the integration from this overview.
If you plan your event registration form based on the templates we’ve provided, you will create a better user experience for your visitors.
How do you configure confirmations on an event website with MEC?
When you create an event website with WordPress, remember that a successful payment screen is only one registration state. The attendee needs a clear confirmation, and staff need a usable booking record.
Test the following sequence:
– The browser shows a confirmation or thank-you page with the event name and next action.
– The attendee receives the correct email at a real external inbox.
– The organizer or administrator receives the expected notification.
– The booking appears with the correct event occurrence, ticket count, payment amount, and status in your dashboard.
– A reminder, ticket, downloadable file, or check-in credential is sent if the workflow requires one.
– Staff can find the attendee quickly and understand whether the booking is pending, verified, confirmed, canceled, or refunded.
For recurring events, check that the attendee record belongs to the right occurrence. For a canceled session, decide whether staff will transfer the booking, issue a manual refund, or contact the attendee manually. Document that process somewhere the event team can find it on the day.
How do you prepare a WordPress event website for search?
When you create an event website with WordPress, each public event needs a stable, crawlable page with specific information. Use a descriptive event name, unique copy, a readable URL, complete dates, a clear location or online-event format, the current price, and the correct availability or event status.
MEC includes event schema settings, but the visible page and structured data must agree. Google’s Event structured data documentation explains the required properties and how to handle canceled, postponed, and rescheduled events. For example, Google advises retaining the identifying event information when an event is canceled and changing its eventStatus, rather than deleting the event’s other properties or changing published status.
– Give each event its own URL when it deserves search visibility.
– Keep dates, venue information, ticket availability, and status current.
– Link to important event pages from the event archive and relevant site content.
– Include event pages in the XML sitemap when they should be indexed.
– Validate the final event output with Google’s Rich Results Test and review any Search Console warnings.
A strong WordPress event website gives search engines the same facts a visitor sees. Structured data cannot repair thin event pages, expired offers, or conflicting dates.
For sitewide work beyond event pages, use the Webnus guide to improving WordPress SEO.
How do you keep a WordPress event website fast and usable on mobile?
When you create an event website with WordPress, the finished page may combine a large hero image, map, schedule, calendar scripts, booking form, and payment tools. Test the actual page instead of assuming the theme or cache plugin has solved performance.
– Compress and size event images before upload.
– Check the calendar, date picker, ticket selector, form errors, and payment controls on a narrow phone screen.
– Make sure buttons and form labels are clear with a keyboard as well as a pointer.
– Check color contrast, visible focus states, headings, field instructions, and error messages.
– Test caching and optimization settings against MEC forms and dynamic booking data.
– Measure representative event pages with PageSpeed Insights and review field data in Search Console when enough traffic exists.
For a broader diagnosis, run this WordPress calendar website audit before changing plugins or themes.
Google’s current Core Web Vitals guidance uses Largest Contentful Paint, Interaction to Next Paint, and Cumulative Layout Shift to measure loading, responsiveness, and visual stability. Treat those measurements as diagnostic signals. Anyone who wants to build an event website with WordPress should also run the human test: Can someone choose a date and finish registration on an ordinary phone without zooming, losing entered data, or tapping the wrong control?
For deeper speed and usability work, see the guide to a high-performance WordPress event website.
How do you test an event website with MEC before launch?
Before you create an event website with WordPress on the live domain, prove that the complete attendee journey works on staging. Use six checkpoints: Discover, Understand, Register, Pay, Confirm, and Attend.
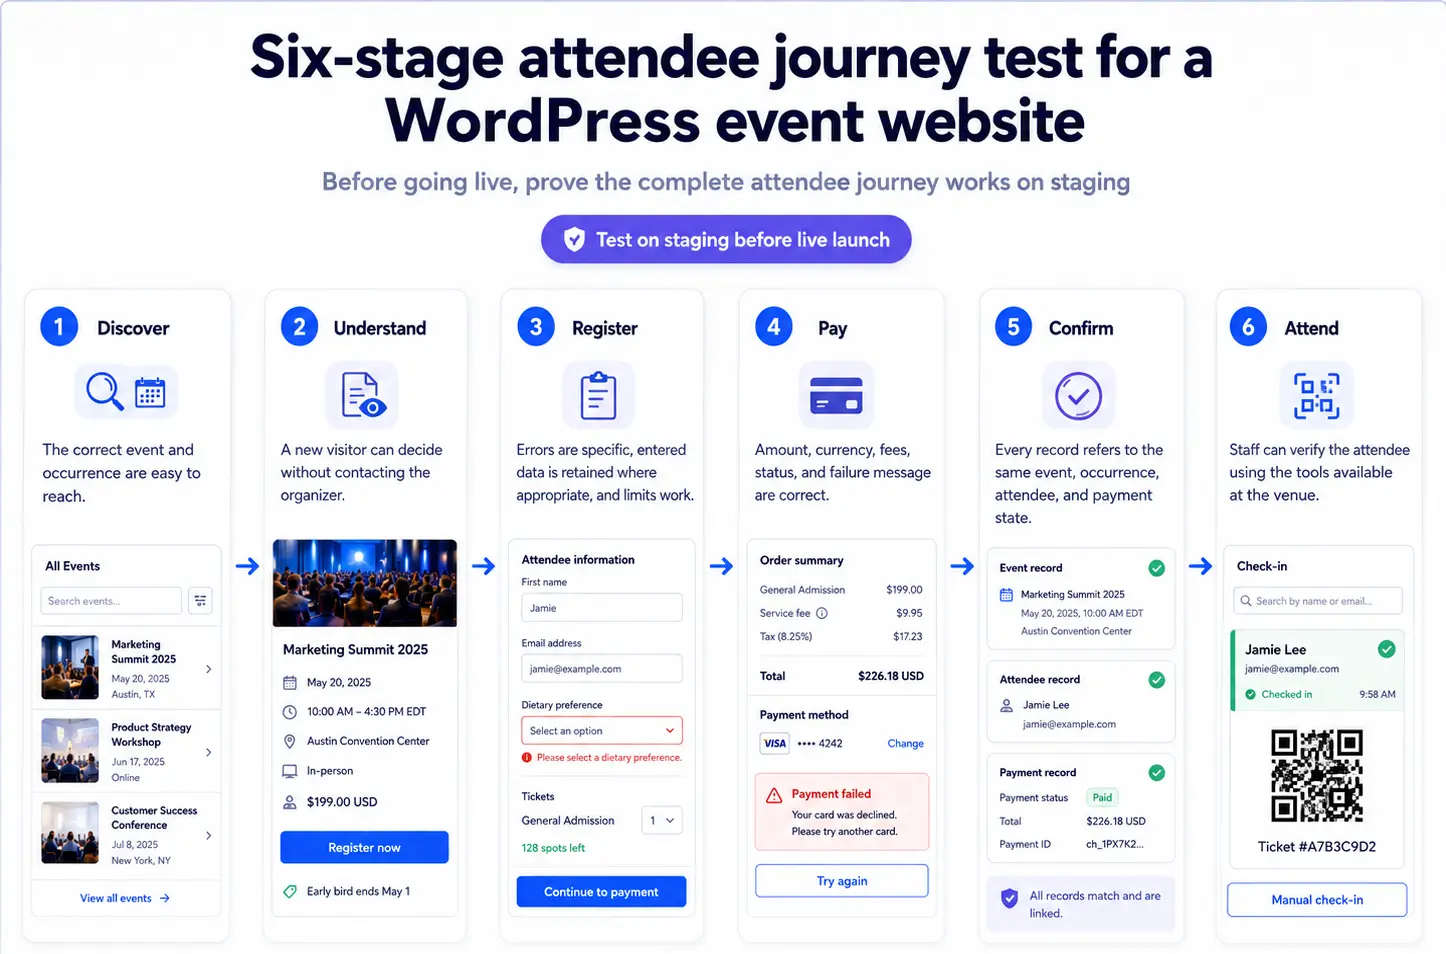
Test the same path a real attendee will follow, including the handoff to event staff.
| Checkpoint | Test | Pass condition |
|---|---|---|
| Discover | Find the event from the home page, event archive, site search, and a shared URL | The correct event and occurrence are easy to reach |
| Understand | Check date, time zone, venue, price, availability, audience, and inclusions | A new visitor can decide without contacting the organizer |
| Register | Submit valid data, invalid data, and more than one ticket type | Errors are specific, entered data is retained where appropriate, and limits work |
| Pay | Run the gateway’s approved test transaction and a failed-payment case | Amount, currency, fees, status, and failure message are correct |
| Confirm | Review the browser message, attendee email, admin email, and booking record | Every record refers to the same event, occurrence, attendee, and payment state |
| Attend | Open the ticket or attendee record and complete the planned check-in method | Staff can verify the attendee using the tools available at the venue |
Repeat the path on desktop and mobile. Test a free registration, a paid ticket, a sold-out state, a canceled or rescheduled event, and one recurring occurrence. If the site accepts guest submissions, submit an event through the front end and check moderation, permissions, file limits, and notification behavior. MEC’s frontend event submission documentation explains the event-list and add-event pages, access roles, guest submissions, and publication status.
What should you do after you create an event website with WordPress?
Watch the first real registrations on the WordPress event website closely. Check failed payments, confirmation delivery, questions sent to support, and any difference between the advertised capacity and the booking record. Fix repeated points of confusion on the event page rather than answering the same question by email.
Before changes to plugins, theme, or payment, take a current backup and use staging where possible. After a material update, rerun the registration path. Review dates, prices, organizers, venue information, and event status as the program changes. Past events can remain useful, but they should not look bookable when registration has ended.
Once the site works, move to promotion. The Webnus guide on how to increase event attendance covers that next stage. If your requirements grow beyond the WordPress setup described here, compare broader event management software before stacking more add-ons onto a workflow that no longer fits.
Build one event, then prove the whole path
The safest way to create an event website with WordPress is to build one representative event and test it from discovery through check-in. That exposes unclear pages, bad recurrence rules, missing emails, capacity mistakes, and payment-status problems while they are still cheap to fix.
Start with the event that has the most demanding workflow. Configure it in Modern Events Calendar, publish it on staging, and complete the six-stage attendee test. Once that event passes, use it as the model for the rest of the catalog.
Frequently asked questions
1. Can I create an event website with WordPress without coding?
Yes. WordPress, a compatible theme, and MEC can cover the main publishing and booking path without custom code. That is enough to build a WordPress event website for many common event programs. You still need to configure the event data, pages, payment settings, emails, and testing. Custom code may be useful when the required design or business rules go beyond the available settings.
2. Is MEC Lite enough for an event website?
MEC Lite can be enough for a WordPress event website that only publishes and displays events or sends visitors to an external registration link. MEC’s native booking and ticketing section is a Pro feature. Check the current MEC compbuild a WordPress event websitearison before choosing an edition because features and add-on requirements can change.
3. Can MEC accept online payments?
An event website with MEC Pro can use the plugin’s booking workflow and supported payment-gateway options. WooCommerce can be used through the existing integration path. The correct choice depends on the gateway, currency, tax, refund, and order-management requirements. Confirm compatibility and use the gateway’s test mode before accepting live orders.
4. Can organizers submit events from the front end?
A WordPress event website can use MEC’s frontend event submission workflow with event-list and add-event pages. Configure WordPress roles, guest-submission rules, required fields, upload limits, and whether new events publish immediately or wait for review. For a public form, moderation should be the default starting point.
5. Does MEC work with Elementor?
You can build a WordPress event website with Elementor and MEC. Detailed control over single-event templates or MEC widgets may depend on the current Elementor integration and add-ons. Use the dedicated MEC and Elementor guide and verify its instructions against the versions installed on the site.
6. Can an event website appear in Google’s event results?
Eligible pages on a WordPress event website can use Event structured data, but markup does not guarantee a search feature. The page must follow Google’s guidelines, expose accurate event information, and remain technically accessible. Validate the rendered markup and keep status, dates, location, price, and availability current.
7. How much does it cost to build a WordPress event website?
The total can include a domain, hosting, a theme, MEC Pro, add-ons, payment fees, design, maintenance, and staff time. A display-only WordPress event website can use MEC Lite. Registration, ticketing, WooCommerce, advanced design, or check-in requirements can add paid products and implementation work. Price the actual workflow rather than the plugin alone when you build an event website with WordPress.