
How to Add Event In MEC Plugin?
To create an event, go to your WordPress dashboard and select M.E. Calendar > Add Event.
MEC events are a WordPress custom post type, so everything you already know from WordPress posts applies here: title, description, excerpt, tags, categories, and featured image work exactly the same way. On top of those, MEC adds its own event details: date and time, repeating rules, location, organizer, tickets, and more, all covered in this article.
As of MEC 7.36, the event editor has a refreshed field layout, an improved time picker, and built-in validation. The editor now warns you about missing details before you publish. See Editor Validation and Pre-publish Checks.
Event Details
Editor Validation and Pre-publish Checks
When you publish an event, the editor runs two kinds of checks. Saving a draft or previewing a post never triggers them; they only run on Publish.
Hard validations (publishing is blocked)
Some problems make the event impossible to publish. When that happens, a notice explains the problem and the editor jumps straight to the tab and field that needs your attention:
- A required field is empty (for example the event title or the start date).
- The end date/time is earlier than the start date/time.
- Repeating is set to Certain Weekdays but no weekday is selected.
- The repeat ends After a number of occurrences that is lower than 1.
Pre-publish warnings (confirmation dialog)
Less critical issues do not block publishing. Instead, a dialog lists everything worth a second look before the event goes live:
- A ticket has a name but no price set.
- The event has tickets but no cost is displayed.
- No featured image is set.
- The event has no description/content.
- No location or no organizer is set.
- The event repeats but ends after only one occurrence.
- Start and end times are identical (zero duration).
Choose Publish anyway to continue, or Go back and fix to return to the editor.
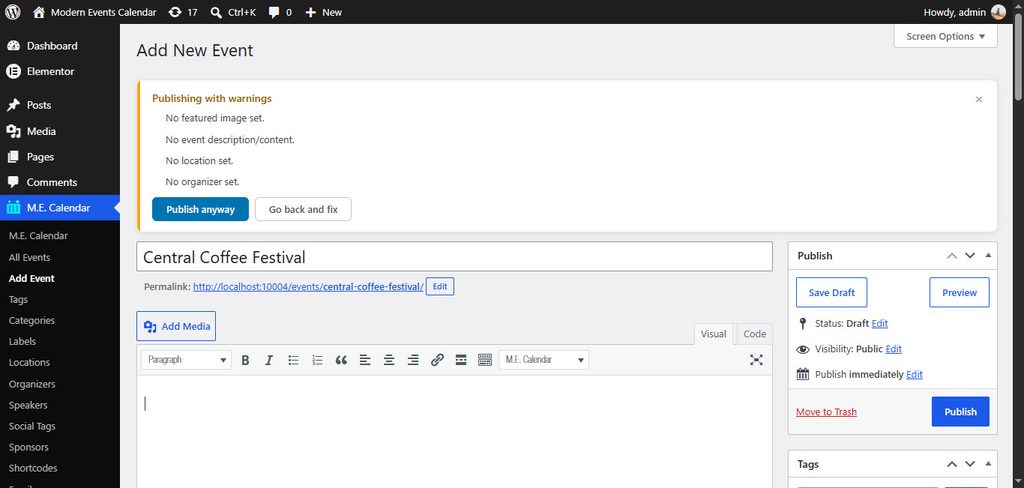
If you find the warnings dialog unnecessary for your workflow, disable it in MEC Settings > General > Basic > Pre-publish Warnings. The option is enabled by default and only controls the warnings dialog; the hard validations above always run.
Unsaved changes protection
If you try to leave the editor with unsaved changes in the MEC meta boxes, the browser asks you to confirm before discarding them.
Date and Time
Set the start and end date and time of your event. Use the improved time picker to choose the time quickly by hour and minute. If your event lasts all day and has no specific start and end time, enable the All-day Event option.
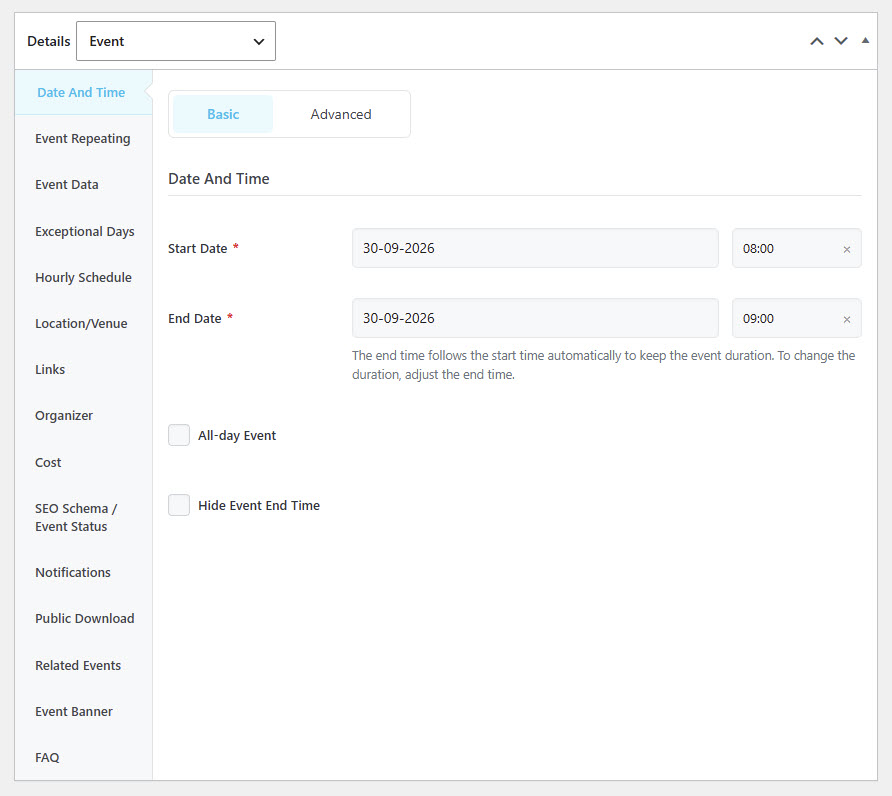
The Advanced section offers additional options. You can hide the event time or the end time on the single event page using Hide Event Time and Hide Event End Time.
If the event time needs extra explanation, for example about the timezone, add it to Notes on the time. The note appears next to the scheduled time on your site.
You can also set a timezone for the event separately from the global settings, which is useful when your calendar hosts events from around the world. To get this option, first enable it in MEC Settings > Single Event > Advanced.
Event Repeating
If you host the same event multiple times, enable the Event Repeating option to turn the event into a recurring one. Once enabled, the repeat options appear.
Repeat Methods
- Daily: repeats every day.
- Every Weekday: repeats Monday to Friday.
- Every Weekend: repeats Saturday and Sunday.
- Certain Weekdays: repeats only on the weekdays you select.
- Weekly: repeats every week.
- Monthly: repeats every month.
- Yearly: repeats every year.
- Custom Days: repeats on the exact dates you pick.
- Advanced: combines rules, for example “the second Monday of each month” or “the last Saturday and Sunday of each month”.
Not every method is available for every event length:
- One-day events can repeat daily, weekly, every weekend, monthly, or yearly.
- 2-7 day events can repeat weekly, monthly, or yearly.
- Events longer than a week but shorter than 30 days can repeat monthly or yearly.
- Events longer than a month can repeat yearly (28 days is the shortest month).
- Multiple occurrences in one day use the Custom Days method with the same date but different times.
Repeat Interval
The repeat interval controls the gap between repetitions. For example, a weekly repeat with an interval of 2 makes the event occur every two weeks.
End Repeat
Choose how the repetitions end:
- Never: the event repeats indefinitely.
- On: the event repeats until the date you select.
- After: the event stops after the number of occurrences you set. For example, 10 means the event occurs 10 times and then stops.
You can also enable Show only one occurrence of this event. Only one instance, the closest upcoming occurrence, will then appear in archives and shortcodes.
Event Data (Custom Fields)
This section lists the custom fields you created in MEC Settings > Single Event > Custom Fields. Enter a value for each field to display it on the single event page.
Exceptional Days
Exceptional days let you exclude individual dates from a recurring event, ideal for holidays or skipped sessions. First activate the module in MEC Settings > Event Modules > Exceptional Days, then enter the dates to exclude.
Hourly Schedule
If your event includes multiple sessions or programs, use the Hourly Schedule to keep your audience informed. Click Add Day, then define each program with its start time, end time, title, and description. For example, for two one-hour classes separated by a thirty-minute break, add three rows: the first class, the break, and the second class.
You can reorder schedule rows with drag and drop using the handle at the start of each row. The new order applies both to the event page display and to the saved schedule.
To assign speakers to schedule rows, first activate the Speaker module.
Hourly Schedule Shortcode
To embed the hourly schedule of an event into any page, post, or shortcode-compatible widget, use the [mec-hourly-schedule event-id="1"] shortcode and replace 1 with the event ID.
Location/Venue
Select where the event takes place. You can pick one of your existing locations or create a new one: click Insert New Location and fill in the details.
The Other Locations field appears only after you select a main location for the event. While the main location is set to hide, the field stays out of the way. The selection list prevents duplicate entries, so the same location cannot be added twice.
Links
Add an Event Link (e.g. a registration page on another website) and a More Info link so your visitors can find additional information about the event.
How the links behave depends on your event setup:
- If the event has tickets, the Register button on the single event page and in shortcodes starts the booking process.
- If the event has no tickets:
- An Event Link makes the Register button, and the event title in shortcodes, point to that external link.
- A More Info link adds a “More info” section to the single event page; in its widget, the Register button follows the More Info link.
- If both links are set, each keeps its own role: the More Info widget shows the More Info link, and the Register button follows the Event Link.
In MEC Lite, the booking system is not available, so the More Info and Register elements use the same link.
Organizer
Select the organizer of the event from your previously created organizers, or add a new one with their name, phone, email, and website.
Like locations, the Other Organizers field appears only after you select a main organizer, and duplicate selections are prevented.
Cost
Manage the event cost displayed to your visitors. The available cost fields depend on the Event Cost Type setting in MEC Settings > Single Event.
Enable Show the minimum price based on tickets to display the lowest ticket price as the event cost automatically.
To set a different currency for this event, enable Change Currency Per Event in MEC Settings > Single Event > Advanced. The Currency Options then appear on the Advanced tab here.
SEO Schema/Event Status
The event status is included in your event’s structured data, so search engines like Google, Yahoo, and Bing can show it correctly.
- Scheduled: the normal status for upcoming events.
- Postponed: use when the event is postponed.
- Canceled: use when the event is canceled. Fill in the reason for cancellation; to display it on the event page, enable the “Display in single event page” option.
- Moved Online: use for events now held virtually, and provide the link to join.
Public Download
Upload a file that becomes publicly available on the event page: a program PDF, a map, or anything your audience needs. Activate the module first in MEC Settings > Single Event > Public Download.
Event Gallery
Sometimes one photo is not enough to convey the mood of an event. After activating the Event Gallery module in MEC Settings > Event Modules, you can attach multiple images to the event here.
Related Events
To manually curate which events appear in the related events section of the single event page, enable Set related events per event in MEC Settings > Event Modules > Related Events, then select the events here.
Event Banner
Add a banner to the top of the single event page using a background color, an image, or both. When both are used, a translucent layer of the color is placed over the image. Activate the module in MEC Settings > Single Event > Event Banner, then enable Display Banner for this event.
Force Featured Image as Event Banner
When this option is enabled in MEC Settings > Single Event > Advanced, the event’s featured image is always used as the banner and the per-event banner options are ignored.
FAQ
Answer common questions directly on the event page. Activate the module in MEC Settings > Single Event > FAQ Module, then add as many question-and-answer pairs as you need.
Notifications
Customize the notification emails for this event. First enable the feature in MEC Settings > Notifications > Notifications per event.
Occurrences
For recurring events, you can override certain parameters per occurrence. Enable Edit Per Occurrence in MEC Settings > Single Event first. The editable parameters are:
- Total Booking Limit
- Page Title
- SEO Schema
- Hourly Schedule
- Event Data
- Event Main Location
- Event Main Organizer
- Event Cost
- Tickets
- Event Links
- Minimum Attendees To Start The Event
Booking
The Booking section appears only when the booking module is activated in MEC Settings > Booking, and is available in MEC Pro only. It contains everything related to booking, ticket sales, and price calculation.
Booking Options (Basic Tab)
Total Booking Limit
Set a maximum number of tickets sold across all ticket types combined. This is useful when the venue capacity matters but the mix of ticket types does not.
Example: a venue has 100 seats and you sell three ticket types: Luxury, VIP, and Standard. Set the Total Booking Limit to 100 and leave the individual ticket limits unrestricted (or set them high enough). Customers can buy any combination of ticket types, and once 100 tickets are sold in total, booking closes, even if some ticket types still have availability left.
Minimum Ticket Per Booking
Require a minimum number of tickets per booking. For example, an event for couples can require at least 2 tickets per booking.
Booking Options (Advanced Tab)
Discount Per User Roles
Offer percentage-based discounts per user role. For example, a value of 20 in the Administrator field lets administrators buy tickets with a 20% discount.
Book All Occurrences
For recurring events such as a weekly yoga course, sell all occurrences in one booking instead of one at a time.
Interval Options
Open the booking form only within a certain window before the event starts. For example, 30 opens the form 30 minutes before the start time (one day equals 1440 minutes). To stop selling tickets after the first occurrence, enable Stop selling tickets after first occurrence.
Automatic Approval
Decide whether bookings for this event are verified and confirmed automatically. See Email Verification and Booking Confirmation for the global behavior.
Last Few Tickets Percentage
Show a “Last Few Tickets” flag on the event when the remaining tickets fall below this percentage. To use it here, enable Ability to change last few tickets percentage per event in MEC Settings > Booking.
Thank You Page
Choose the page users land on after a successful booking, and how long to wait before redirecting them (in milliseconds; 2000 equals 2 seconds). You can inherit both from MEC Settings > Booking > Thank You Page.
Booking Button Label
Change the booking button label for this event in shortcodes.
Partial Payment
Collect only a portion of the total price at booking time, for example 20% online, and the rest later by cash or another method. You can inherit the global behavior from MEC Settings > Booking > Partial Payment.
Total User Booking Limits
Restrict how many tickets a single user can book. The limit applies per email address: with a limit of 2, each email address can book up to 2 tickets.
Tickets
Create the tickets your event sells. Tickets are defined per event: click Add Ticket and fill in the details. As of MEC 7.36, ticket rows use a clear label-and-control layout, so every field is named directly on the row.
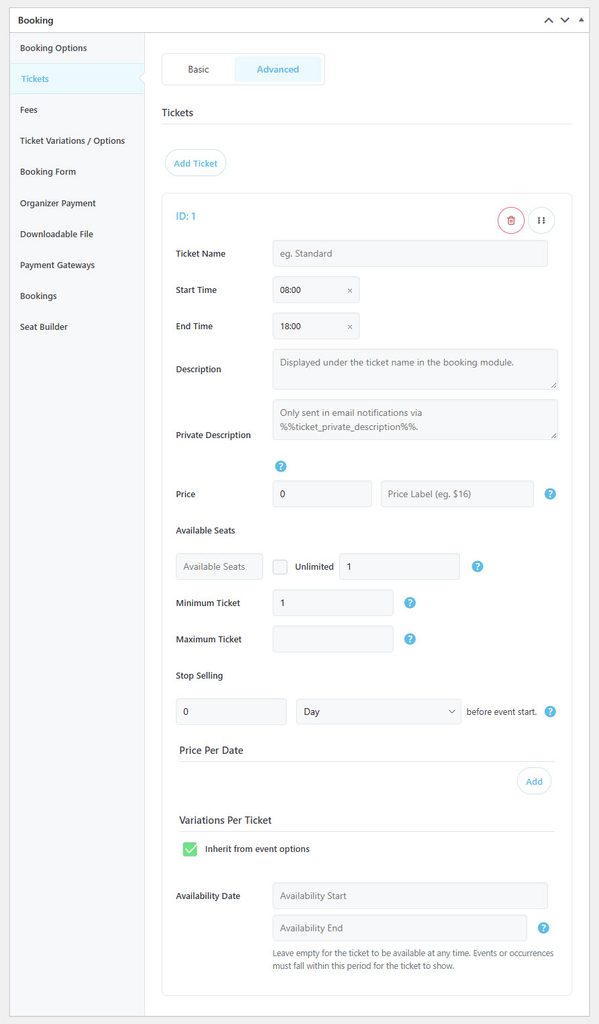
1. Ticket ID
The ticket ID can be used in the booking shortcode with ticket-id="x" to display only this ticket in the booking module. Replace x with the actual ticket ID.
2. Ticket Name
The name of the ticket shown to customers.
3. Description
A short description of the ticket, if applicable.
4. Private Description
An internal description sent to the buyer in notification emails only, useful for extra instructions or pickup details.
5. Price
The ticket price as a plain number, without currency symbols or any other characters.
6. Price Label
The price exactly as customers see it on the frontend. You can include currency symbols and any other characters here.
7. Available Tickets
How many tickets are available for booking. For example, 50 means users can book up to 50 tickets per occurrence.
8. Minimum Ticket
The minimum number of this ticket a user must purchase in one booking.
9. Maximum Ticket
The maximum number of this ticket a single user can buy.
10. Stop Selling Ticket
The cut-off time for selling this ticket, set in days or hours before the event starts.
11. Price Per Date
Change the ticket price for specific time periods, for example, lower the price in the final week before the event to sell out faster.
Fees
Define fees and taxes applied to the final price. By default they follow MEC Settings > Booking > Taxes / Fees; disable Inherit from the global options to manage them for this event only.
Ticket Variations / Options
Ticket variations let customers add extra items to their booking: a meal, a pre-ordered book, or anything else you offer alongside the event. Enable Variations Per Ticket in MEC Settings > Booking > Ticket Variations & Options to use this section.
Booking Form
The booking form follows the global MEC Settings > Booking > Booking Form by default. Disable Inherit from global options to customize the form fields for this event.
Organizer Payment Credentials
If an organizer receives a share of the sales, provide their payout account details here.
Downloadable File
Upload a file that becomes available to participants after booking. Enable the Downloadable File element in MEC Settings > Booking > Booking Elements first.
Payment Gateways
All gateways enabled in MEC Settings > Booking > Payment Gateways are listed here, so you can turn individual gateways off for this event. To use this section, enable Disable / Enable payment gateways per event in the global settings.
Booking / Attendees
Review the bookings made for this event: attendee names, emails, transaction IDs, and purchase amounts. Bookings for recurring events can also be moved to another date, helpful when an occurrence is canceled and attendees need to be accommodated elsewhere.
For a video walkthrough of creating events, see the Webnus video tutorials.


I really like reading through a post that can make men and women think. Also, thank you for allowing me to comment!
Hi, how to restrict access in MEC-fes-form using User Dashboard addon ? i select wanted checkbox in parameters by nothing more , all fields are displaying, regards
Hello.
you can restrict quest user.
and you can enable/disable some items on the settings.
https://webnus.net/dox/modern-events-calendar/mec-user-dashboard-addon/
if this is not the case, please go to support.webnus.net and there you can log in or sign up. You should sign up with the same email you have created your tickets. Also if have created your tickets using your Gmail account you can simply log in using your Gmail account. If you wanted to create a new ticket, simply head over to webnus.net/support and click on ‘Create a Ticket’ but please do remember to use the same email you created your technical support account with.
support.webnus.net

I can’t see the Booking section in Settings. Is that a Pro feature?
When I add a “More Info” link it doesn’t appear on the single event page. What am I doing wrong?
Hello,
set “More Info “: When you set a “More Info” link for your event, besides the More info link itself in the single event page, in its widget the register button will do the same function as your More Info does.
– make sure you have the latest version.
– For troubleshooting, deactivate all your plugins and let the MEC remain active only, set your theme on default, then reload the page, if the issue was solved, then activate your plugins one by one and your theme, refresh your page and check to see which plugin is causing the issue.
if the issue remains, please go to support.webnus.net and there you can log in or sign up. to create a new ticket, simply head over to webnus.net/support and click on ‘Create a Ticket’ and share the required information.
I just like the helpful information you provide in your articles