Booking Settings
By enabling the booking settings in the Modern Events Calendar, you will be able to handle ticket services.
Note: This feature is only available in the MEC Pro version.
In order to enable the booking feature, you need to go to MEC Settings > Booking > Booking, check the “Enable booking module” option and reload the page afterward.
Booking Basic Tab
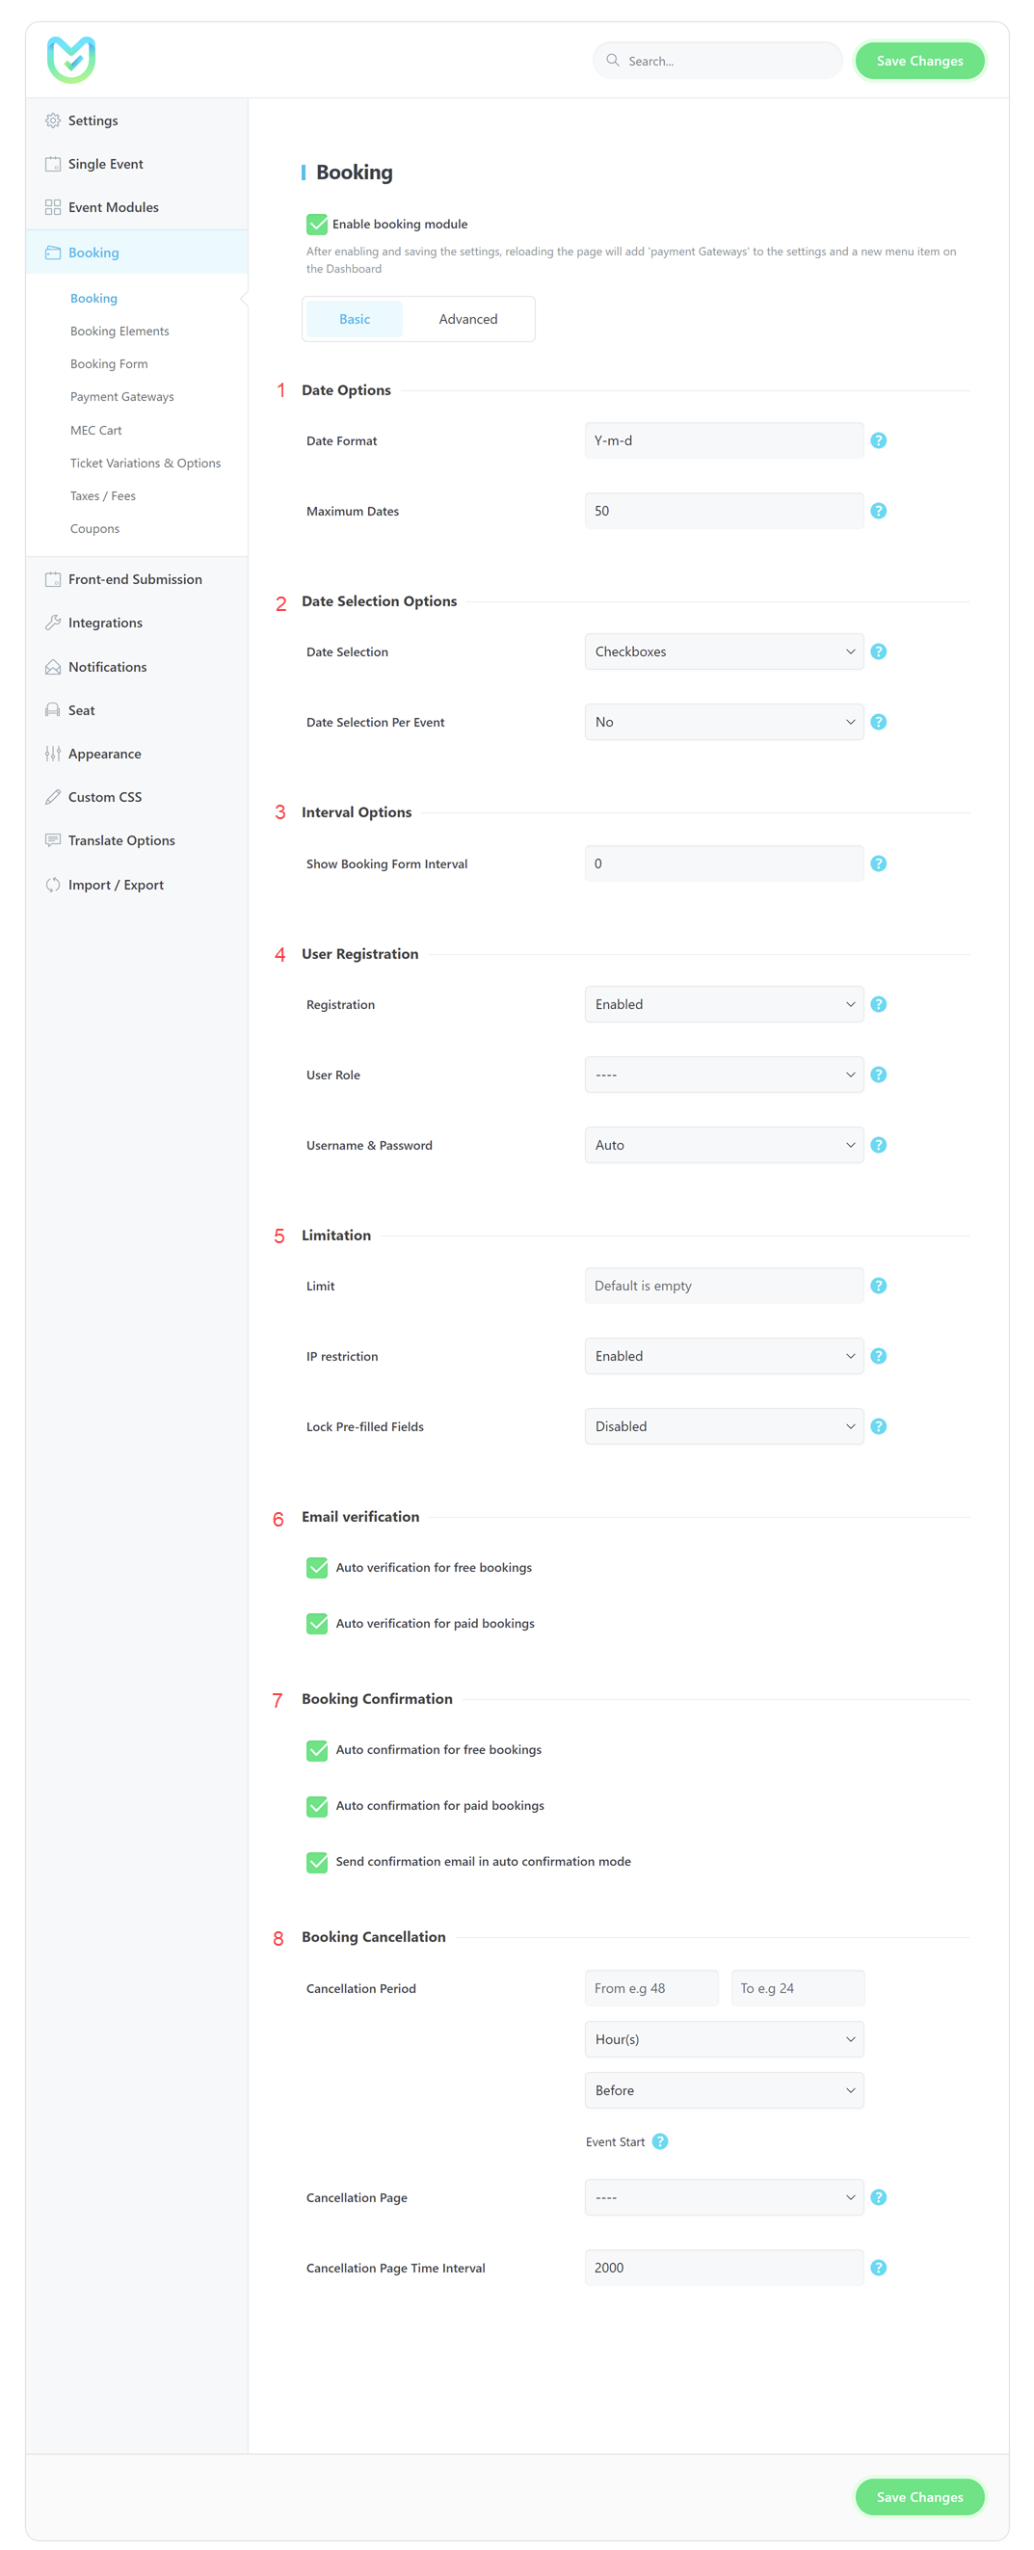
1- Date Options
Date Format: Please indicate the desired date format for the event’s date in the booking module. For more information, please refer to All Date Formats.
Maximum Dates: Please indicate the dates accessible from the dropdown menu for recurring events.
2- Date Selection Options
Date Selection: Please indicate the type of date selection field that should be used in the booking module. You can set the date selection style from the following options: “Dropdown,” “Calendar,” “Checkboxes,” and “Express Calendar.” For more information, please refer to this link.
3- Interval Options
You have the option to display the booking form for a specific duration before the event begins. By selecting a value of 30, the booking form will become available only 30 minutes prior to the start of the event. It is important to note that one day equals 1440 minutes.
4- User Registration
Registration: If you set this option to “Enabled,” MEC will create a WordPress User for main attendees. It’s recommended to keep it enabled.
User Role: You can set the role of the users that are going to be created after they’ve completed their registration process. The default role of the users is “Subscriber,“ but you can change it to other roles.
Username & Password: If you set it to the manual option, users can insert their desired username and password during registration. Otherwise, MEC uses their email and an auto-generated password to create their account.
5- Limitation
Limit: The total number of tickets that a user can book. It is useful if you’re providing free tickets. Leave it empty for an unlimited booking.
IP restriction: If you set a limit for the total tickets that users can book, MEC will use IP and email to prevent users from booking more tickets than your defined limit. You can disable the IP restriction if you don’t need it.
Lock Pre-filled Fields: When users are logged in, name and email fields will be pre-filled, but they can change them. If you enable this option, then logged-in users cannot change their pre-filled fields.
6- Email Verification
Auto verification for free bookings: The booking Verification Notification informs the users that they had a reservation and obliges the users to verify their orders.
If you enable this option, this notification will no longer be sent for free bookings.
Auto verification for paid bookings: If you enable this option, The Booking Verification Notification will no longer be sent for paid bookings.
In order to configure this notification, you need to go to MEC Settings > Notifications > Booking Verification.
You need to use the tags provided at each section’s end to manage this section.
Note:
- Please read this to see how to customize the content of emails in MEC.
- To learn more about the Modern Events Calendar email system, click this link.
7- Booking Confirmation
Auto confirmation for free bookings: Booking Confirmation Notification ensures users that they had a successful reservation.
If you enable this option, this notification will no longer be sent for free bookings.
Auto confirmation for paid bookings: If you enable this option, The Booking Confirmation Notification will no longer be sent for paid bookings.
Send confirmation email in auto-confirmation mode: If you enable this option, a confirmation notification will be sent in any case.
In order to configure this notification, you need to go to MEC Settings > Notifications > Booking Confirmation.
8- Booking Cancellation
Cancellation Period: You can restrict the period of canceling the bookings. Leave empty to enable cancellation at any time.
For example, if you insert 5 hours before the event starts, then bookers will be able to cancel their booking before this time, and after that, they won’t be able to do that.
Cancellation Page: The user will be redirected to this page after canceling their booking. Leave it empty if you want to disable it.
Cancellation Page Time Interval: Waiting time before redirecting the user to the cancellation page. It’s in milliseconds, so 2000 is equal to 2 seconds.
Booking Advanced Tab
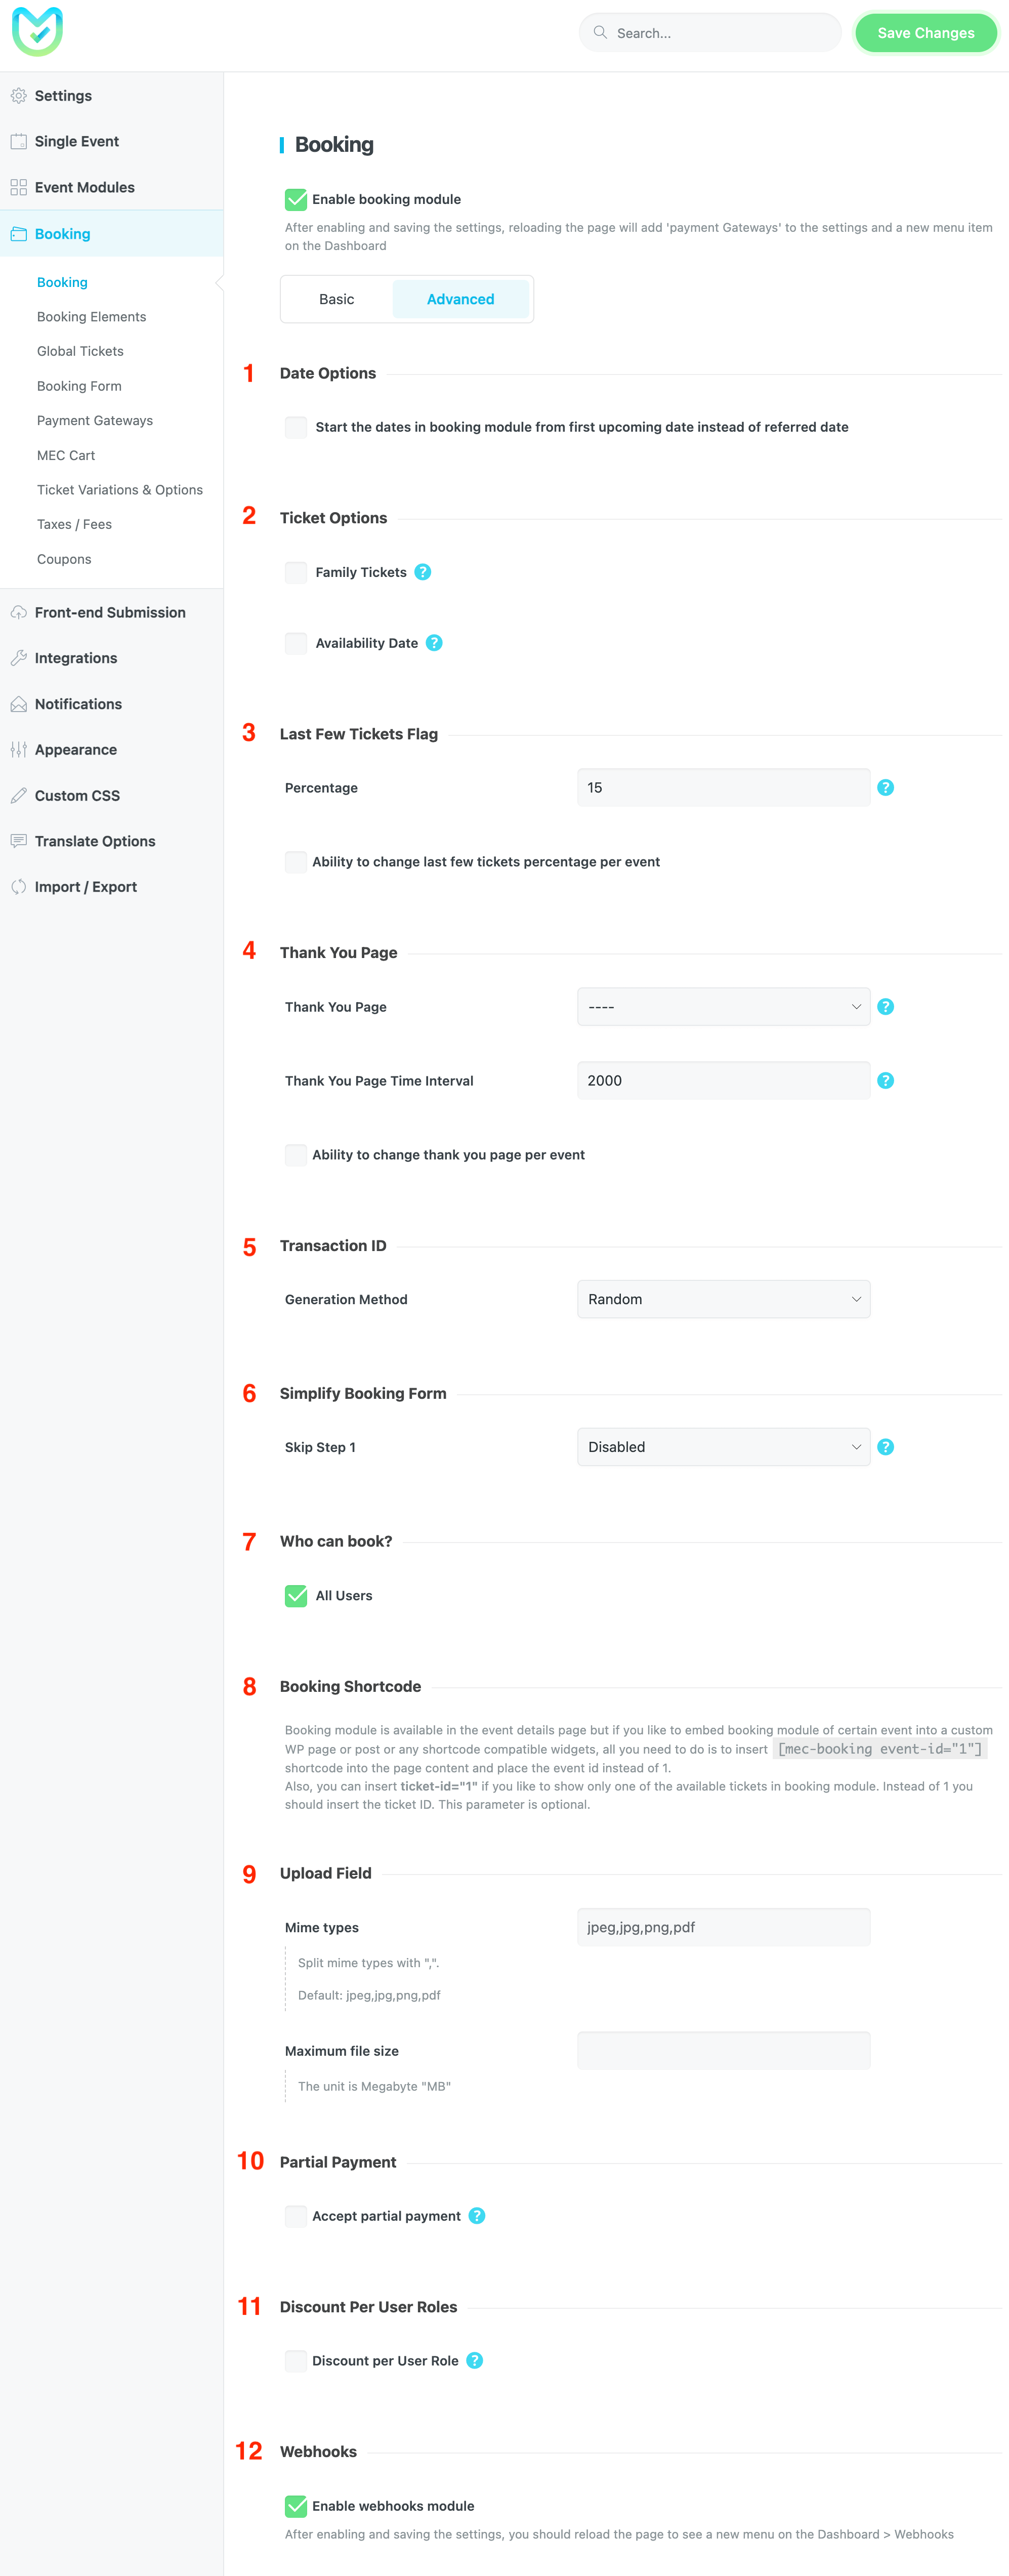
1- Date Options
With this option, Start the dates in the booking module from the first upcoming date instead of the referred date
2- Family Tickets
MEC’s new feature, Family Tickets, allows event organizers to define and sell tickets for a family or group. Suppose you have an event and you want to provide your customers with the possibility of booking Family tickets separately, as well as the possibility of booking for individuals. In this case, this option will help you.
To activate this feature in your MEC, go to MEC Settings > Booking > Advanced and activate the Family Tickets option.
By activating this option, a field will appear in the Tickets section of the Single Event edit page where you can specify the number of family members or Number of seats. Every time this ticket is booked, the number of family members will be deducted from the remaining tickets.
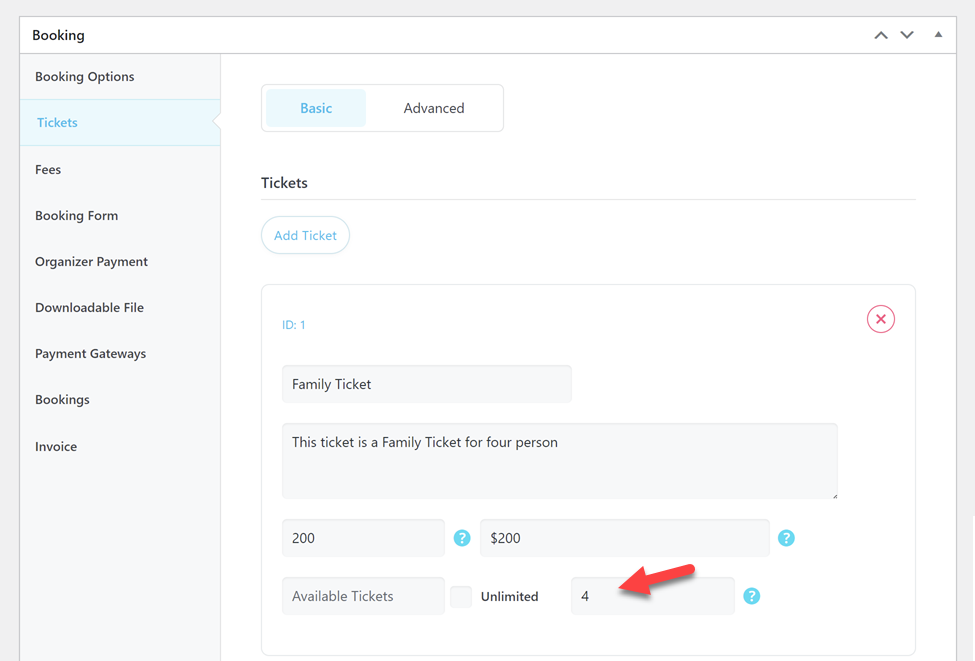
To illustrate, imagine you have an upcoming event that can host up to 200 attendees. Your plan is to offer tickets for individual sales as well as for families of four. To accomplish this, you will need to create two ticket options: one for single admission and another for families of four.
First, we set the Total Booking Limit to 200.
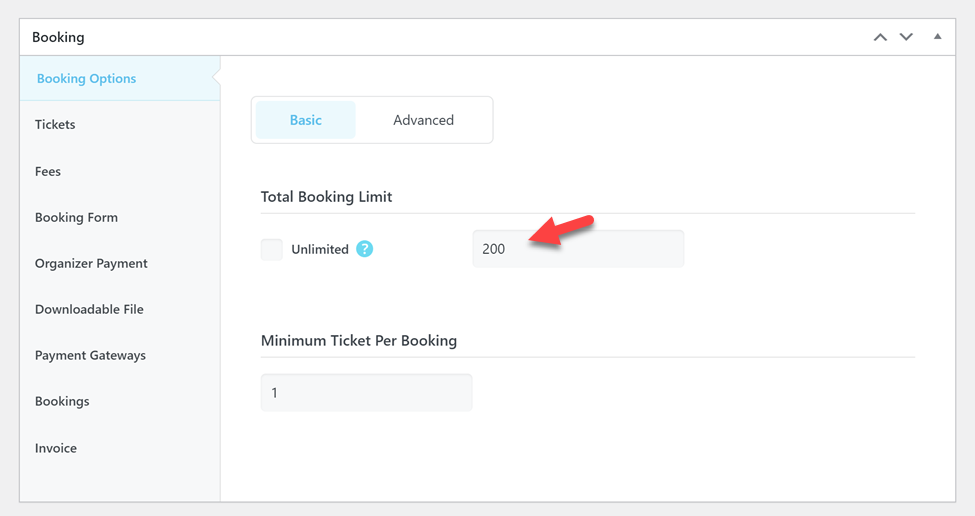
Then I create a single ticket according to the previous procedure of creating tickets and set Available tickets to 200.
But now we want to create a family ticket. The only difference is that we need to fill the Number of seat fields according to the number of family members. As you can see in the screenshot below, we want to have tickets for 4-member families, so I set Available tickets to 200 and the number of seats to 4.
Now users can choose between single and family tickets and complete the booking process. As you can see in the screenshot below, the number of family tickets that can be booked is equal to 50. It means 200 divided by 4.
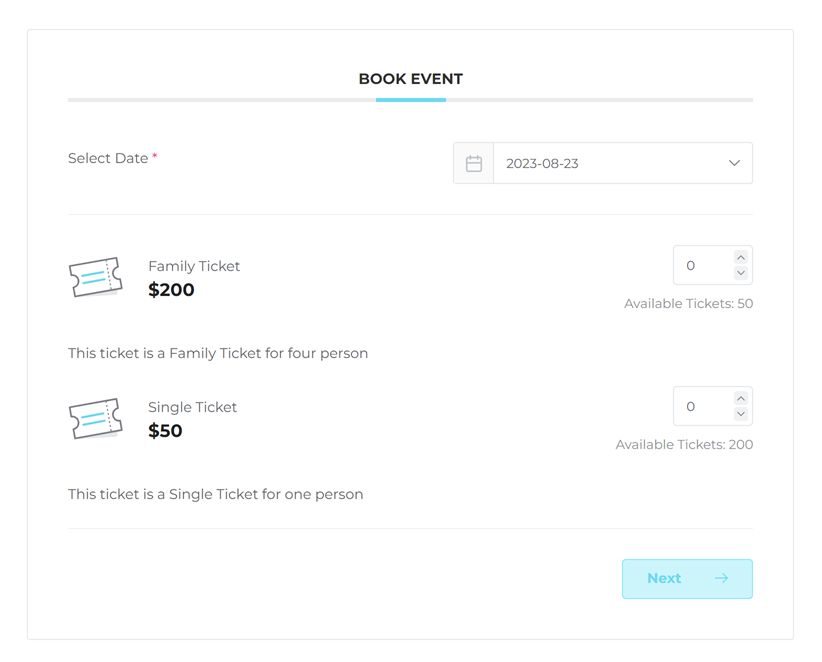
Note: Considering that one ticket is sold by booking family tickets, the number of attendees registered in the relevant booking will be one person. It is possible to distinguish these tickets from single tickets by using the ticket name.
3- Last Few Tickets Flag
By setting a percentage number for this option, a “Last Few Tickets” flag will be shown on your events when the remaining tickets are less than this percentage, and you can set the last few tickets for every event separately by checking the “Ability to change last few tickets percentage per event” option.
4- Thank You Page
Thank You Page: Users will be redirected to this page after making a successful booking. Leave it empty if you want to disable it.
Thank You Page Time Interval: Waiting time before redirecting users to the thank you page. It’s in milliseconds, so 2000 is equal to 2 seconds.
And you can set a separate thank you page for every event by checking the “Ability to change thank you page per event” option.
5- Transaction ID
You can generate transaction IDs using “Random Numbers” or “Ordered Numbers” with prefixes instead.
Start From: If you select Ordered Numbers from the previous option, this field will be enabled for you. You can set the prefix of your transaction IDs using this field.
6- Simplify Booking Form
Set the “Skip Step 1” option to “If Possible” if you need to skip the first step of the booking process. Otherwise, select “Disabled.” If users have no choice in the first step of the booking module, this step will be skipped. In other words, this step will be skipped if the event has only one date and the total user booking limit option is set to one.
7- Who can book?
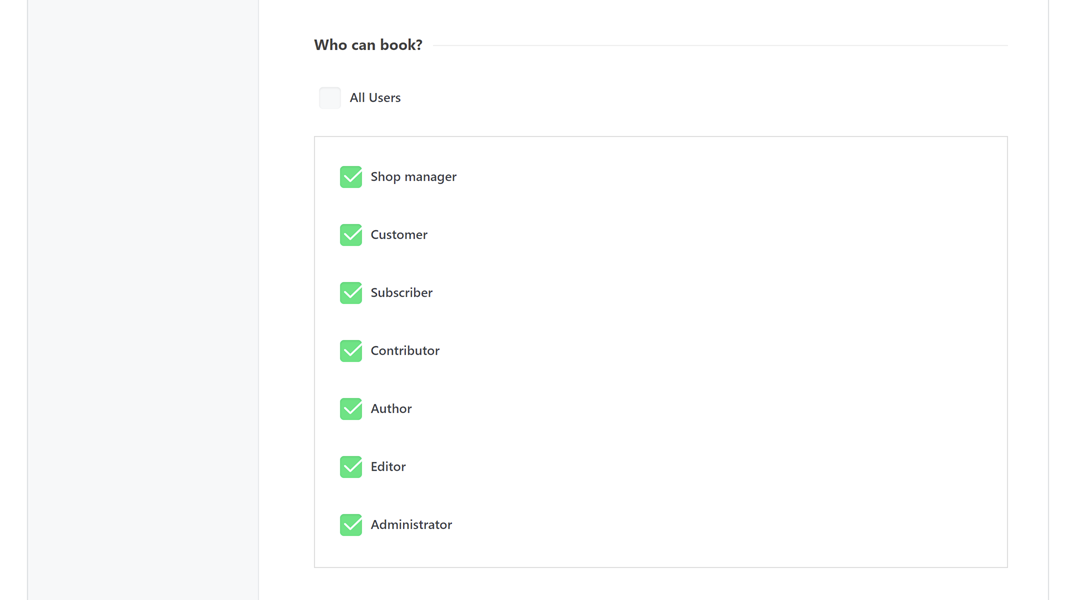
By default, all users can book your events. You can restrict event booking to specific roles by unselecting the “All Users” checkbox.
8- Booking Shortcode
The booking module is available on the event details page, but if you like to embed the booking module for a certain event into a custom WP page or post or any shortcode-compatible widgets, all you need to do is insert [mec-booking event-id="1"] shortcode into the page content and place the event id instead of 1.
Also, you can insert ticket-id=”1″ if you like to show only one of the available tickets in the booking module. Instead of 1, you should insert the ticket ID. This parameter is optional.
9- Upload Field
Within the upload field section, you have the ability to restrict the file extension and size of any uploaded files.
10- Partial Payment
This MEC feature is a payment option that allows you to ask for a portion of the total price in an initial payment and decide how to get the rest of the money later on. For example, you can receive 20 percent of the total price online and get the rest in cash or using other payment methods.
In order to use this feature you need to first make sure that you have installed MEC 6.8.0 or higher versions. After that, you can enable Partial Payment from the following menu:
MEC Settings > Booking > Advanced > Accept partial payment

The following options will appear after you have enabled the feature:
Ability to edit payable options per event:

This feature allows you to dictate “payable” in each event separately without affecting the settings in other events.
After enabling this feature, from your single event edit page, you can go to MEC Settings > Booking > Advanced > Ability to edit payable options per event and access Partial Payment for each event separately.
11- Discount Per User Roles
If enabled, you can set discounts for users based on their roles.
12- Webhooks
After enabling and saving the settings, you should reload the page to see a new menu on the Dashboard > Webhooks.
Booking Elements
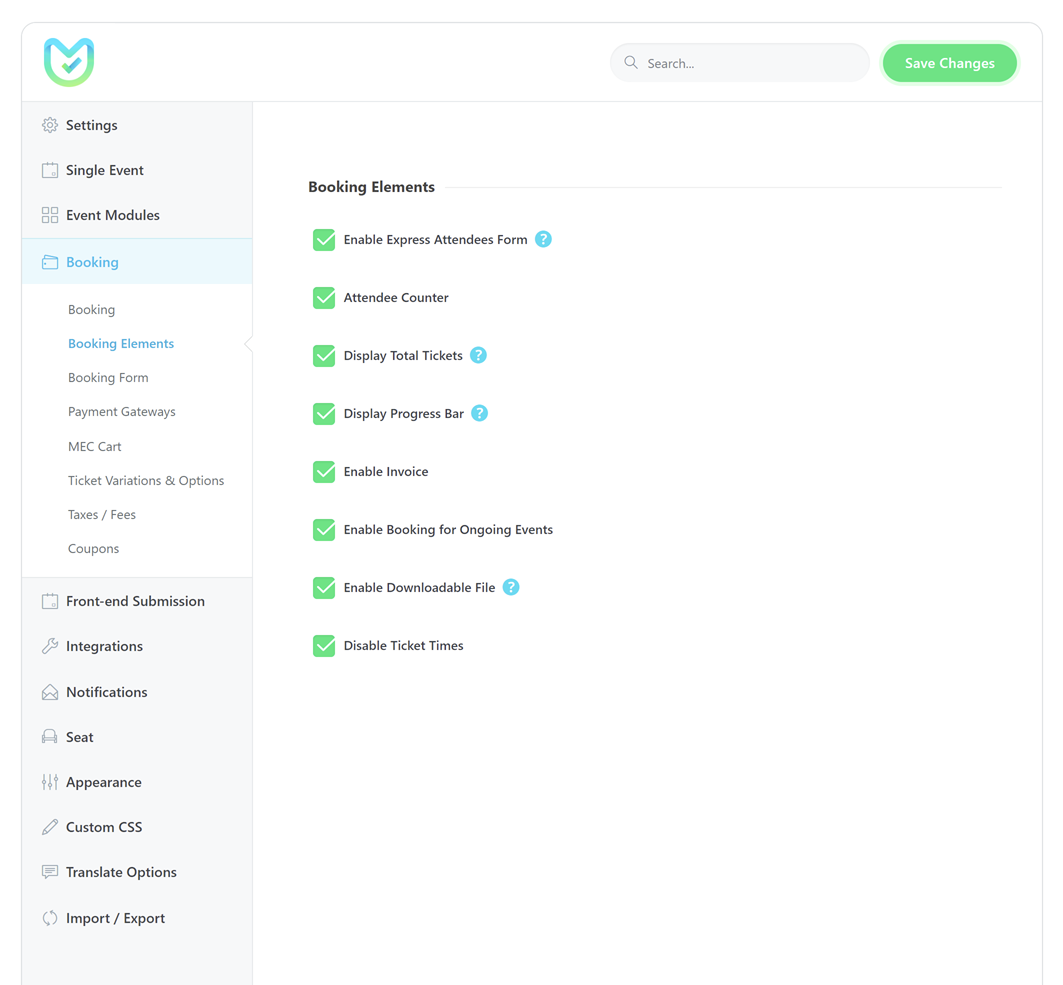
Enable Express Attendees Form
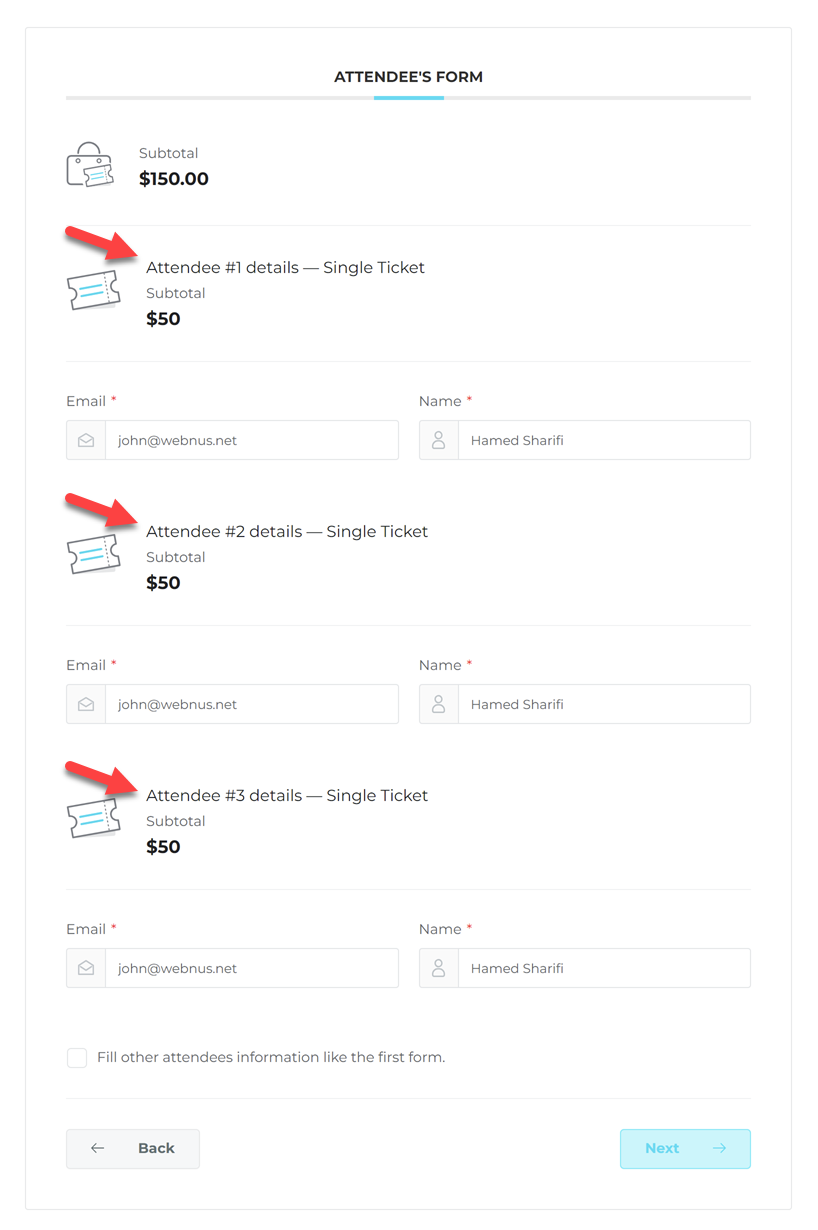
Apply the information from the first attendance of the users to all of their purchased tickets. Uncheck if you want every ticket to have its own attendee’s information.
Attendee Counter
Enabling this option will show the total number of attendees.
Display Total Tickets
If enabled, the total number of selected tickets will be displayed next to the booking button in the first step of the booking.
Display Progress Bar
If enabled, a progress bar will be added to the booking module indicating the current step and the next steps.
Note: It won’t get displayed if there is only 1 step.
Enable Invoice
By enabling this option, users will be able to download the invoice of their purchase after the booking process.
Enable Booking for Ongoing Events
If you enable this option, booking events will be available during the event.
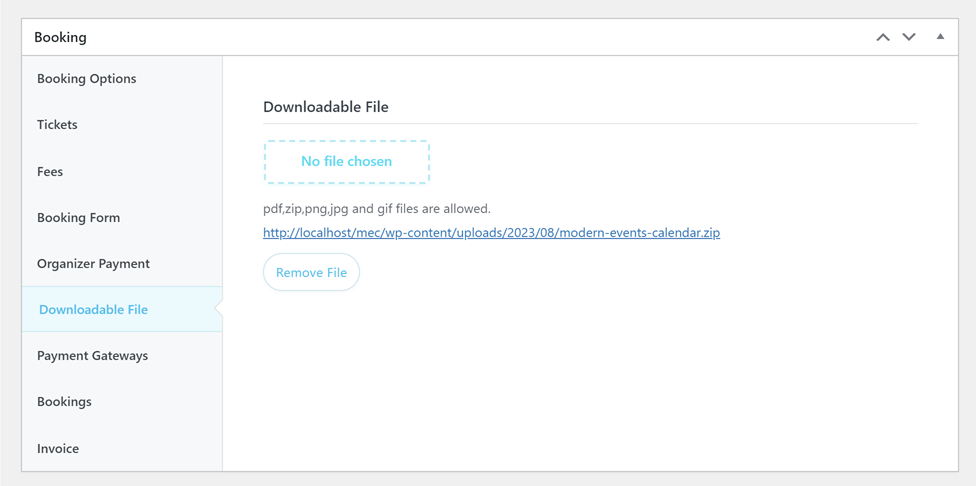
Enable Downloadable File
By enabling this feature, you will be able to upload a file for each event, and users will be able to download it after a successful booking process. It adds the ability to upload files to any single event. You can send this file in the notification email using the placeholder too.
Disable Ticket Times
Enable this option if you need to hide the ticket time.
Booking Form
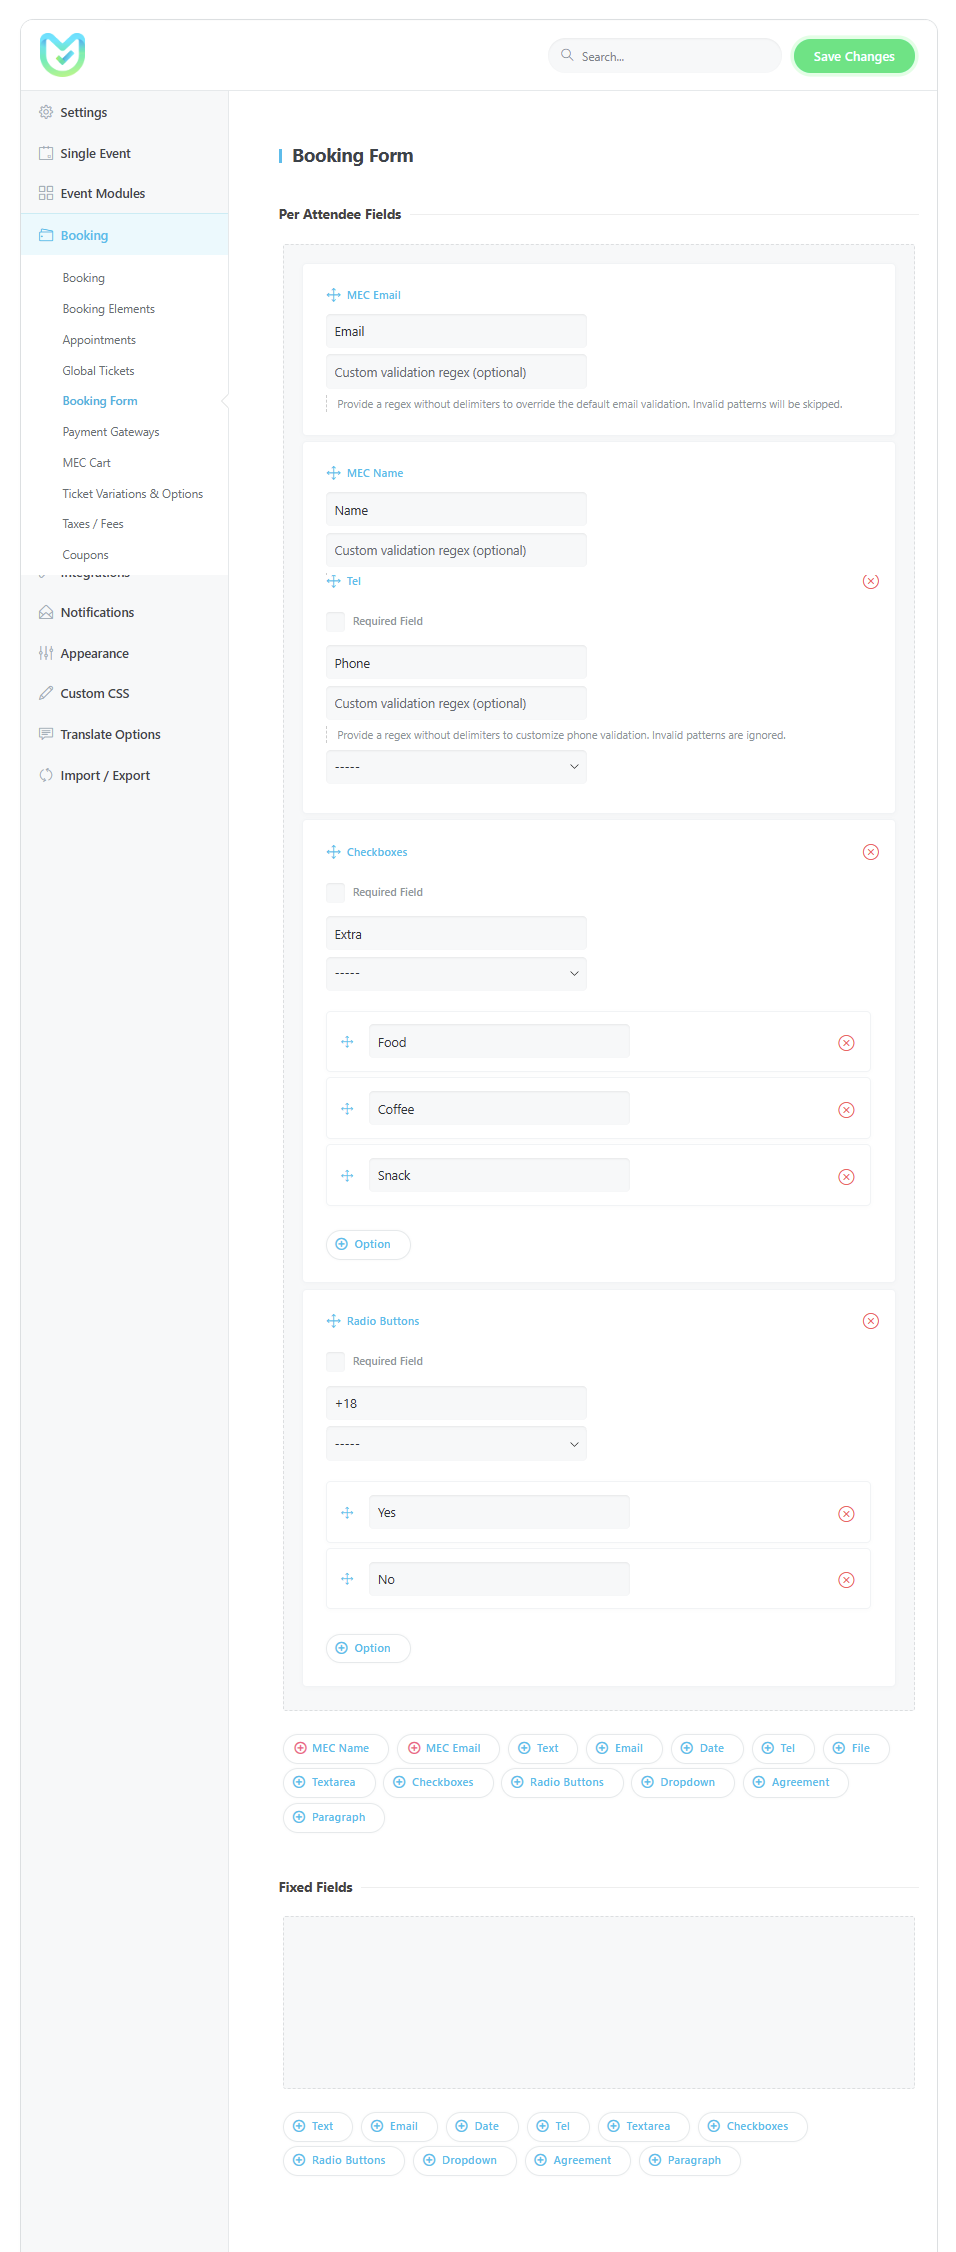
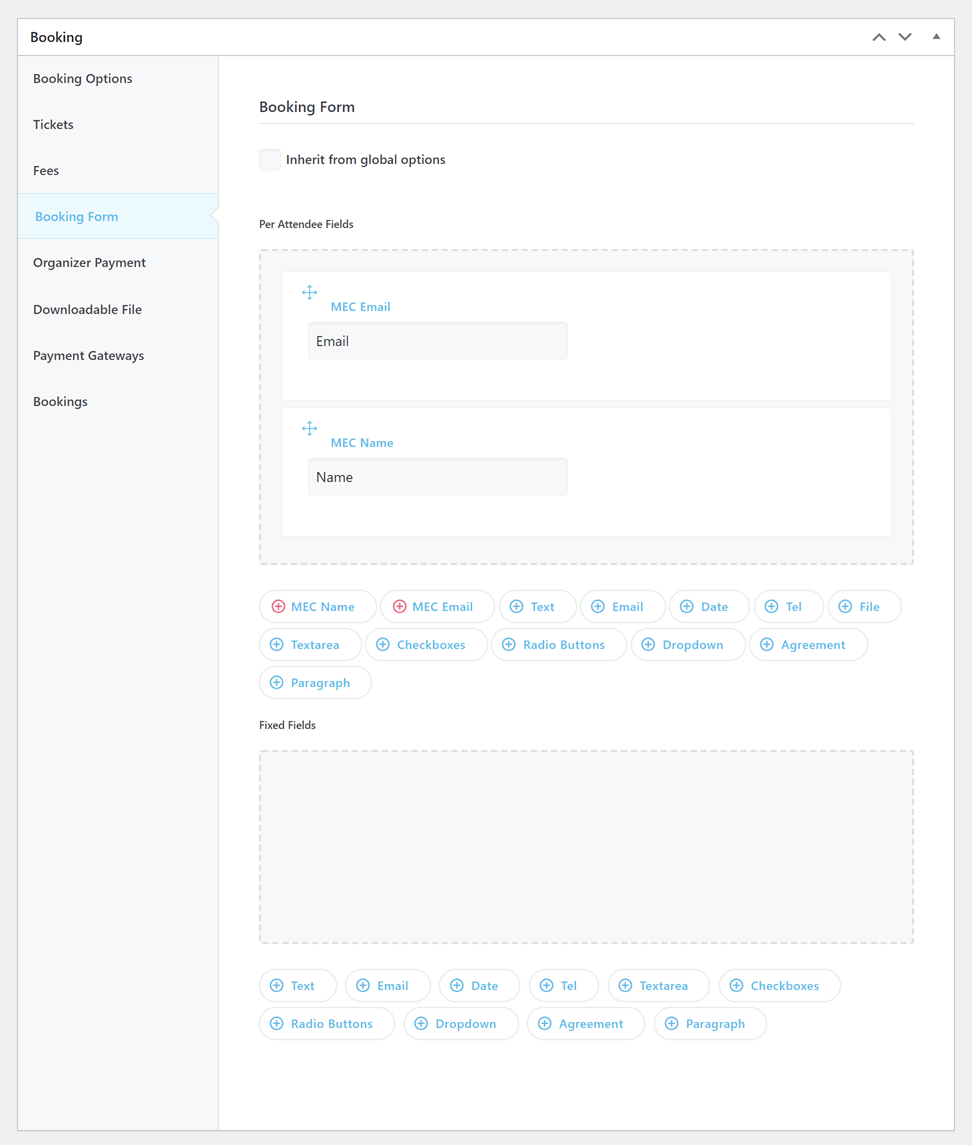
You can build and customize your Booking Form in the Modern Events Calendar using this option. Keep in mind that this form will be used for all attendees.
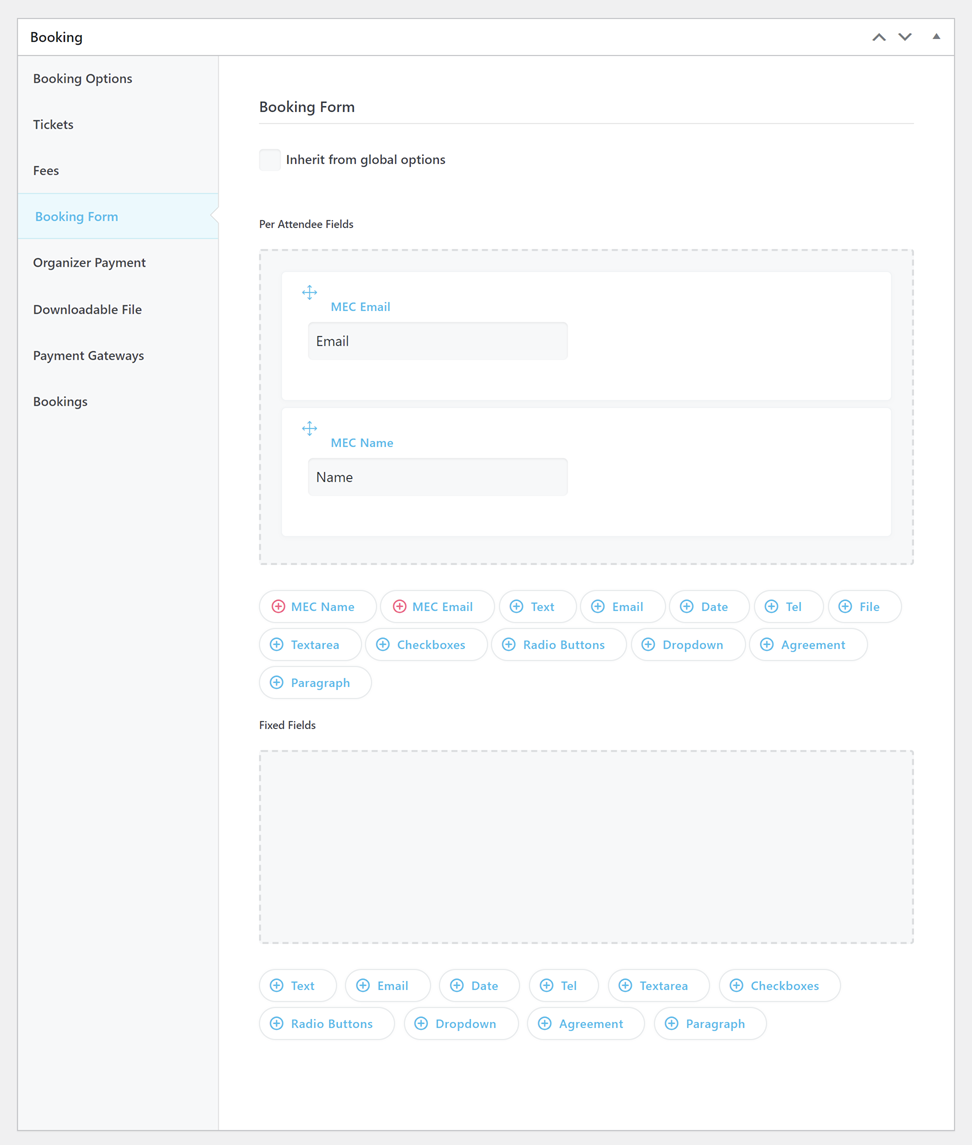
You can also customize your Booking Form for each event.
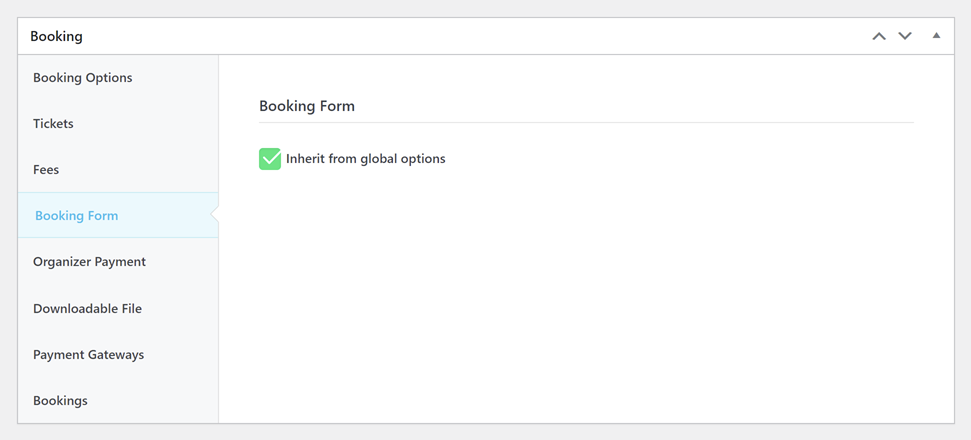
In order to do that, you need to go to Single Event Edit Page > Booking > Booking Form and uncheck the “Inherit from global options” option.
In order to prevent fake bookings, configure and use Google reCAPTCHA.
Booking Form Input Validation
We have introduced a robust layer of input validation in the MEC Booking Form to ensure higher data quality and improved security. Each field in the form is now validated against a predefined set of regular expressions (regex rules). These default rules prevent users from entering invalid or unsafe characters, while still allowing flexible input for real-world use cases.
For example, the telephone field only accepts digits, spaces, +, -, and parentheses, ensuring that phone numbers follow a recognizable format. The email field enforces a standard email structure, preventing malformed or incomplete addresses. Similarly, the name field accepts letters, numbers, spaces, and dots from multiple languages, making it suitable for international users.
Additionally, the text field supports a wider range of characters, including punctuation and special symbols commonly used in descriptions or notes, while filtering out potentially unsafe inputs such as HTML tags. This helps protect the system from malicious content injection and ensures that submitted data remains clean and consistent.
Custom Validation and Overriding Default Rules (Advanced)
For advanced users or specific regional requirements, you now have the ability to override the default validation rules for individual fields.
Under each field in the Booking Form configuration, you will find the “Custom validation regex (optional)” input.
- How it works: Entering a custom regex pattern in this field will completely override the default validation rule for that specific input (e.g., the default email structure validation). This allows you to enforce specialized formats—for instance, requiring a country-specific phone number format or validating a custom ID field pattern.
- Syntax Requirement: You must provide the regular expression without delimiters (e.g., if your pattern is
/^[a-zA-Z0-9]+$/, you should only enter^[a-zA-Z0-9]+$in the field).
- Safety Check: If you provide an invalid or improperly formatted regex pattern, the system will recognize it and skip your custom validation, reverting to the default security rules instead.
By combining the default validation with optional custom regex, the booking form remains user-friendly and secure, while providing powerful flexibility for administrators with advanced needs.
How to use Fields Mapping in the booking form
Field mapping is another unique feature of MEC. Imagine you wish to get user data such as phone numbers, but you don’t see the need to ask the user to provide the info once in the booking form and another time in the WooCommerce form. Here, Fields Mapping comes to help.
To this end, first, we need to create the fields.

We need to link our fields to WooCommerce fields for the next step. We will use the subfields related to our customized fields from the dropdown menu to do that.

As you can see, we linked the Phone field to the Billing Phone field and the Address to Billing Address 1 field.

Once this process is over, we can get to examine them. For that, go to the booking form and try to create a ticket.
You’ll see that the registered information in our custom fields is recalled from WooCommerce forms and displayed.
Payment Gateways
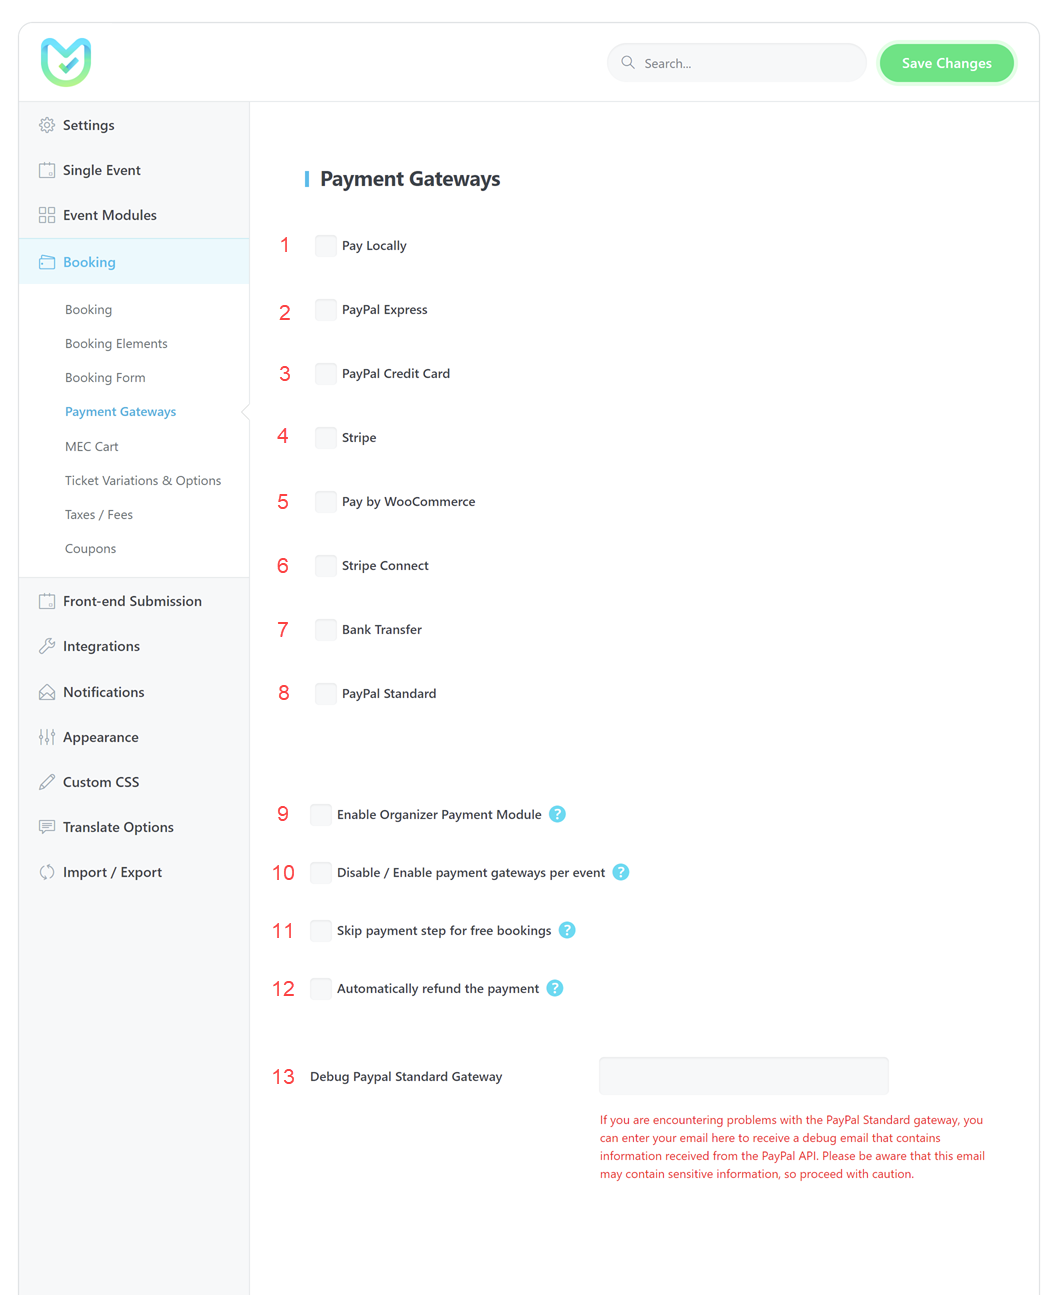
In order to utilize MEC payment gateways, the booking module must be activated beforehand. After activation, proceed to the Payment Gateways Settings located in the MEC settings menu > Booking. There, you will find a diverse selection of payment gateways that are accessible through the Modern Events Calendar plugin. The plugin offers numerous payment gateway options to choose from.
1- Pay Locally
With this feature, you can test your payment method and buy a ticket on your local host. Additionally, it allows event attendees to pay on-site.
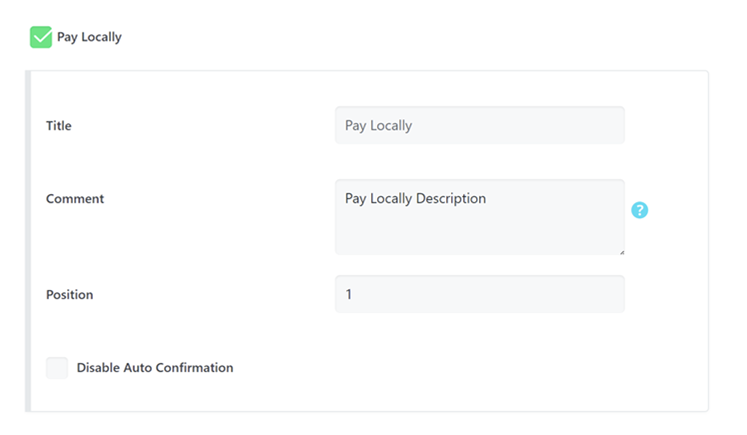
Title: To change the default title on the payment list, simply fill in the text field.
Comment: Once a payment option is selected, this field will appear. You have the option to input either text or HTML in this section.
Position: Please input the position you want this payment gateway to occupy in the booking form. It will be located in the indicated position once set.
Disable Auto Confirmation: If you choose to enable this option, the booking that is free of charge will not be confirmed automatically.
2- PayPal Express
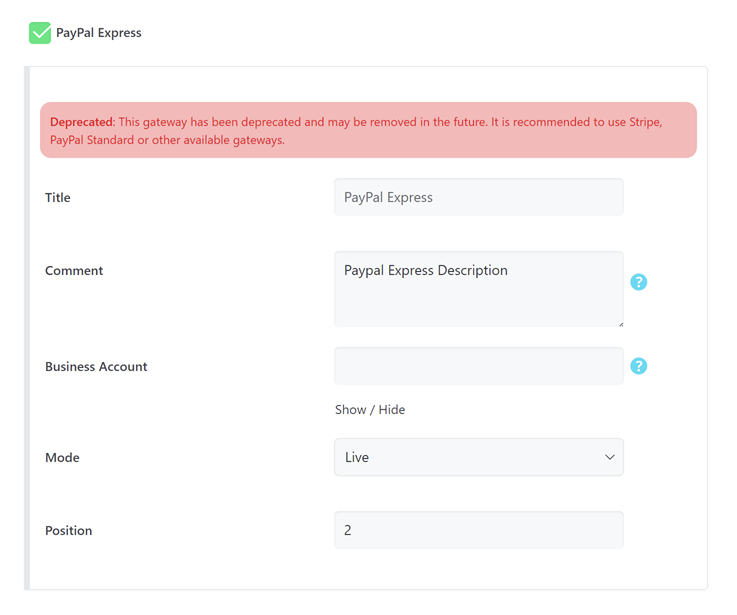
Title: If you need to change the default title on the payment list, fill out this text field.
Comment: This field will be displayed after selecting the payment option. You can enter text or HTML here.
Business Account: You should put your PayPal email in this field. To use this service, you must have a merchant/business account with PayPal.
Mode: Use Sandbox mode to test your integration end-to-end. And Live mode for real payments.
Position: Enter your desired position for this payment gateway in this field. This payment gateway will be placed in this position in the booking form.
Note: This gateway has been deprecated and may be removed in the future. It is recommended to use Stripe, PayPal Standard or other available gateways.
3- PayPal Credit Card
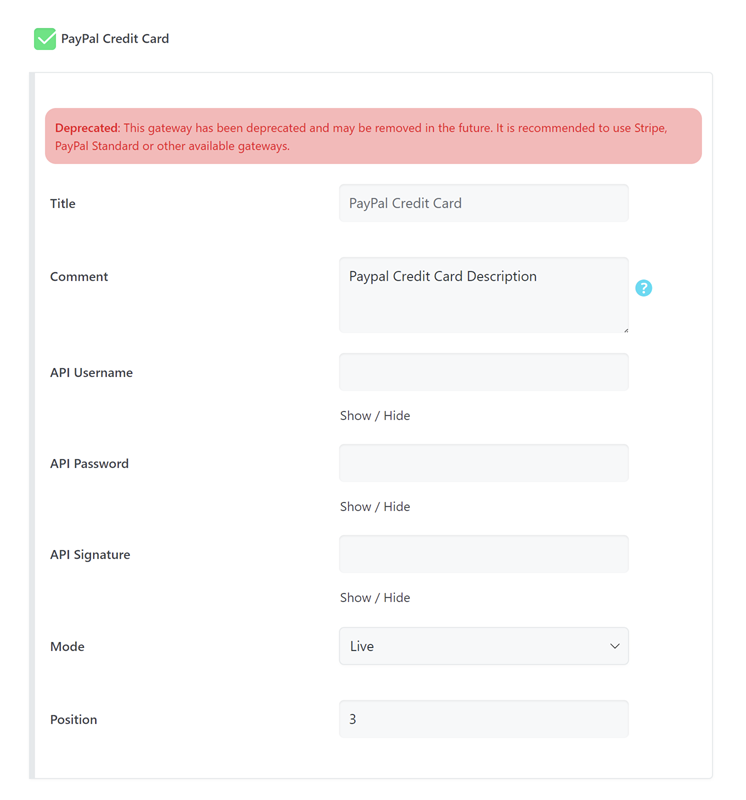
Title: If you need to change the default title on the payment list, fill in the text field.
Comment: This field will be displayed after selecting the payment option. You can enter text or HTML here.
API Username, API Password & API Signature: You need to receive these credentials from the provider.
Mode: use Sandbox mode to test your integration end-to-end. And Live mode for real payments.
Position: Enter your desired position for this payment gateway in this field. This payment gateway will be placed in this position in the booking form.
Note: This gateway has been deprecated and may be removed in the future. It is recommended to use Stripe, PayPal Standard or other available gateways.
4- Stripe
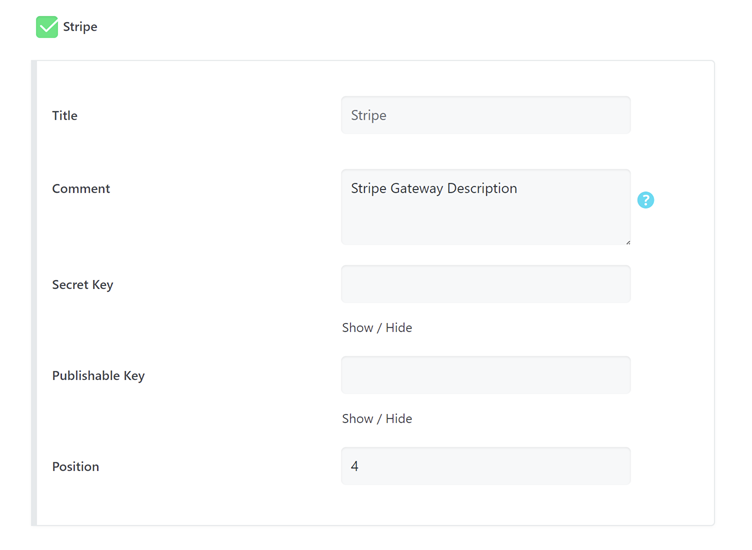
Title: If you need to change the default title on the payment list, fill in the text field.
Comment: This field will be displayed after selecting a payment option. You can enter text or HTML here.
Secret Key & Publishable Key: You need to receive these credentials from the provider.
Position: Enter your desired position for this payment gateway in this field. This payment gateway will be placed in this position in the booking form.
5- Stripe Connect
Using this gateway, the booking fee will be paid directly to the organizer account, but you can get your fee in your Stripe account. (Standard, Express)
If the organizer connects his/her account, then it will be the only enabled gateway for organizer events, even if other gateways are enabled. The Organizer Payment Module must be enabled to use this!
You should set the Redirect URL in your stripe dashboard.
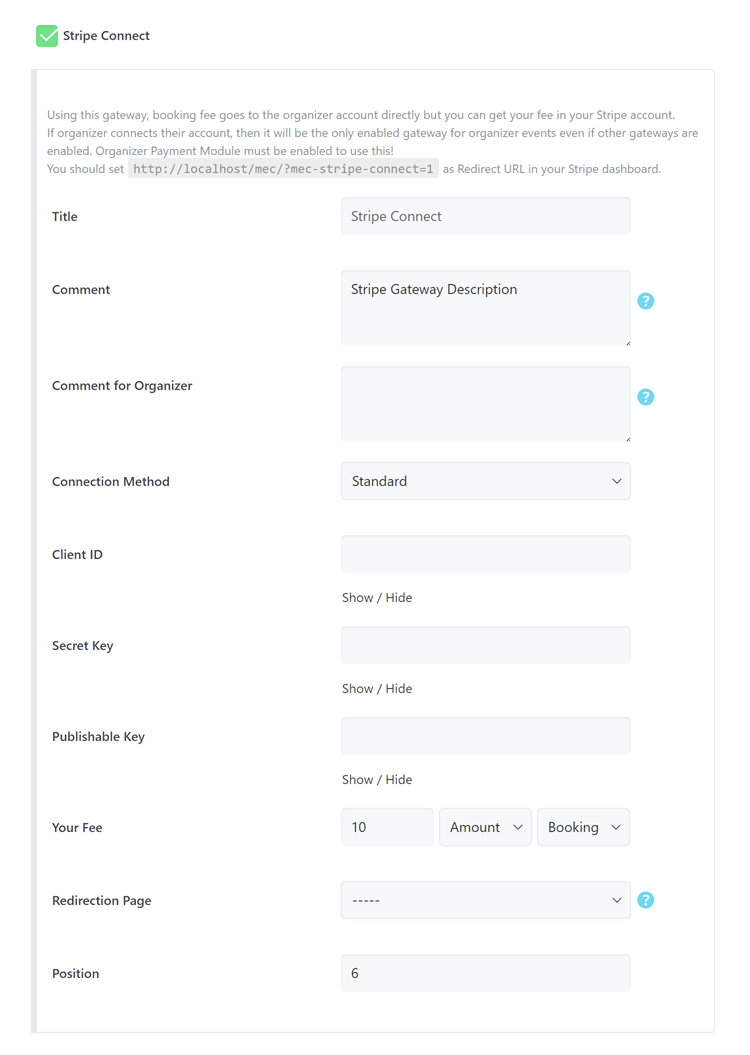
Title: If you need to change the default title on the payment list, fill in the text field.
Comment: This field will be displayed after selecting the payment option. You can enter text or HTML here.
Comment for Organizer: If you have a message for the organizer, write it here.
Connection Method: Determine the connection method here.
Client ID, Secret Key & Publishable Key: You need to receive these credentials from the provider.
Your Fee: Set your fee amount/percent per ticket/booking.
Redirection Page: Users will be redirected to this page after connecting to your Stripe account. You can create a page to thank them. If you leave it empty, then users will be redirected to the home page!
Position: Enter the desired position for this payment gateway in this field. This payment gateway will be placed in this position In the booking form.
6- Bank Transfer
It makes it possible to purchase a ticket using Bank Transfer.
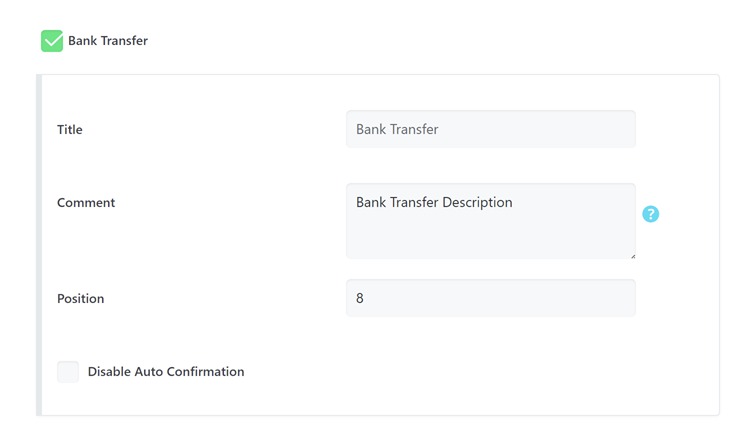
Title: If you need to change the default title on the payment list, fill in the text field.
Comment: This field will be displayed after selecting a payment option. You can enter text or HTML here.
Position: Enter the desired position for this payment gateway in this field. This payment gateway will be placed in this position In the booking form.
Disable Auto Confirmation: By enabling this option, the free booking will not be automatically confirmed.
7- PayPal Standard
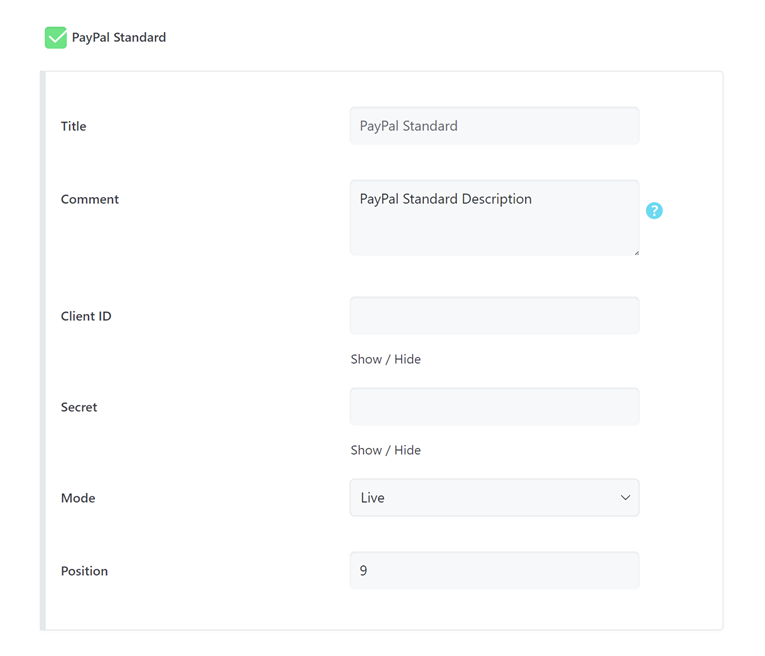
Title: If you need to change the default title on the payment list, fill out this text field.
Comment: This field will be displayed after selecting the payment option. You can enter text or HTML here.
Client ID: You should put your PayPal Client ID in this field.
Secret: You should put your PayPal Secret in this field.
Mode: Use Sandbox mode to test your integration end-to-end and Live mode for real payments.
Position: Enter your desired position for this payment gateway in this field. This payment gateway will be placed in this position in the booking form.
8- Pay by WooCommerce
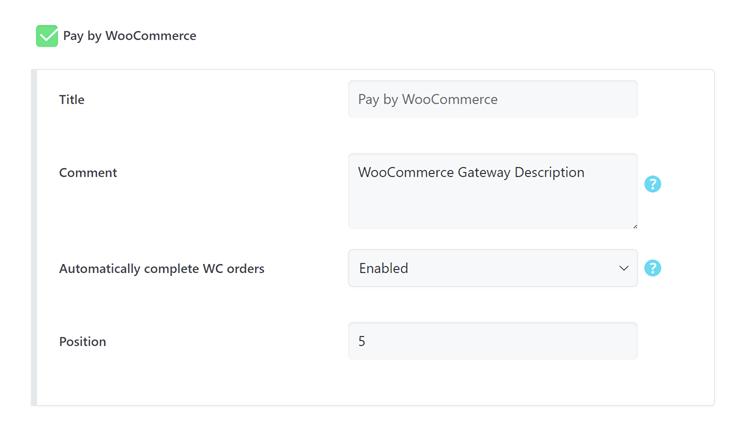
Title: If you need to change the default title on the payment list, fill in the text field.
Comment: This field will be displayed after selecting the payment option. You can enter text or HTML here.
Automatically complete WC orders: It applies only to the orders that are related to MEC.
Take a look at MEC integration with WooCommerce for more information.
Note: About PayPal, you need to get an API called “PayPal API for Integration of the NVP/SOAP API (Classic).”
Use WooCommerce as Payment System
When the WooCommerce payment gateway is enabled in MEC, the payment data will be sent to WooCommerce after users click on the checkout button. If the payment is made completely and successfully, it returns a “true” answer, but if not, it will return “false,” and the payment won’t be made. Despite the WooCommerce process about payments, when the payment is done and is returned to MEC as true, the booking is done successfully. MEC emails will be sent, and a new record will be stored in the database as a new booking.
The functions of WooCommerce and MEC are totally different and are not related to each other. The successful or unsuccessful status of the payment will only be sent from WooCommerce to MEC. This was the whole process of integration.
By enabling this feature, tickets will be added to the WooCommerce cart, and all payment processes will be done by WooCommerce, so all MEC payment-related modules will be disabled. To configure your desired gateways, booking fields, etc, you need to configure WooCommerce on your website.
Note: The product won’t be added to the WooCommerce Cart unless you use the WooCommerce Integration addon. In order to use the “Add to Cart” function, you should use the WooCommerce Integration addon.
You cannot use the following MEC features so you should use WooCommerc and its add-ons if you need them.
- Payment Gateways
- Price per Date of Tickets
- Coupons
- Ticket Variations
- Taxes / Fees
- Discount Per Roles
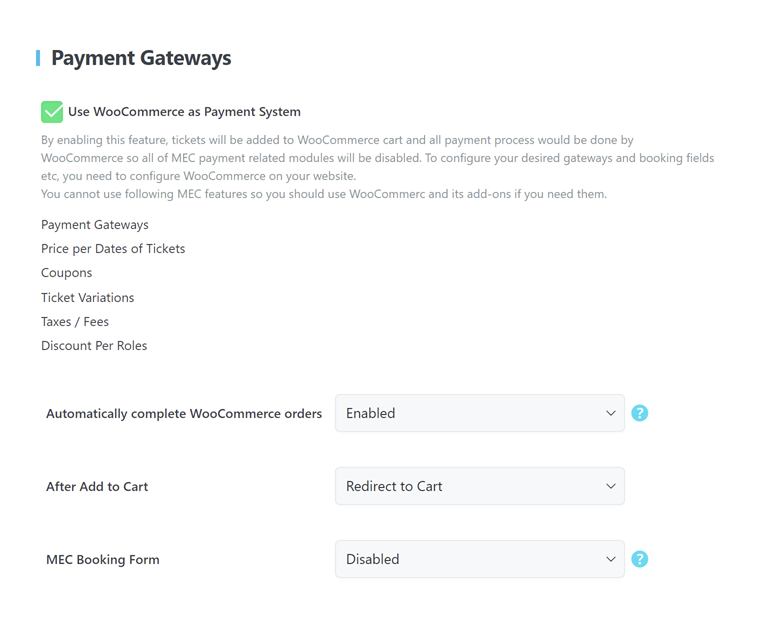
Automatically complete WooCommerce orders: If you want your WooCommerce order completed (even with a physical product) enable this option.
After Add to Cart: You can set this option to redirect users to the desired page (Redirect to Cart or Redirect to Checkout).
MEC Booking Form: By enabling the “MEC Booking Form,” users should fill out the booking form in MEC, and then they will be redirected to checkout.
Note: The event has not been added to the cart, In other words, an event is not a product.
Click here for more information about the Modern Events Calendar WooCommerce Integration addon.
9- Enable Organizer Payment Module
When the module is enabled, organizers can input their payment credentials for enabled gateways per event, allowing them to receive payments directly.
10- Disable / Enable payment gateways per event
By enabling this module, users are able to disable/enable payment gateways per event.
11- Skip payment step for free bookings
If enabled, it will skip the payment step for free bookings. You can disable it if you’re required by law.
12- Automatically refund the payment
Automatically refund the payment when a booking paid by applicable gateways (Stripe) gets canceled.
13- Debug Paypal Standard Gateway
If you are encountering problems with the PayPal Standard gateway, you can enter your email here to receive a debugging email that contains information received from the PayPal API. Please be aware that this email may contain sensitive information, so proceed with caution.
MEC Cart
MEC Cart in Modern Events Calendar allows you to create an in-app cart and checkout system for your users. In order to enable this feature, you need to go to MEC Settings > Booking > MEC Cart and check the “Use MEC Cart System” option.
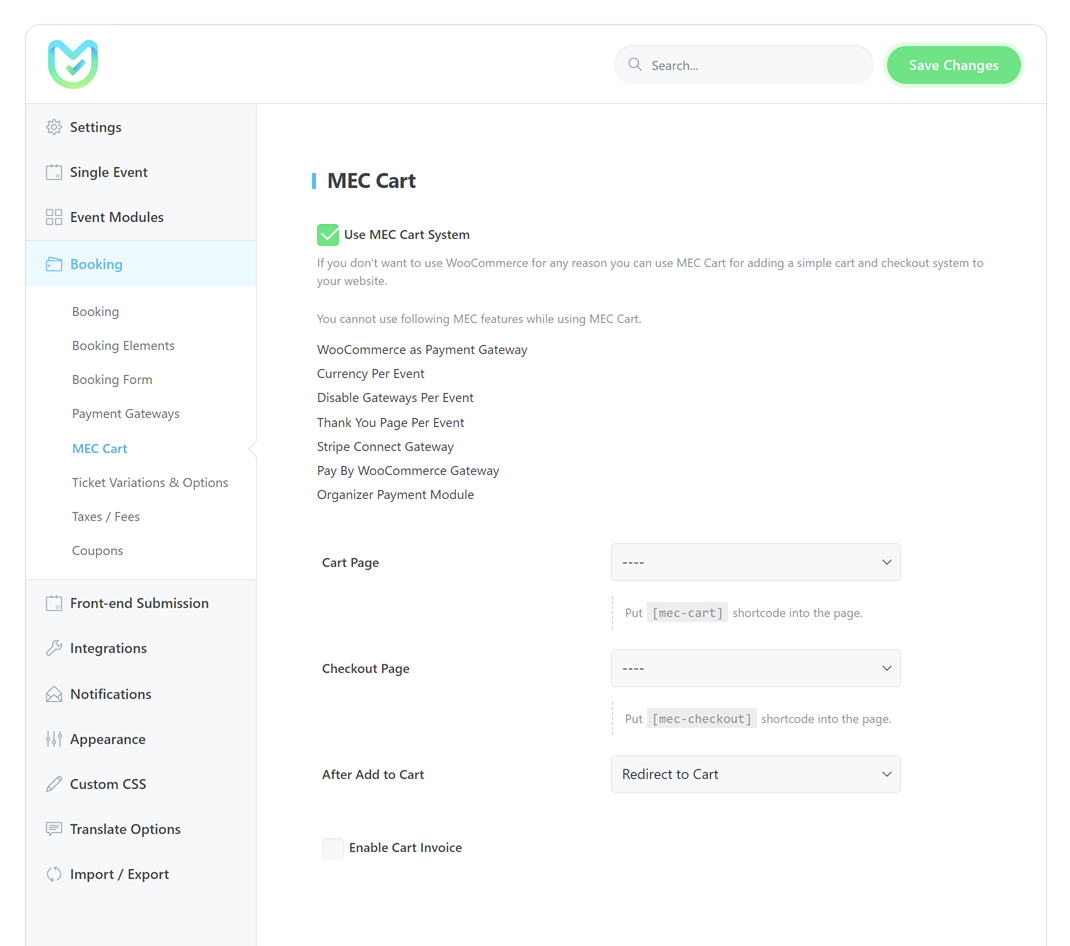
Just like WooCommerce, You have a cart shortcode and a checkout shortcode, which must be placed on a separate page.
However, using the WooCommerce payment gateway, users can add other WooCommerce products besides event tickets.
Note: You cannot use the following MEC features while using MEC Cart.
- WooCommerce as Payment Gateway
- Currency Per Event
- Disable Gateways Per Event
- Stripe Connect Gateway
- Pay By WooCommerce Gateway
- Organizer Payment Module
You can create your cart and checkout pages like the below images:


In order to add multiple dates for the same event to the cart, you need to use Checkboxes for Date Selection.
And definitely, tickets from different events can be added to the cart. If you set Fee and Ticket variations, those will be applied to tickets.
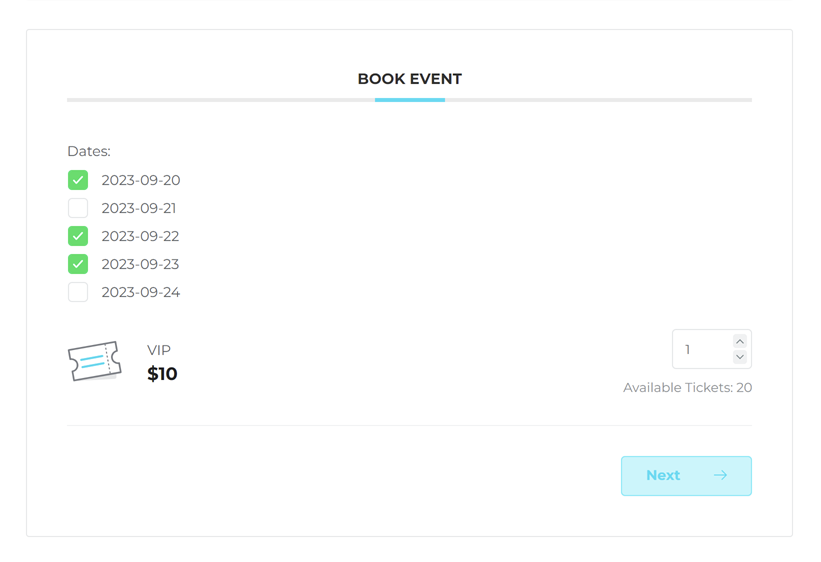
Here is how you can add your tickets to the cart:

You can also check the tickets you want to book on the cart page, remove them, or use a discount coupon altogether:
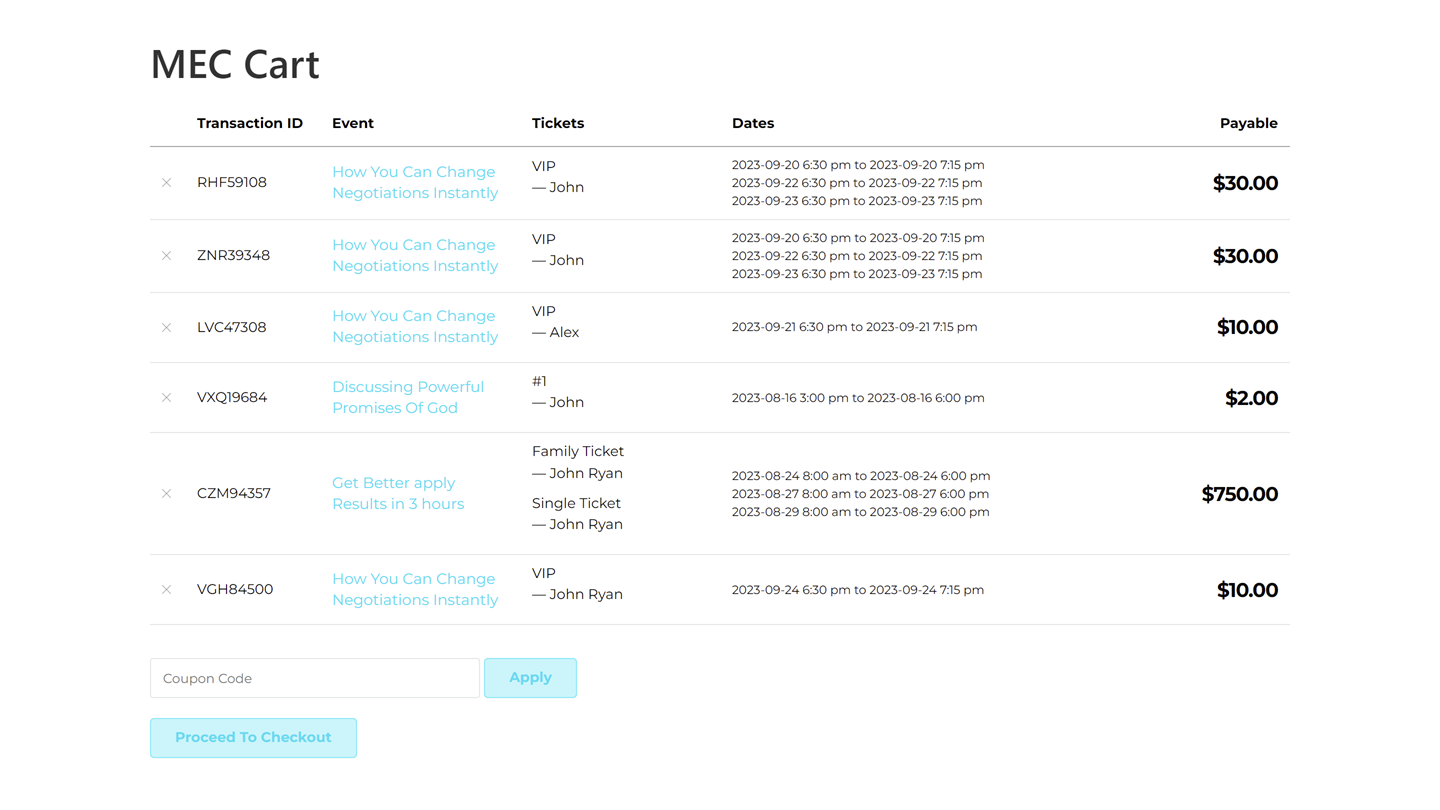
Then go to the checkout page to pay and complete all the reservations and pay by selecting the payment gateway of your choice.
Ticket Variations & Options
The ticket variations option in the Modern Events Calendar lets the users choose more items and include them in their reservations while booking an event. For example, reservations for a meal, pre-ordering a book or an article, or whatever you need on the sidelines of your event. In order to enable this option, you need to go to MEC Settings > Booking > Ticket Variations & Options and check the “Enable ticket variations module” option.
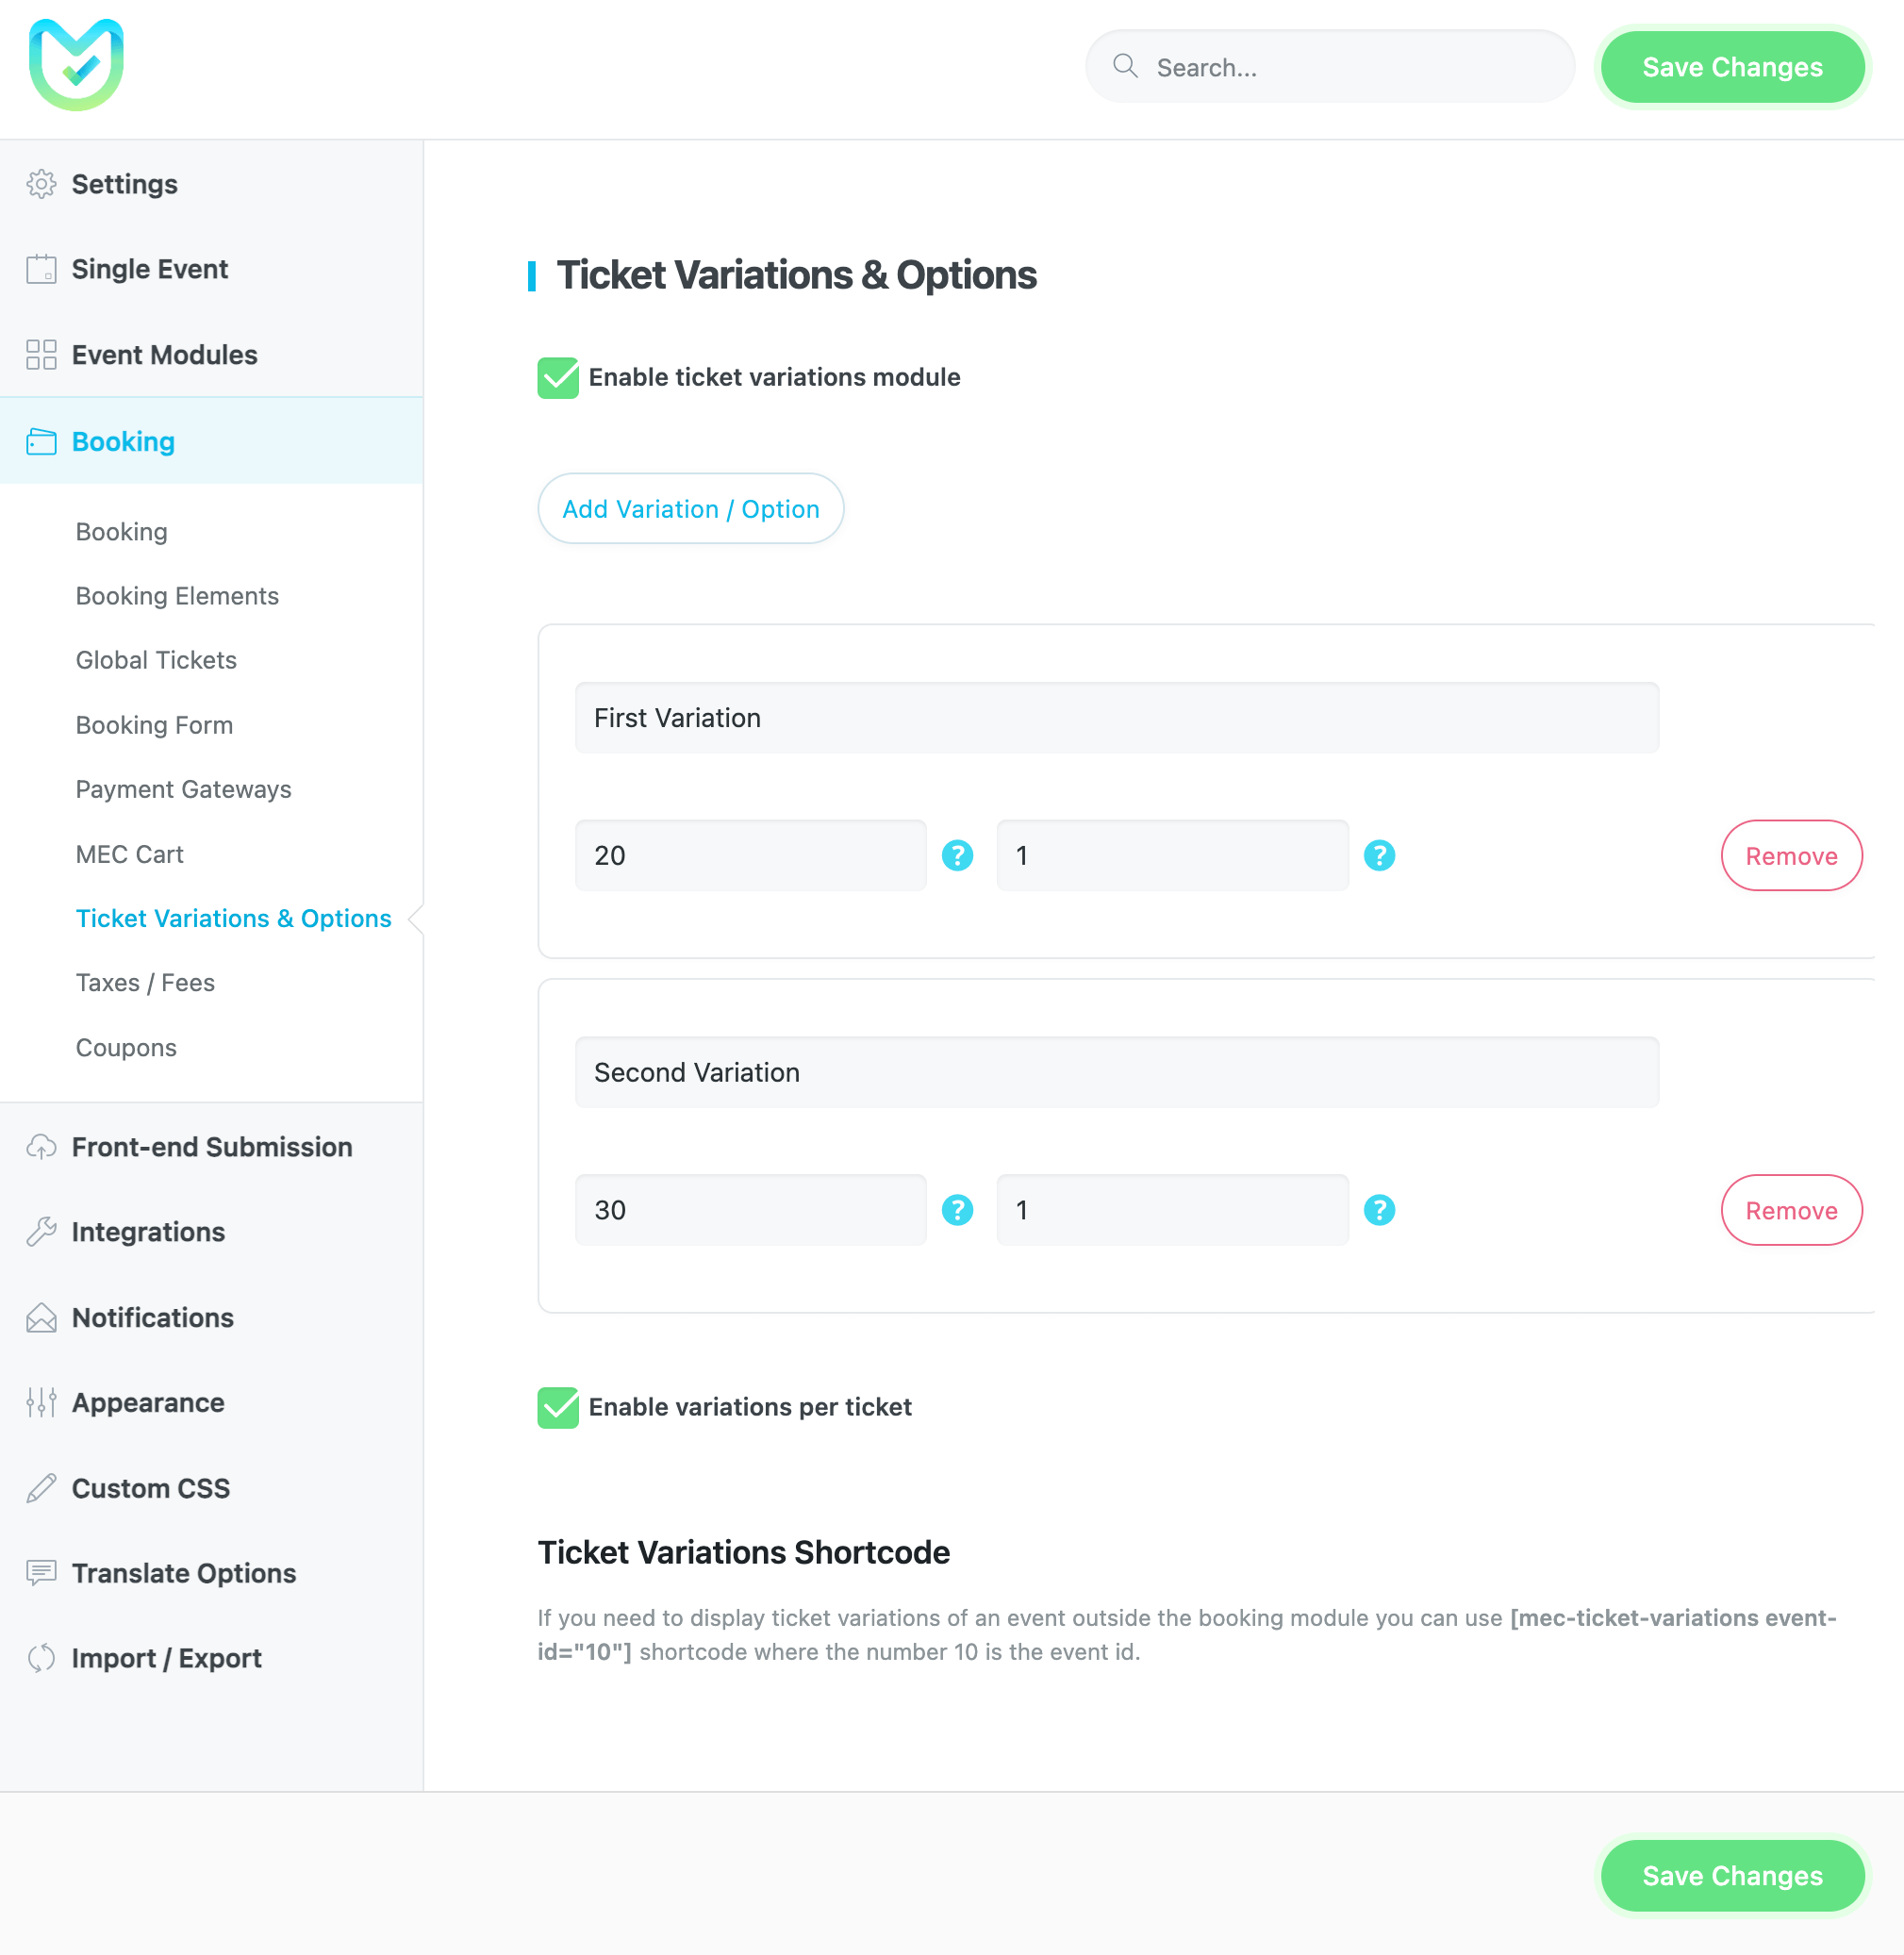
After setting up a default preset for your ticket variations, you can either use them or customize them for each event. In order to do that, you need to go to Single Event Edit Page > Booking > Ticket Variations / Options and uncheck the “Inherit from global options” option.
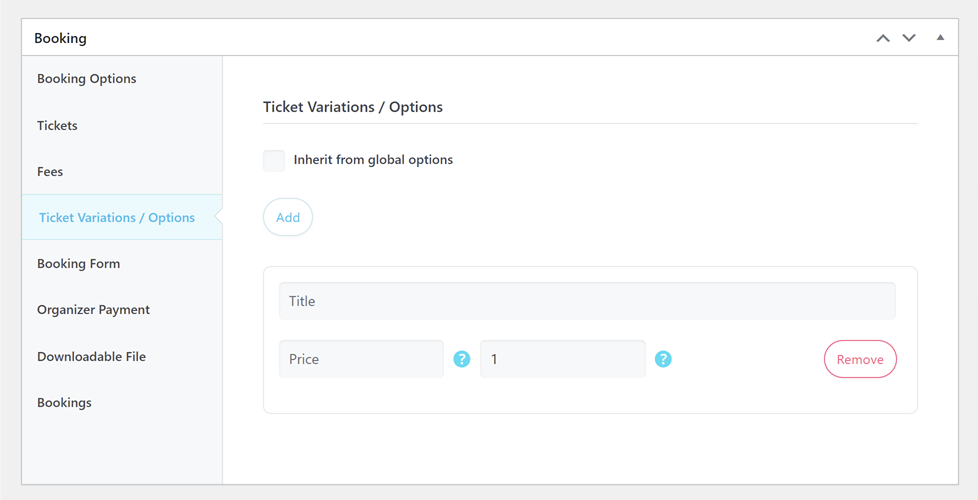
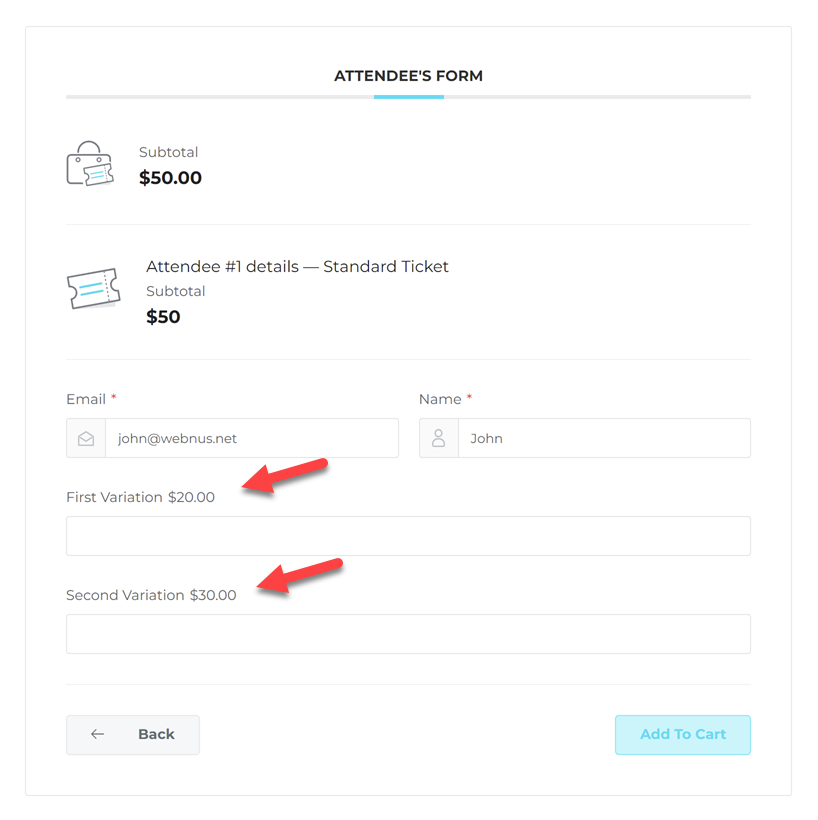
Note: Just keep in mind that the event must have a reservation. To do this, you need to go to the back end of that particular event, and under Booking, you will see this option.
You can set a limit for purchasing tickets in the “Maximum Per Ticket” field.
Ticket Variations Shortcode
If you need to display ticket variations of an event outside the booking module you can use [mec-ticket-variations event-id=”10″] shortcode where the number 10 is the event id.
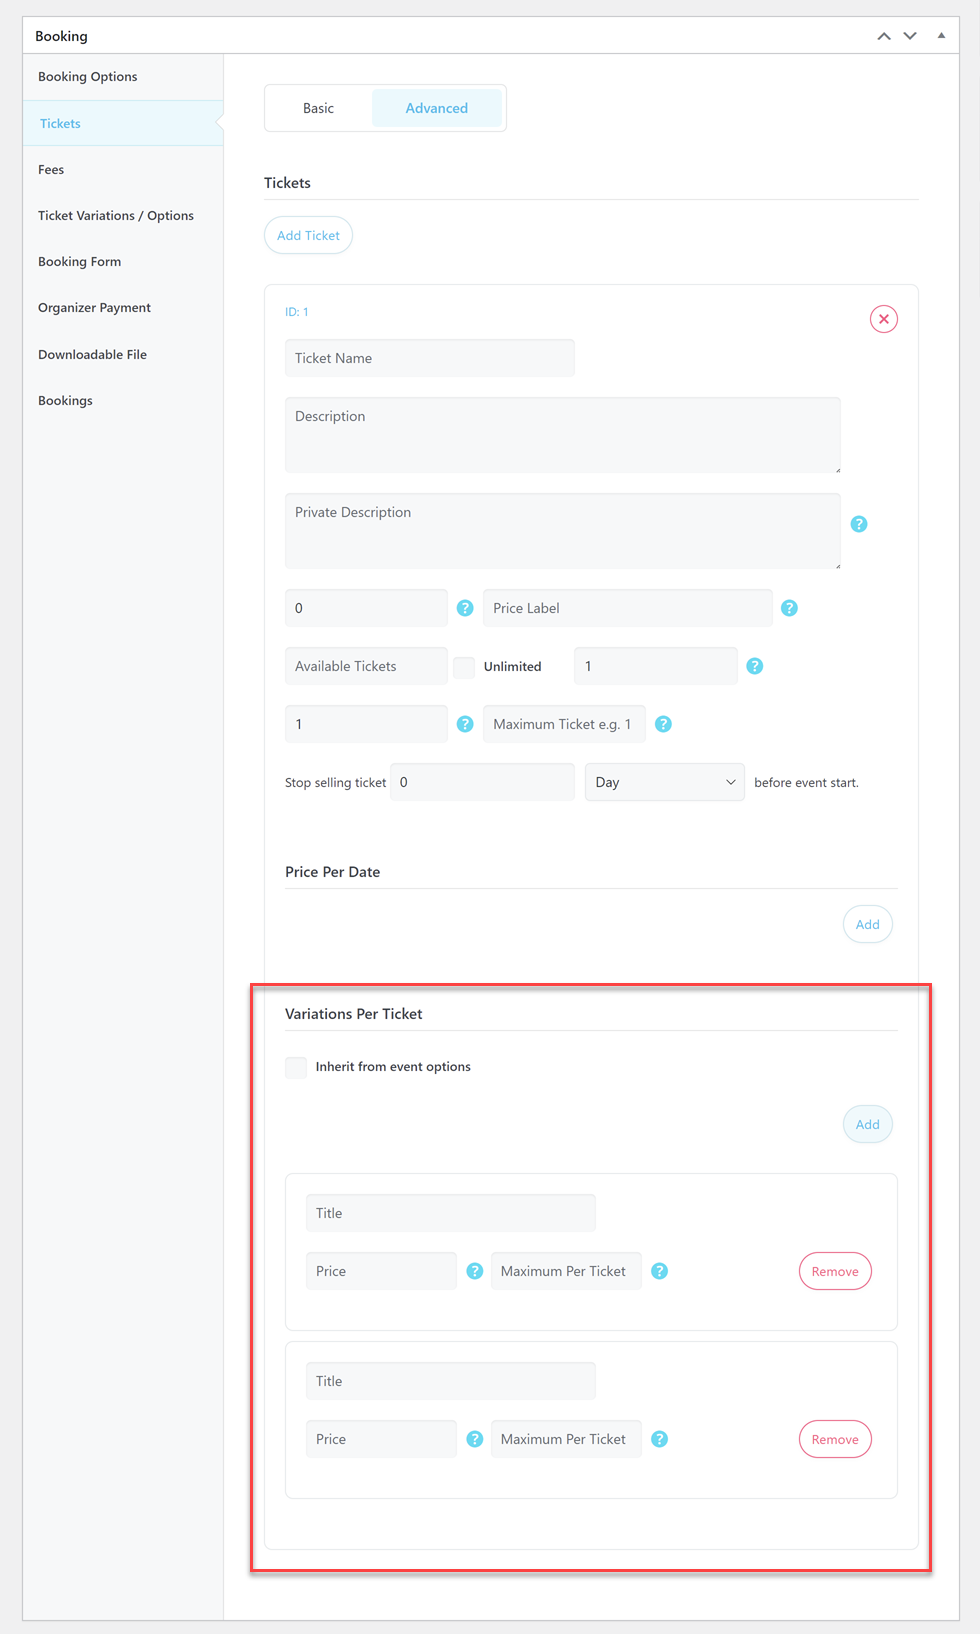
Ticket Variations per Ticket
You can set ticket variation per ticket. In order to do that, you need to make sure that you have enabled the “Enable Variations per Ticket” in MEC Settings > Booking > Ticket Variations & Options.
Taxes / Fees
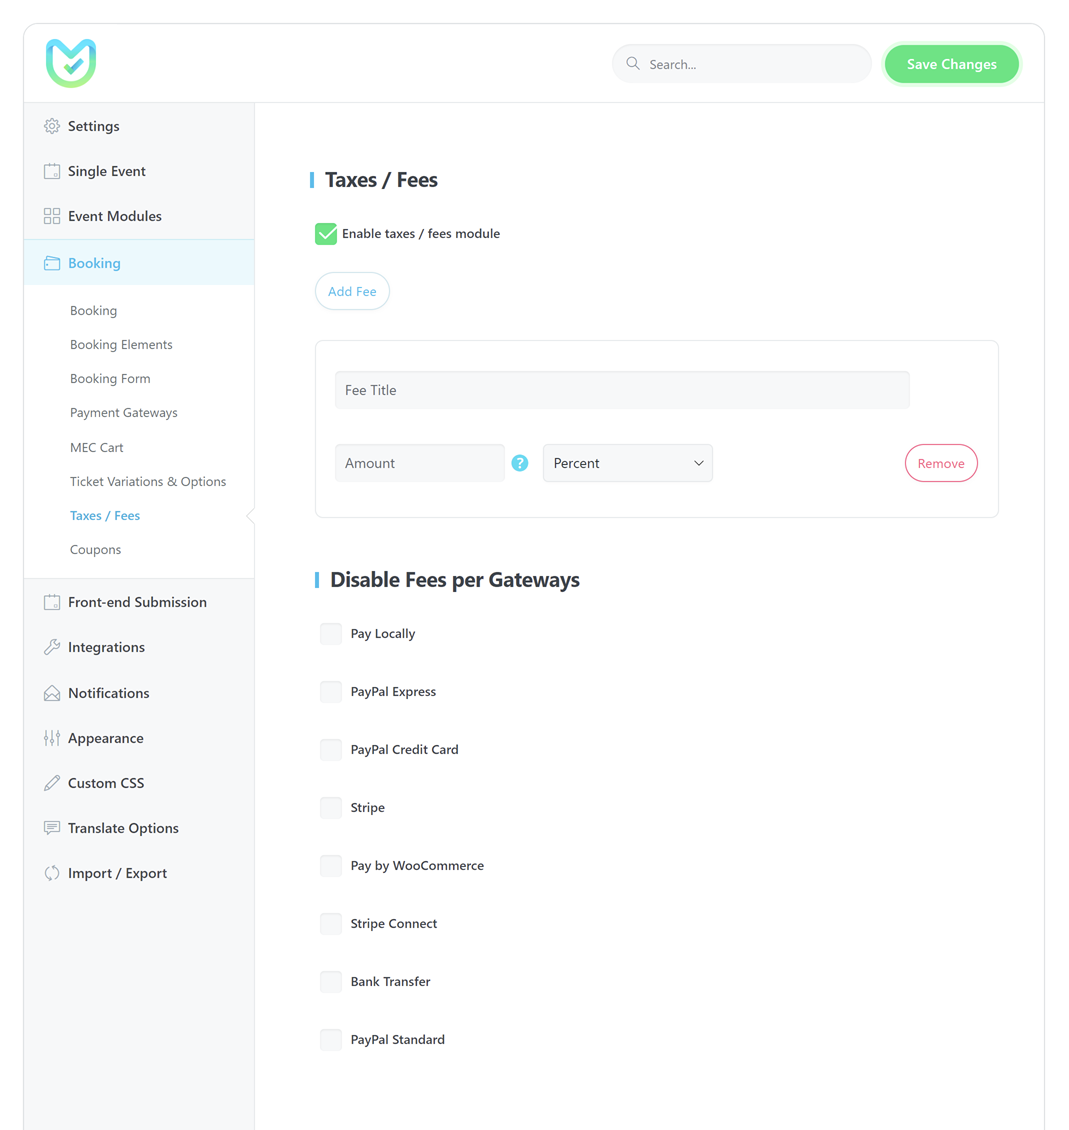
Within the Modern Events Calendar plugin’s settings section, activating the taxes/fees option is a simple process. You can create a fee with your own specific criteria in that section. It should be noted that taxes and fees are actually the same in MEC settings, but you can differentiate them by giving each one a different name.
Types of Fees in Modern Events Calendar
We have four types of fees in the Modern Events Calendar:
Percentage
Apply a percentage per ticket.
Amount Per Ticket
It charges a fixed fee for your booking per ticket.
Amount Per Date
It charges a fixed fee for your booking per each date.
Amount Per Booking
No matter what the ticket type is, this will be applied to the booking.
The above options are public, and you can change the cost of tickets for a particular event too.
Disable Fees per Gateways
You can disable fees on your specific payment gateways with this option.
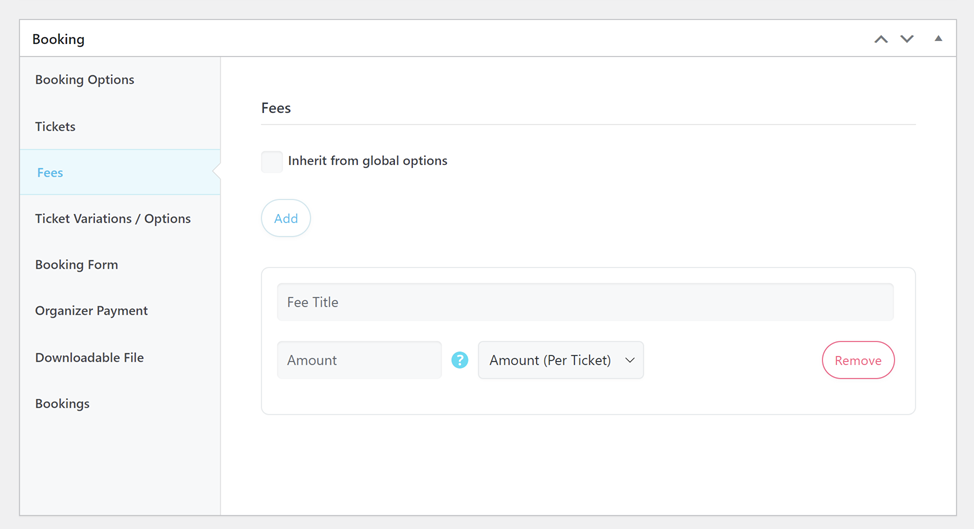
Taxes / Fees per Event
You can define separate taxes/fees per each event within the following path:
Single Event Edit Page > Booking > Fees
From there, you need to uncheck the “Inherit from global options” option and hit the “Add” button.
Here is how your fees will be applied to your tickets/events:
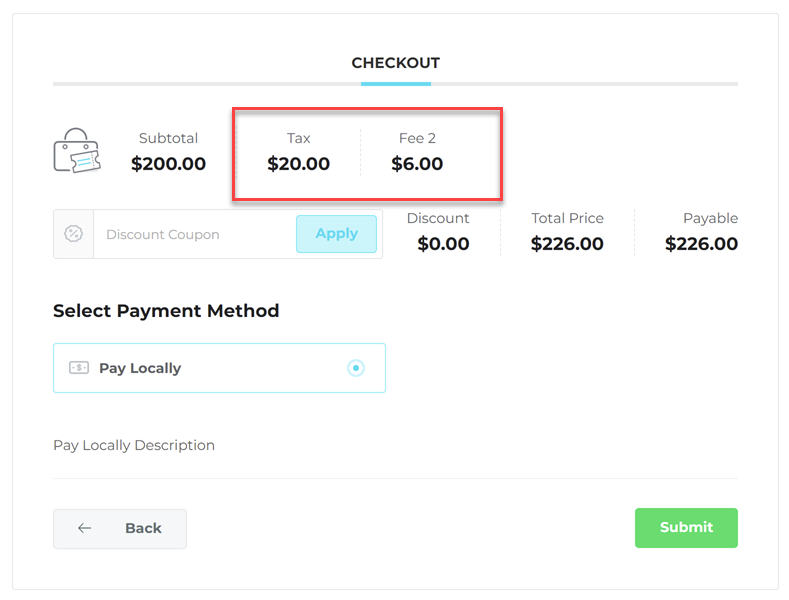
Coupons
When you activate the “Coupons” option in Modern Events Calendar, you will notice a new menu under WordPress Dashboard > Booking. This menu allows you to create and showcase coupons for a specific event.
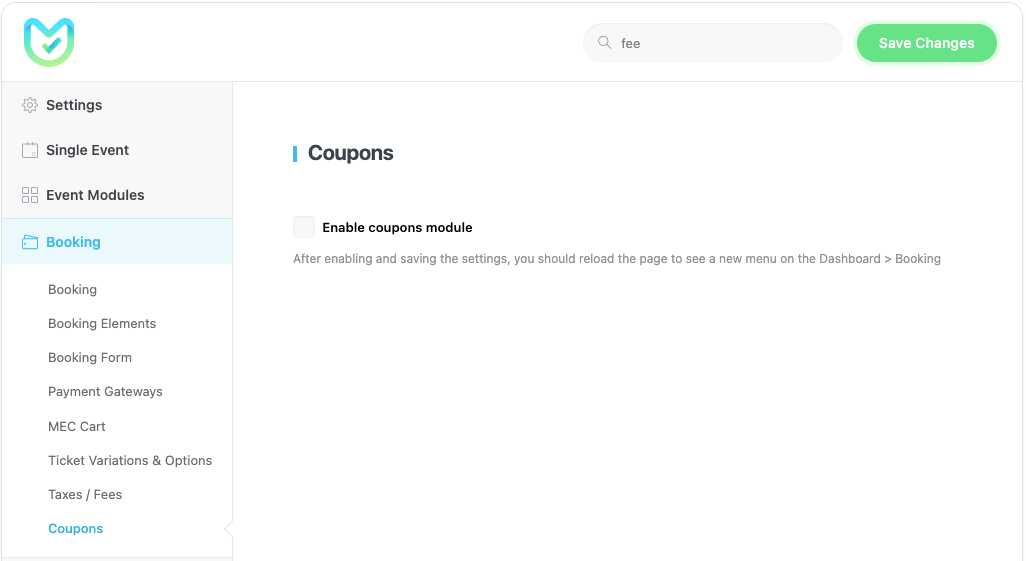
Note: After you have checked the “Enable coupons module” option and saved the changes, you should refresh the page.
Follow the below instructions in order to create and use a coupon:
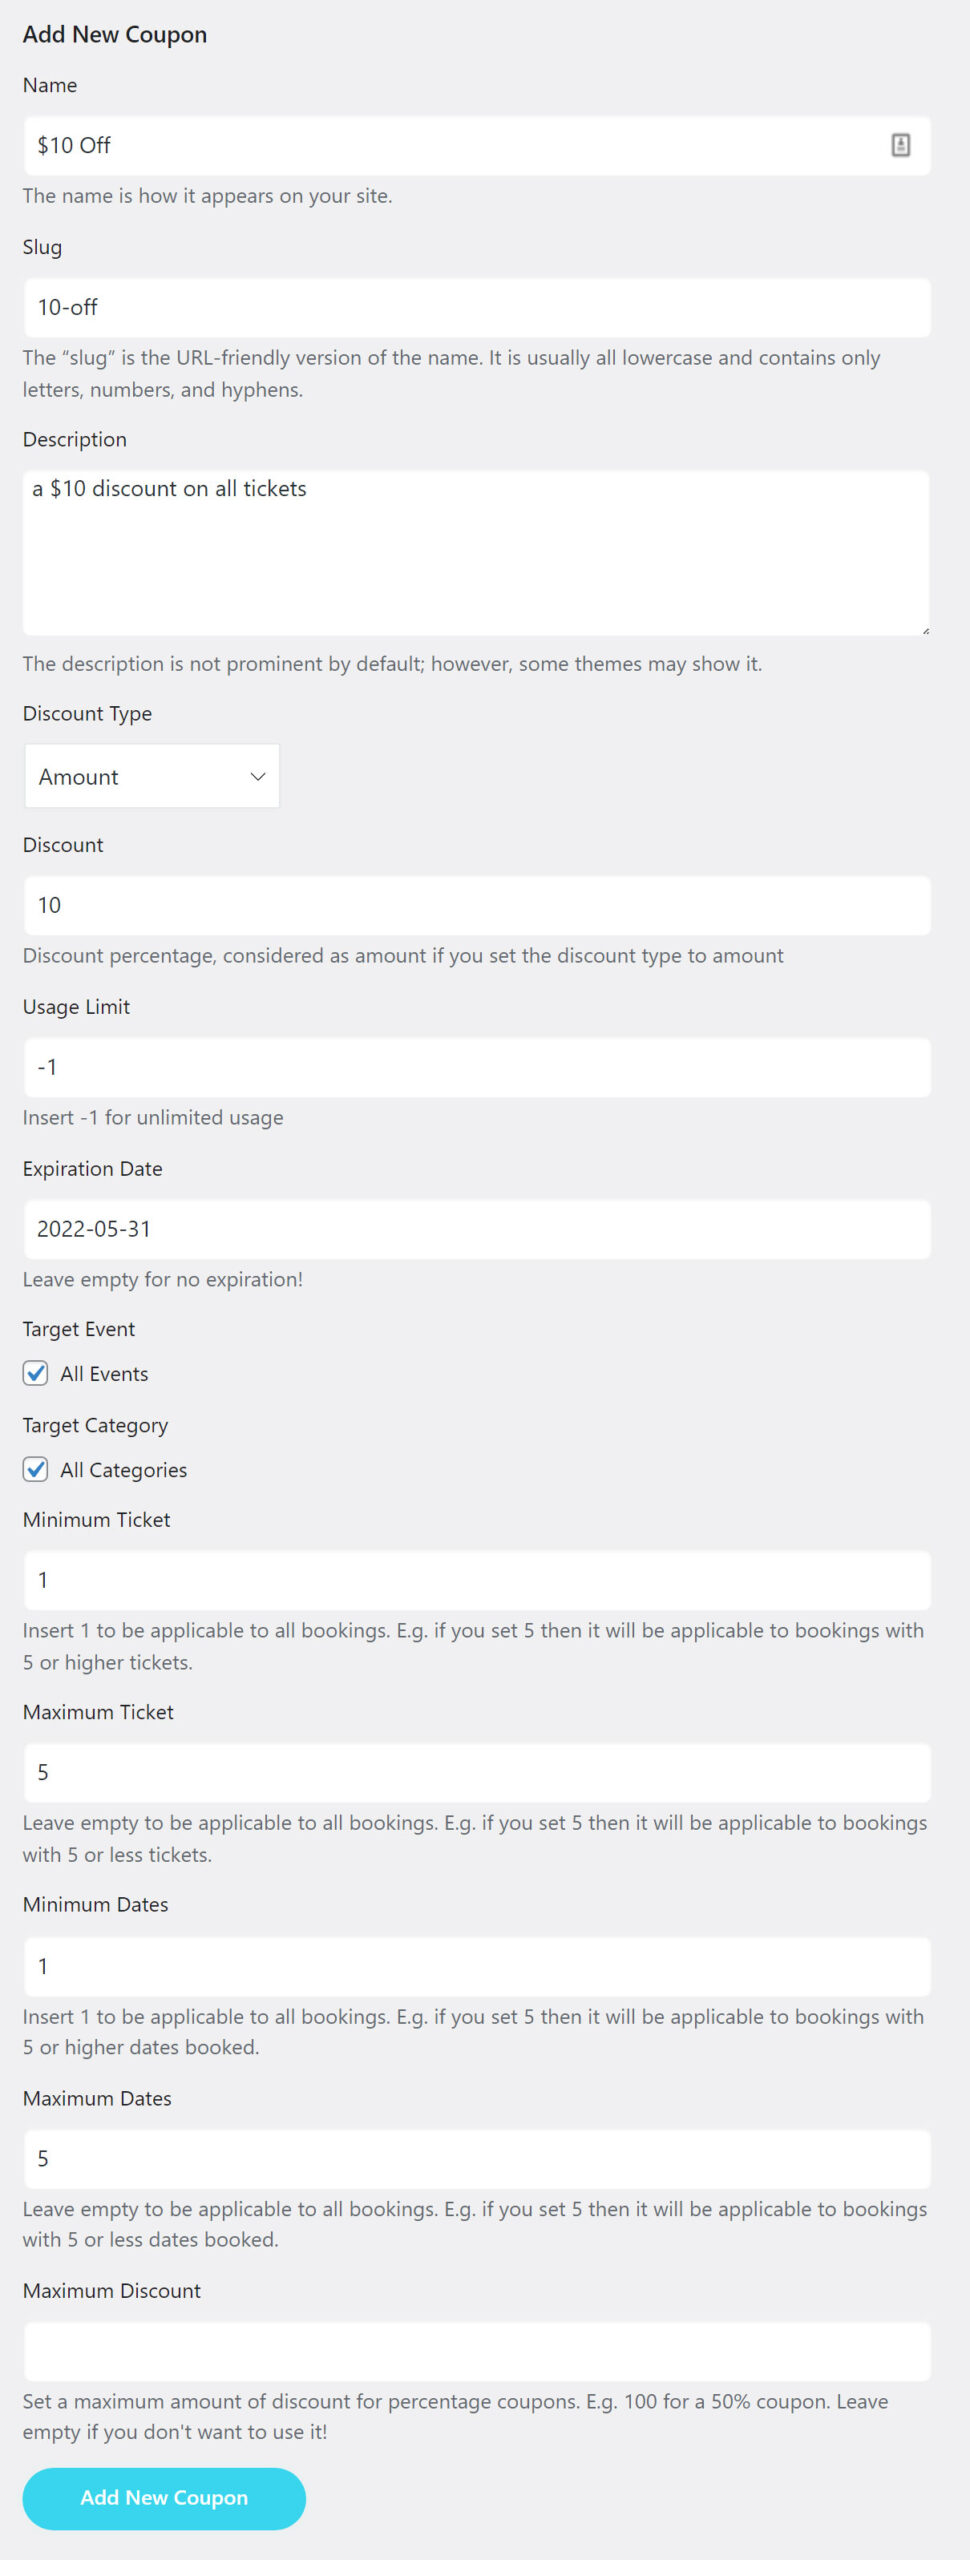
Name: Coupon name or code should be written without any whitespaces. Your users will be able to enter this code as their discount code in their booking process.
Slug: Fill out the slug for this coupon.
Description: Write down a description of your coupon or leave it empty.
Discount Type: Set your discount type – based on a percentage or a fixed amount.
Discount: Set the discount rate (without any symbols).
Usage Limit: If the discount is limited, enter the number. If you want this to be unlimited, set “-1”.
Expiration Date: Set an expiration date for your coupon code if you need it.
Target Event: You can determine if this coupon is specific to a particular event or all of your events.
Target Category: You can determine if this coupon is specific to a particular category or all of your categories.
Minimum Ticket: You can use this field to limit this coupon to the events that at least have “x” tickets. (x equals to your minimum tickets)
Maximum Ticket: You can use this field to limit this coupon to the events that have “x” tickets at most. (x equals your maximum number of tickets)
Minimum Dates: The minimum number of dates that an event should have for the coupon to be applicable.
Maximum Dates: The maximum number of dates that an event should have for the coupon to be applicable.
Maximum Discount: Set a maximum amount of discount for percentage coupons.
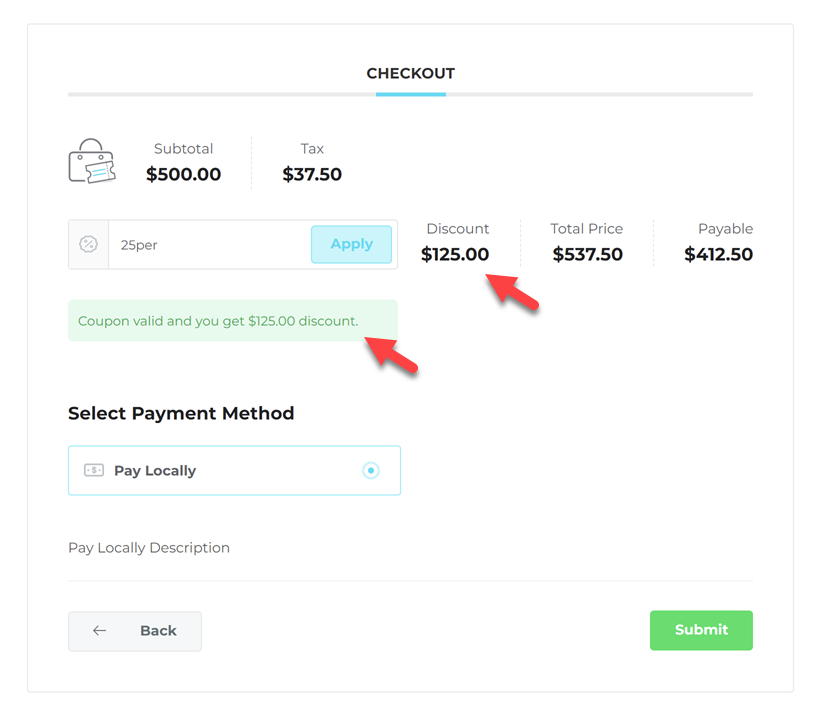
Note: If a user has booked an event using a discount code, you can see this information and the amount of the offer in the invoice and booking menu.
Manage The Bookings
From your WordPress dashboard, you can view and edit the bookings in one place just by going to the WP Dashboard > Bookings > Bookings section.

You can also use bulk action and use filters during selection and export booking in the Modern Events Calendar just by going to the booking section and selecting CSV export. You can find it on the “Bulk Action Menu.”
Also, you can edit a booking and tickets in your bookings:
- Go to Edit Form.
- Enable “I need to edit the details of a booking” option.
- If you need to Confirm or Verify the booking just go to the Status and Invoice section.
And if you want to let some users manage the booking on your site please note that MEC is using WordPress user roles.
WordPress has user roles to let you set privileges and manage users and there are plenty of ways to do that. So users will be able to manage the bookings in the WordPress dashboard.
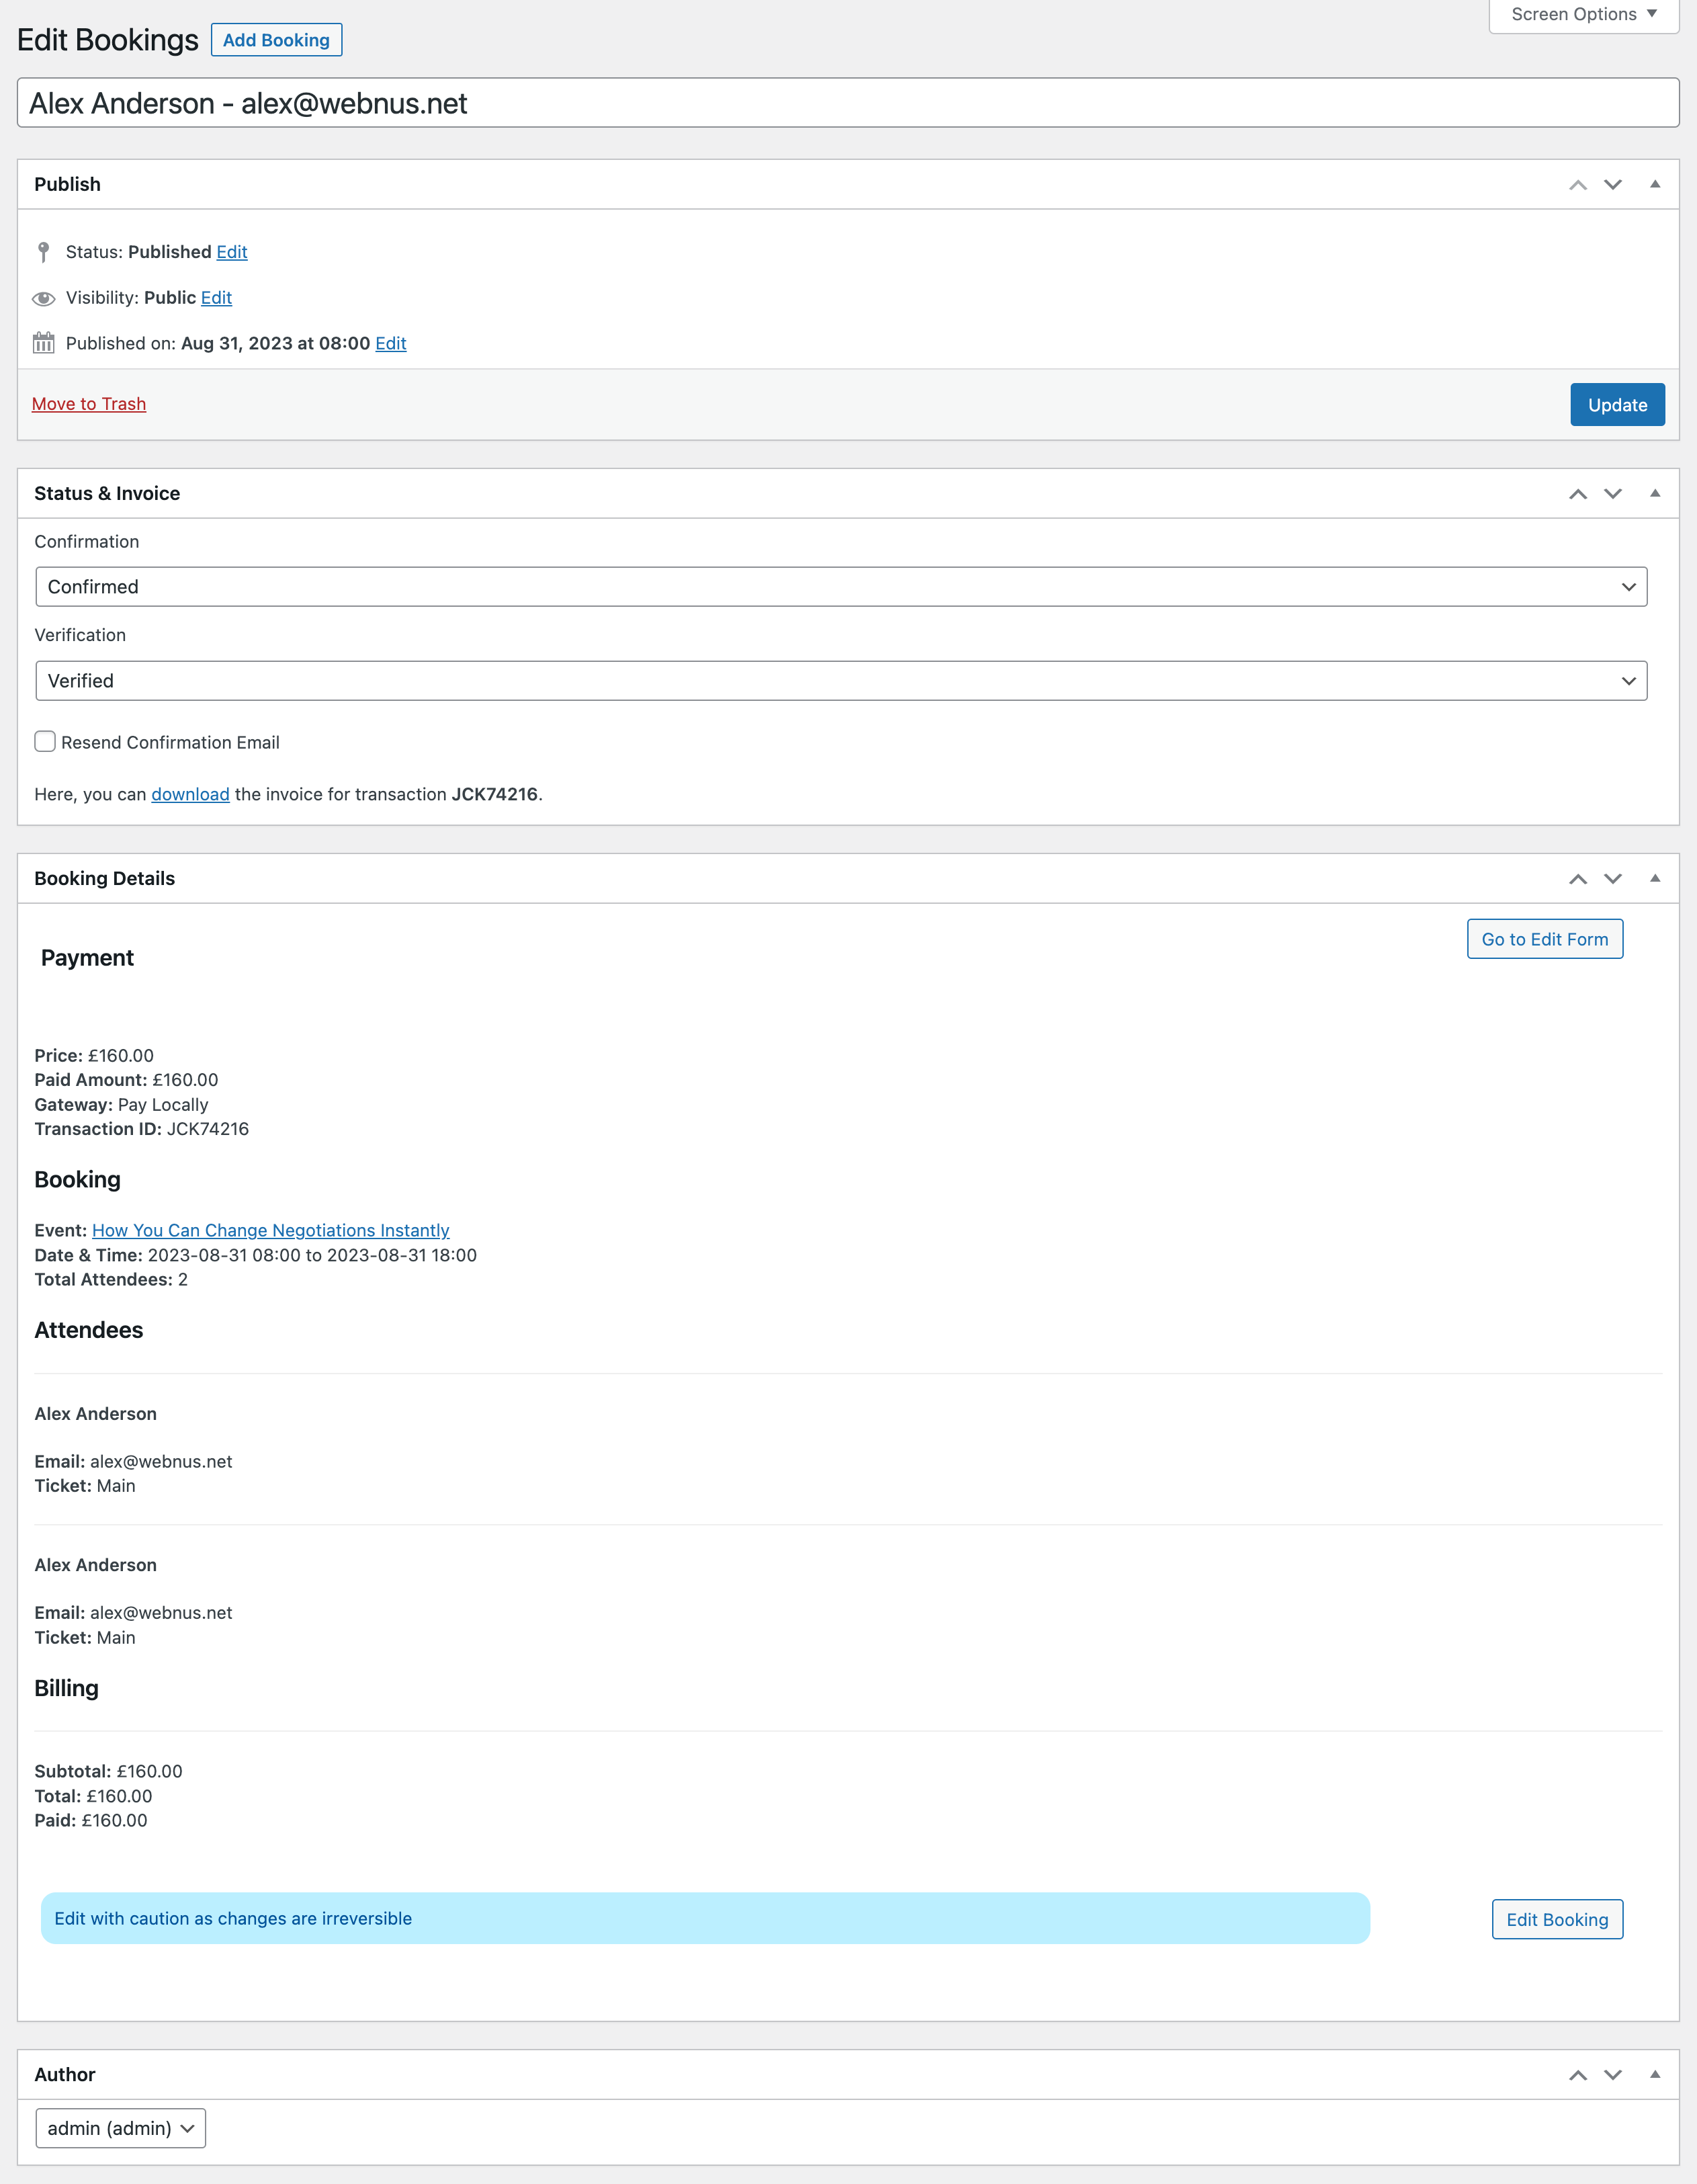
If Booking Verification and Booking Confirmation notifications are enabled for this booking, you can resend any of those emails as needed.
- Check “Resend Confirmation Email” option.
- Check “Resend Verification Email” option.
- Click on the “Update” button.
Report Out Dated Content
If you think the content of this page does not reflect updated information, please let us know.
I have everything set up, but if I sign up for a paid ticket, after I click SUBMIT, the circle spins and then stops. I get a request for verification email and on the backend all seems okay. However, is there a way for the user on the front end to see that it went through? Now, it looks like the payment or sign-up never registered….I have thank you page enabled and yet it isn’t going there….
Is there any way for the attendee to see their bookings. I want to do that for virtual events.
Hi,
I saw it was possible to define an interval for “open” the reservation.
Could we use this interval for close the reservations, for example, 36 hours before the start of each repeat event ?
thanks !
I’m personally very frustrated with this package. I’ve followed the instructions on setting up a booking event on the calendar, adding a ticket to it so that people have to pay to register, and connected paypal API info to the system but the technitian I’ve been having to deal with doesn’t seem to even know the product. They even told me that Paypal is not a supported feature of ME Calendar Pro. In the last email they were showing me how to setup a product to be purchased when this discussion was suppose to be about the ME Calendar booking and payment system.

Can bookings be used for appointments or us it just tickets. For example i want to create a system that allows for private party bookings, with a base cost for up to 10 people then it is priced per person for each additional person.
The customer who is booking should be able to pick a 1hr time slot out of a range of time slots. They also should be able to purchase addons while booking, for example food options.
Currently, I’m using woocommerce bookings, Would ME be a suitable replacement?
Hello,
you can set time on the tickets.
https://webnus.net/dox/modern-events-calendar/tickets-and-taxes-fees/
please check this link:
https://webnus.net/dox/modern-events-calendar/ticket-variations/
We do however have a 60-minute online demo (that can be used infinite times) which allows users to test out the limits of MEC and to make up their mind. On the off chance that even after your purchase MEC seems incompatible to your needs, you can request a refund within 30 days of your purchase.
Here is a link to our online demo:
http://webnus.biz/mec-test/
And here is a link to our online documentation:
https://webnus.net/dox/modern-events-calendar